While running a WooCommerce store, offering cart discounts to your customers is a great way to increase sales and gain improved customer satisfaction. However, it is not possible to create cart discounts through the default WooCommerce setup.
That’s when you need to use a superb plugin like WholeSaleX to create cart discounts without going through any complicated process.
To create cart discounts in WooCommerce, here are the easy steps you need to follow:
- Install & activate WholeSaleX Plugin
- Create a dynamic rule
- Select desired user roles for the cart discount
- Select specific products for the discount
- Set the amount for the cart discount
- Set conditions for the discount
- Set the duration for the discount
What is Cart Discount in WooCommerce?
Cart discount refers to the discount that your users see on the cart page of your WooCommerce shop. Based on their cart’s conditions, you can specify the cart discount they can avail.
For example, you can set a condition that if a customer purchases 10 products at once, they can enjoy a 10% discount on the whole purchase.
This is a great way to incentivize existing customers and increase the conversion rate for your WooCommerce business.
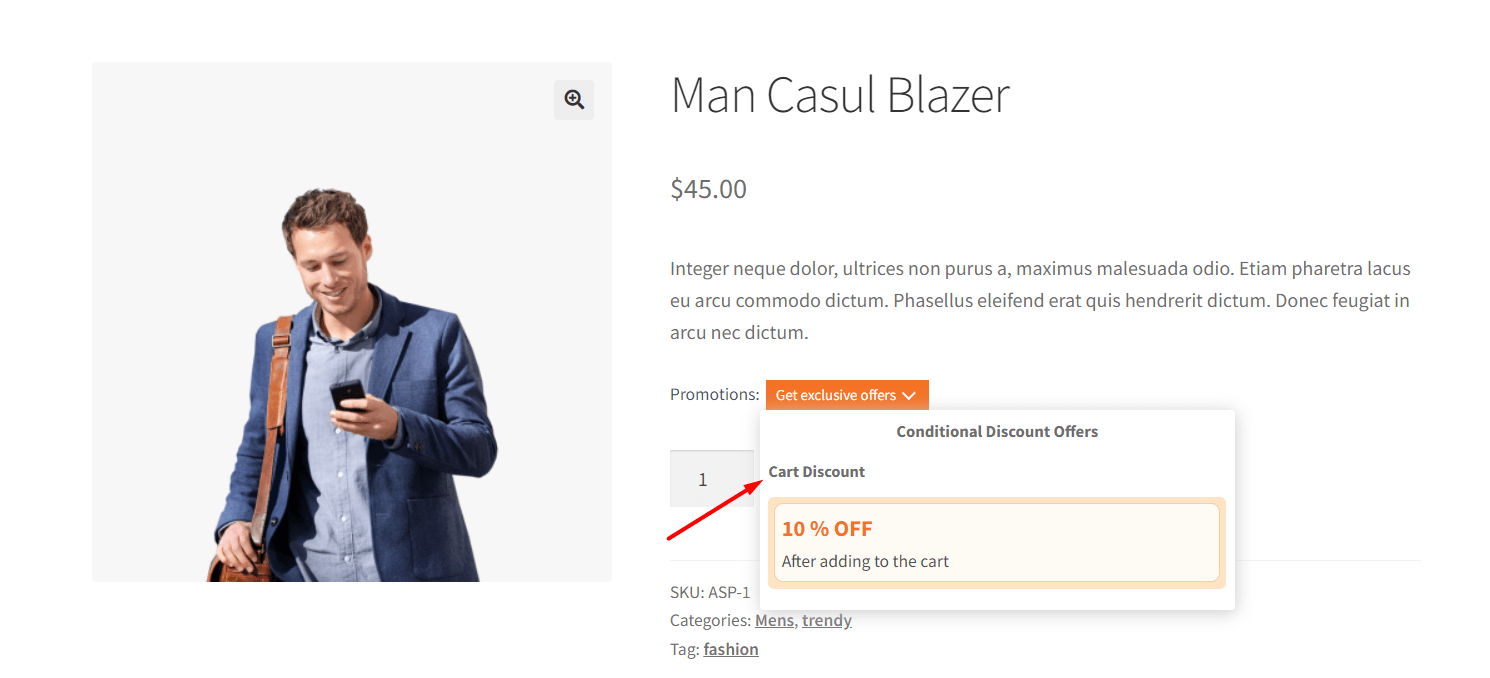
There are several benefits you can enjoy when you set up a cart discount for your WooCommerce store. Let’s go through them in detail.
- Increased customer satisfaction: Cart discount increases customer satisfaction and make them come back to your store again as a returning customer.
- Increase average order value: If you set conditions for the cart discount based on purchase quantity, it leads to improved average order value.
- Reduce cart abandonment: When potential customers visit your WooCommerce store and see a cart discount, they are more likely to purchase products.
- Rapid sales of a specific product: If you want to sell a specific product very fast, you can apply a cart discount for that particular product only.
How to Create Cart Discounts in WooCommerce: Detailed Steps
As you already know, WooCommerce does not allow offering cart discounts for your customers, we will need to use a dedicated plugin such as WholeSaleX to do the task for us.
WholeSaleX is an all-in-one solution that helps build your dream B2B and B2B/B2C hybrid stores. It makes handling product pricing and discounts much easier than traditional methods.
Wish that you could easily manage pricing for specific users and offer special discounts for your most valuable customers? With the help of WholeSaleX, you can achieve all that and more in just a few clicks.
Let’s quickly go through what benefits you get while using the plugin WholeSaleX:
- Easy installation: In just a few clicks, you can get started and manage the pricing of your store. The installation is easy and straightforward and WholeSaleX offers helpful guides and docs to keep you informed.
- High performance: You don’t have to compromise performance while enjoying all the features. WholeSaleX is built with optimized code so that it doesn’t slow down your site.
- Top-notch support: WholeSaleX has a dedicated support team making continuous efforts to solve any issues users face.
- Theme Compatibility: No need to switch to a compatible theme to get started. WholeSaleX works well with all the popular WordPress themes.
Now that you know the benefits, let’s discuss the step-by-step process to set up cart discounts for your WooCommerce store.
Step 1: Install & Activate WholeSaleX
First, you need to install and activate the WholeSaleX plugin to use the dynamic rules feature in order to set up the cart discount. Note that you will require a pro version of WholeSaleX to enjoy the dynamic rules feature.
In the next steps, I will show you the detailed steps to get started with WholeSaleX.
The steps are as follows:
- Visit your admin dashboard and go to the plugins section
- Search for WholeSaleX, install the plugin, and activate it
- Purchase a license for the pro version of WholeSaleX
- After acquiring a license, you will find a zip version of the WholeSaleX pro on your account’s download section
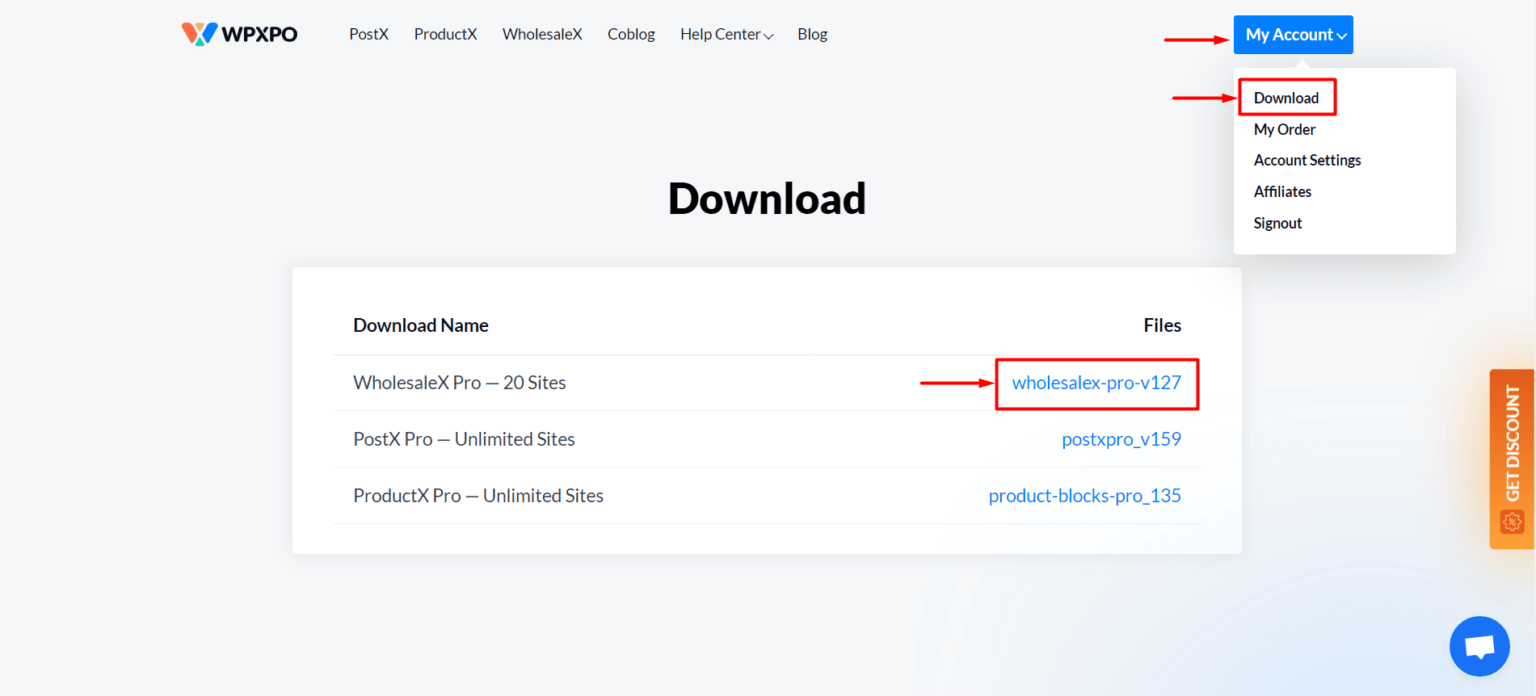
- Download the zip file and go to the plugins section again to upload the file
- Install and activate the plugin
- Make sure to activate the license to enjoy the pro features
Step 2: Create A Dynamic Rule
Dynamic Rules help business owners unlock automated pricing and discounts. You can easily adjust and set unique offers for your special customers without juggling through complicated methods.
To get started with the dynamic rule feature for setting up the cart discount, follow these steps:
- From your admin dashboard, click on WholeSaleX > Dynamic Rules > Create Dynamic Rule. This will create a new untitled rule
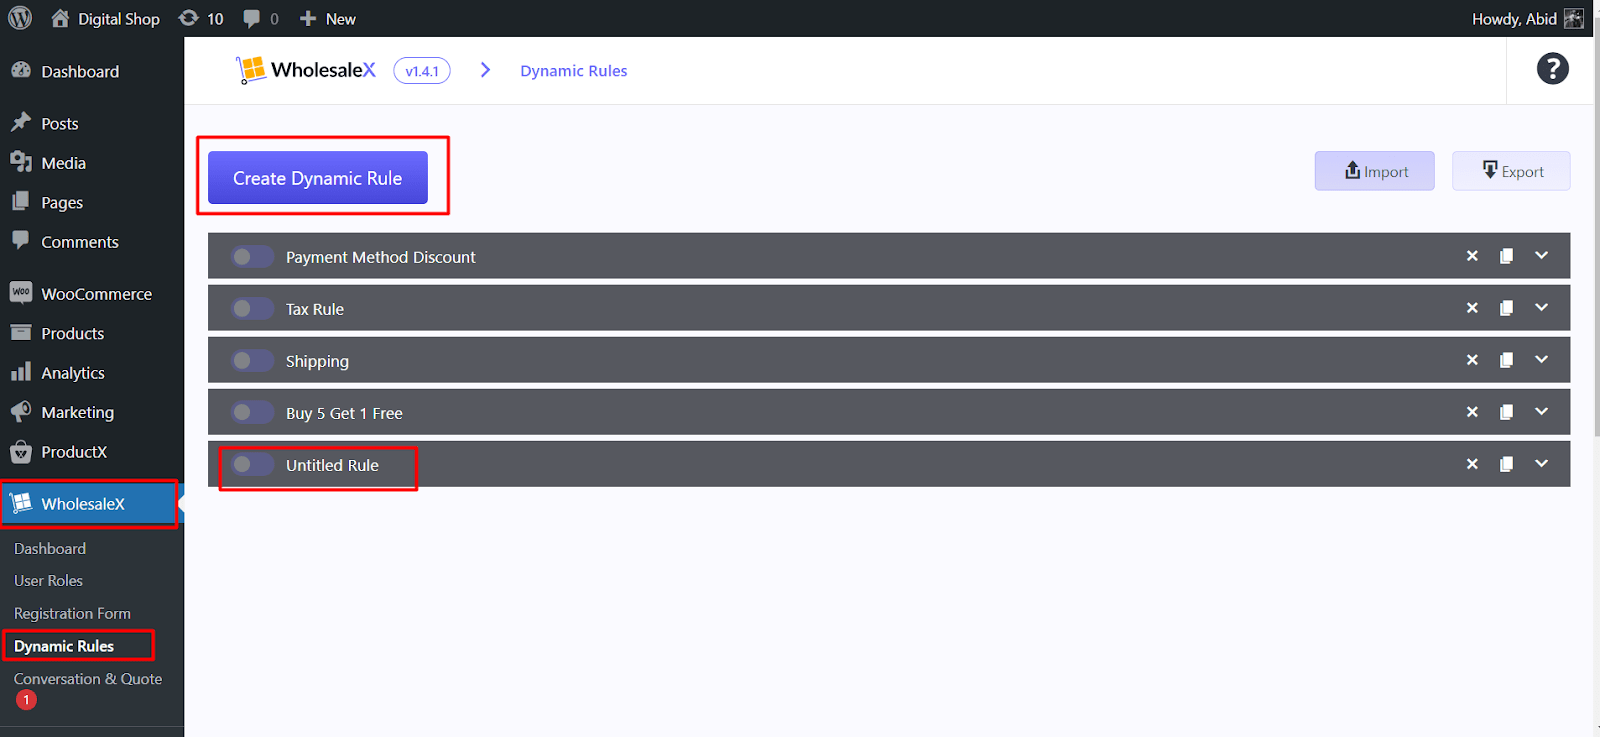
- Expand the rule and you can see several options such as rule name, rule type, user role, product filter, and so on.
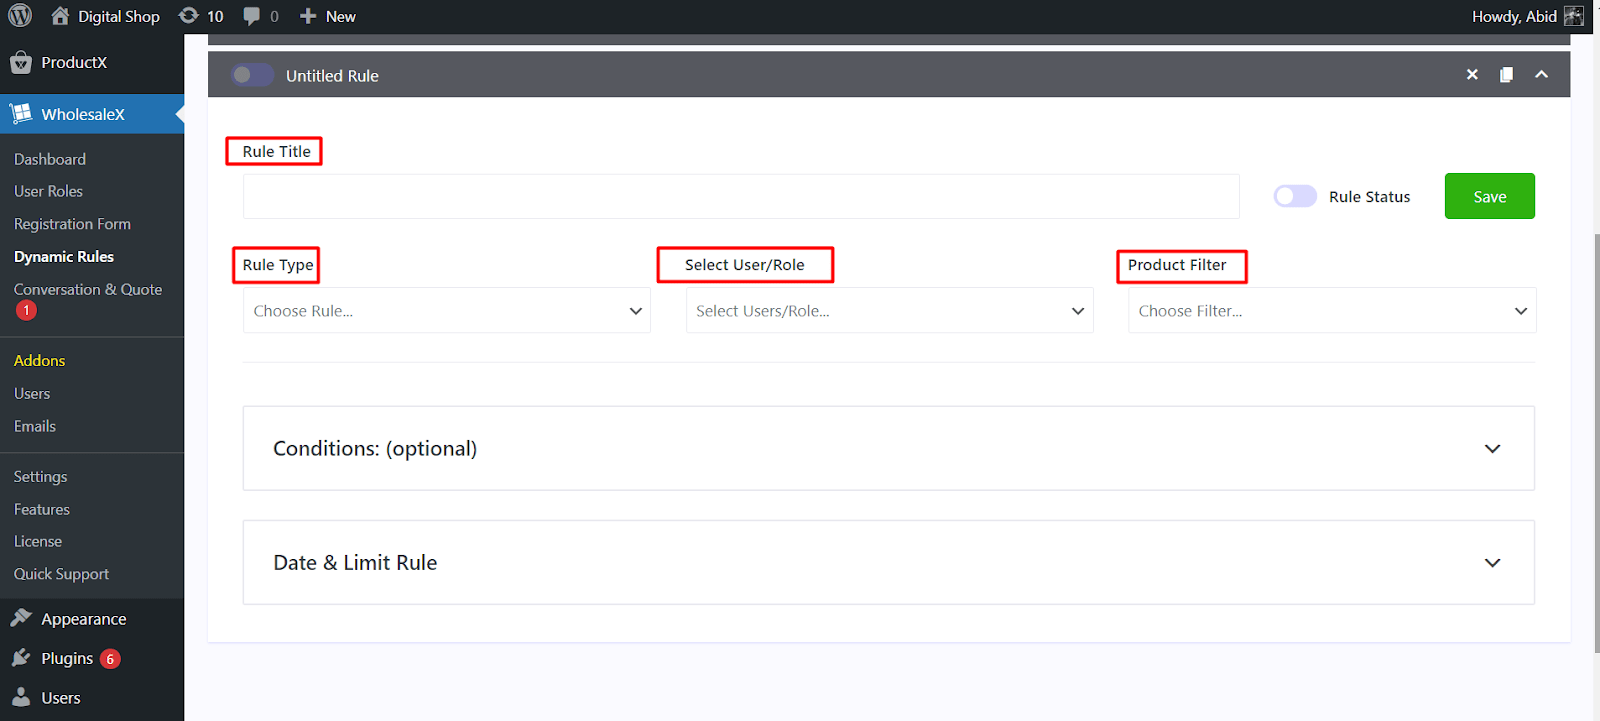
- Give the dynamic rule a name to your liking. Let’s say it is called “Special Cart Discount”
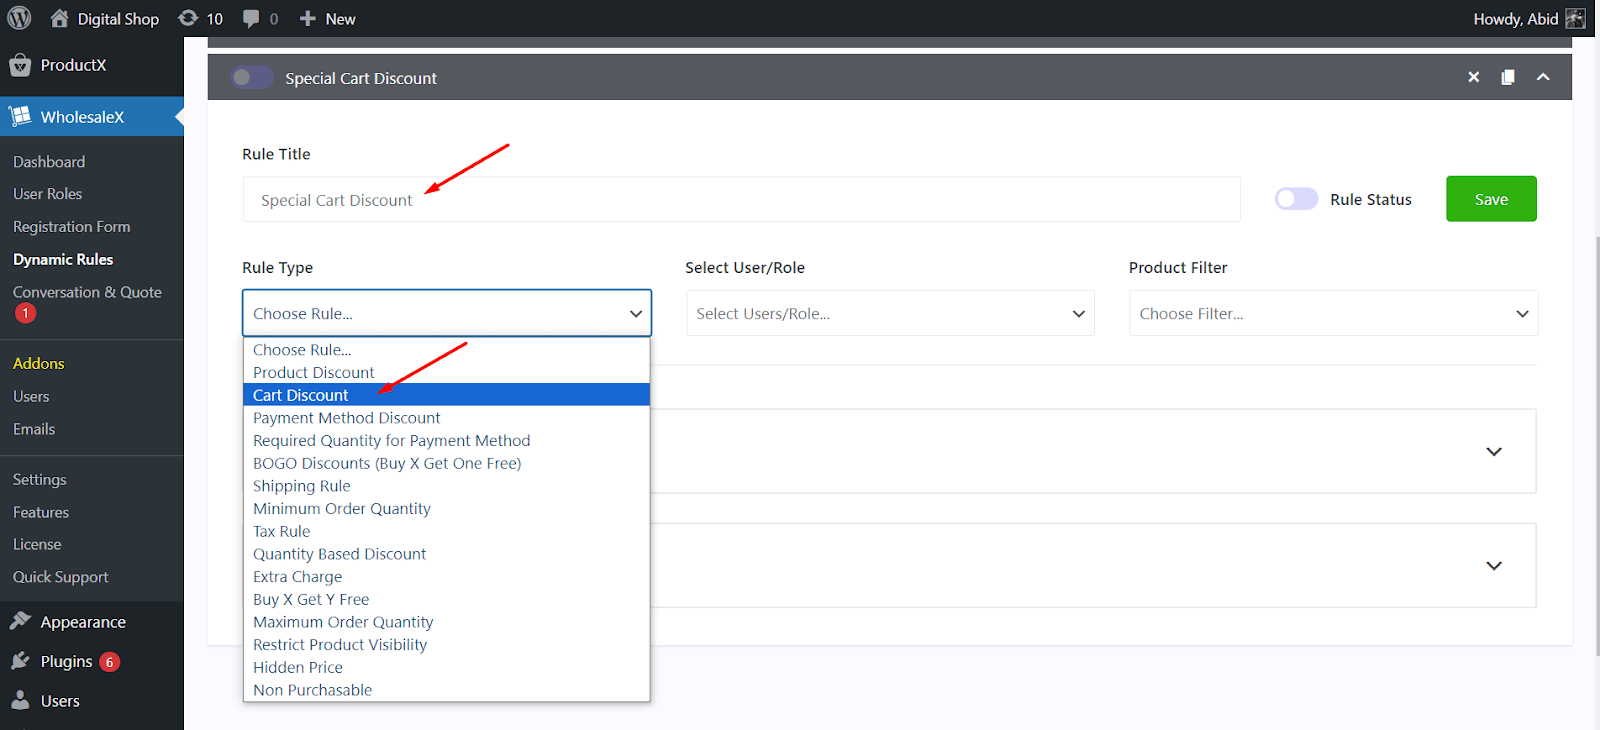
- Under the rule type dropdown, select the option that says “Cart Discount”
Step 3: Select Specific Users Eligible for the Discount
After the initial setup of the dynamic rule, now you need to specify which users from your store should enjoy the discount. This is a great way to achieve role-based pricing for your WooCommerce store.
To get started with setting up user roles, simply select the type of users from the dropdown under “Select Users/Role”
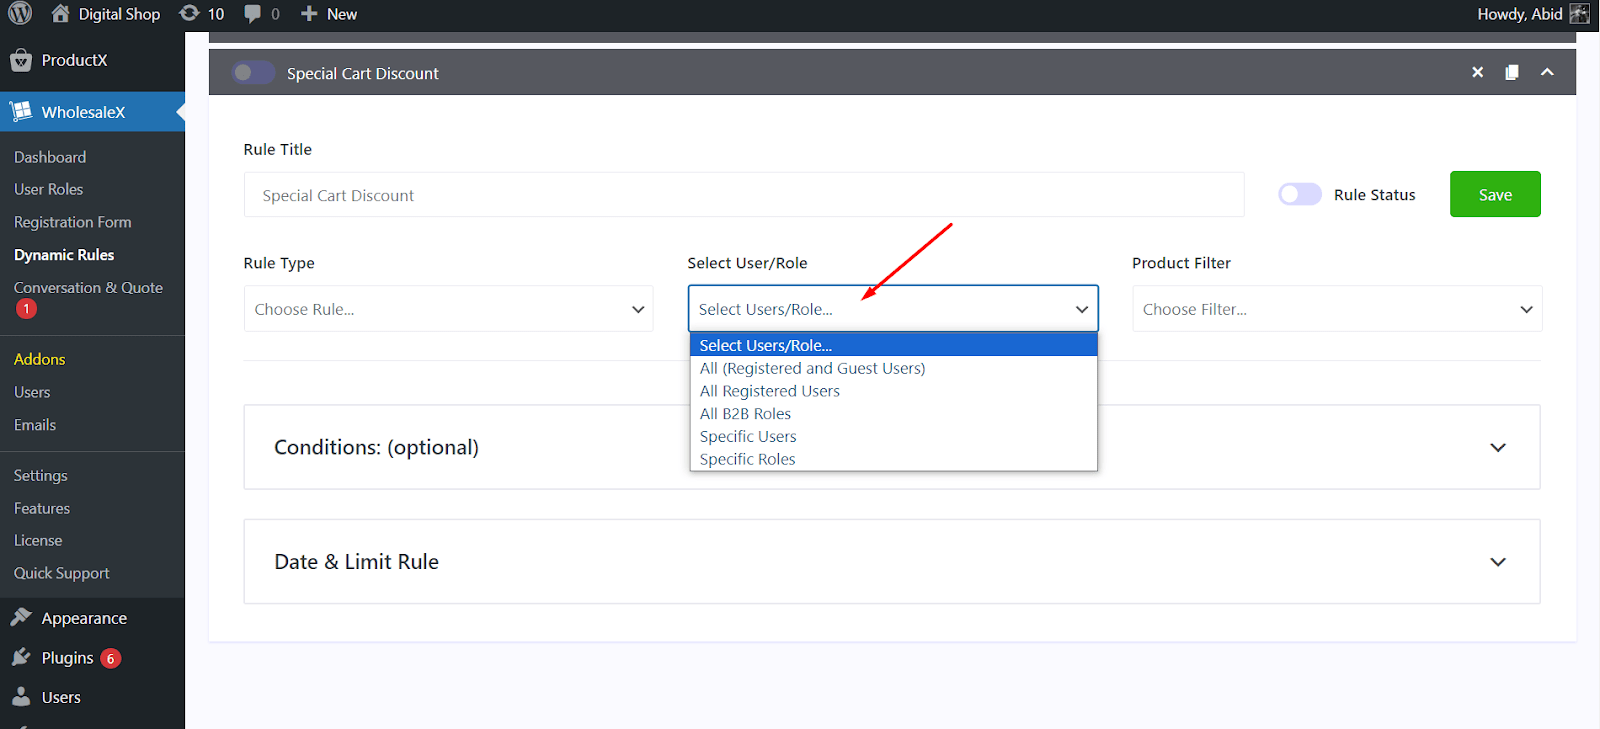
It can be all registered and guest users that visit your site. It can be all B2B users.
If you set up any special roles for users, you can also specify that here if you choose Specific Roles.
Not only that, if you want only a specific user or a selection of your favorite users should be able to enjoy the discount, you can set it as well by selecting the option Specific Users.
Step 4: Select Specific Products Eligible for the Discount
After you have set up the specific users, you need to specify which products you want to apply the discounts to.
This helps in boosting sales for particular products. So, if you see that a particular product is not performing well in terms of sales, you can offer a cart discount just for that product.
To do this, simply select the products from the dropdown under Product Filter.
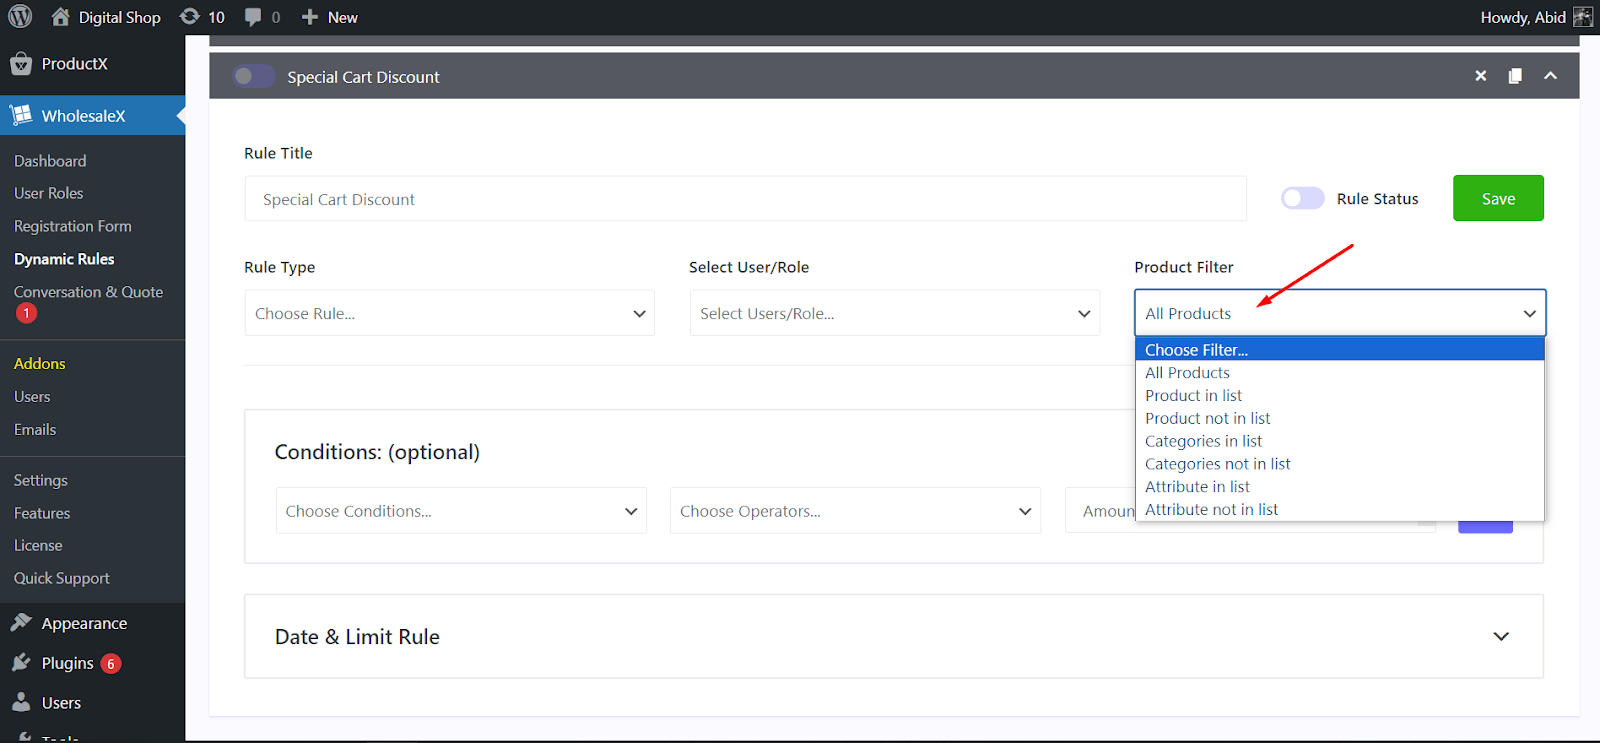
Here, you can apply the cart discount to all products if you choose the All Products option. However, if you want to launch the offer for products from a specific category, you can select the option “Categories in list”
Alternatively, you can specify specific attributes such as the color of the products to further customize the cart discount in WooCommerce.
Step 5: Set the Cart Discount Amount
After you have carefully selected the users and products for the discount, now it’s time to fine-tune the discount itself. How much will you offer as discounts for your WooCommerc store, now’s the time to decide.
You have three discount types to choose from: Percentage, Amount, and Fixed Price.
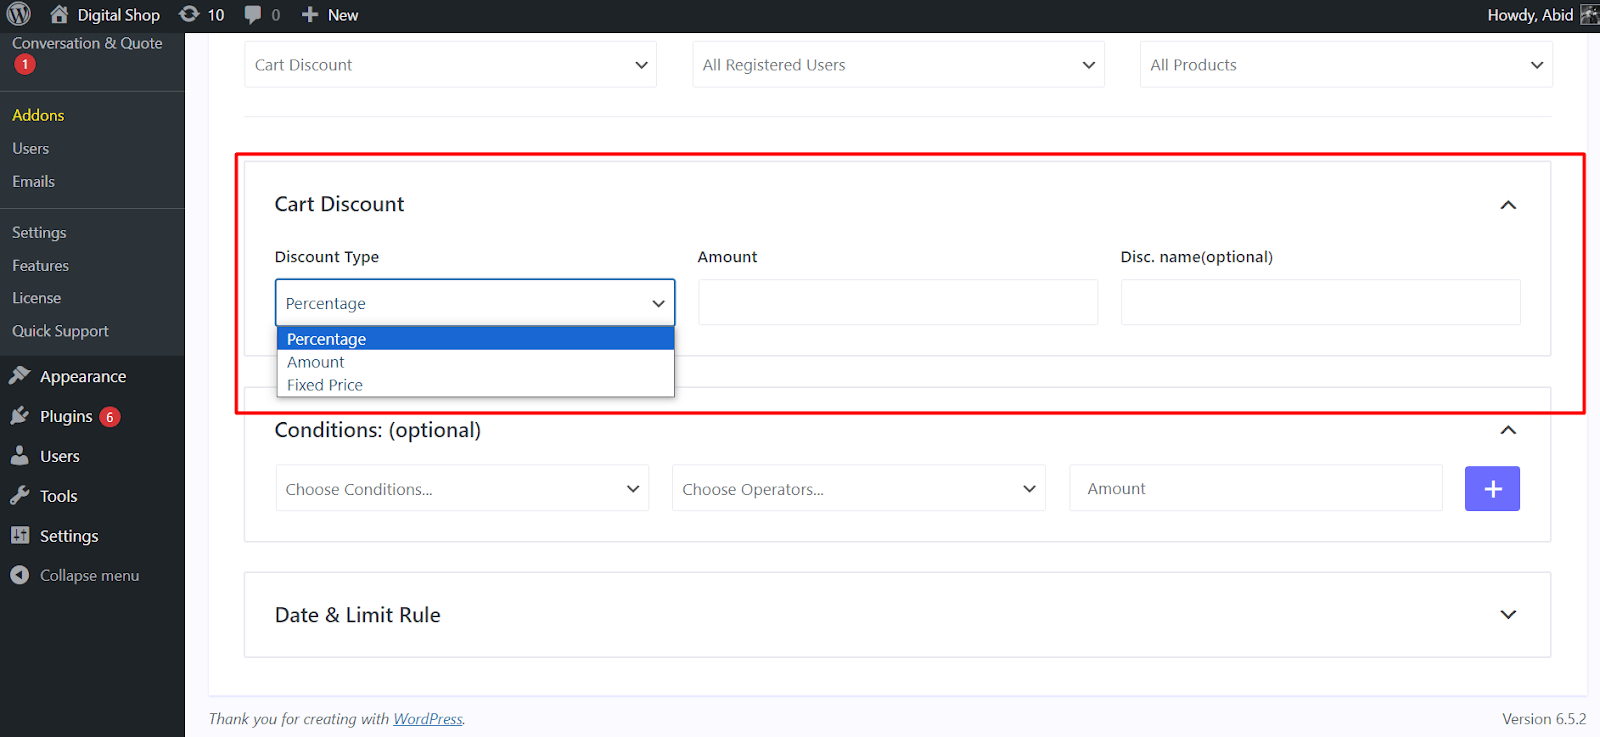
For the Percentage option, you determine how much discount a user will get based on the amount they spend in your store.
For example, if you set up a 20% cart discount, customers will enjoy 200 USD off from every 1000 USD purchase.
On the other hand, if you choose the option Amount, you can select a fixed cart discount in your WooCommerce store. So, no matter how much users spend, they will enjoy a specific amount of discount every time.
Alternatively, by choosing the Fixed Price option, you can set a predefined price for a specific product for your selected customers.
So, simply select from any of the three options and put its amount number inside the Amount box.
Optionally, you can give the discount a name that will be shown when your customers are viewing their cart. This way, it will be easier for them to identify why they are getting the discount.
Step 6: Set Conditions for Cart Discount
You have defined users, and products and specified the amount for the discount. But that’s not all. To fully customize how the cart discount will be applied to your WooCommerce store, you also should set specific conditions.
Set Cart Discount Based on Product Quantity
With dynamic rules, you can set cart discounts based on the number of products present in the cart. So, to enjoy the cart discount, the customer must meet the specific requirements specified under this condition.
This is a great way to encourage customers to buy a large number of products, leading to more profits for a WooCommerce store owner.
To do this, the steps are simple:
- On the dynamic rule, scroll down to the section that says Conditions (optional).
- From the first dropdown, select the type of condition Cart – Total Qty
- Under the next dropdown, choose the condition to your liking. For example, you can choose conditions such as greater than (>) or less than (<)
- Finally, inside the rightmost box, enter the quantity of the product
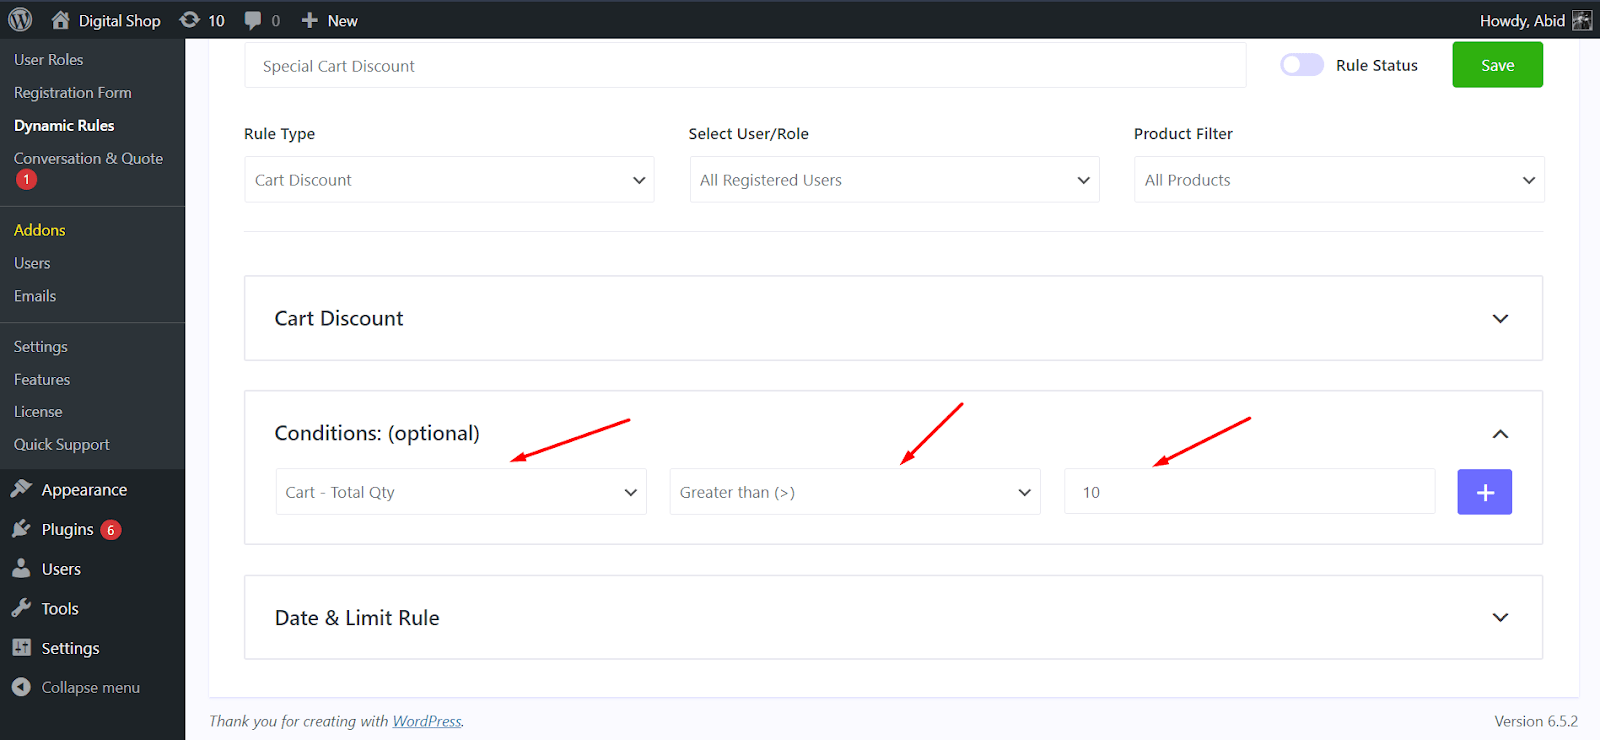
So, if you want to apply the cart discount only when a customer purchases more than 10 products, you can easily achieve that by following the above steps.
Set Cart Discount Based on Product Value
In addition to product quantity, you can also set conditions based on products’ value while launching a cart discount for your WooCommerce store.
So, this way, the cart discount will only be applicable when the purchased products reach a specific value.
To set this condition, here are the steps you need to follow:
- Select the type of condition Cart- Total Value from the first dropdown menu
- From the next dropdown, select your desired condition
- Finally, specify the number of products required to match the condition
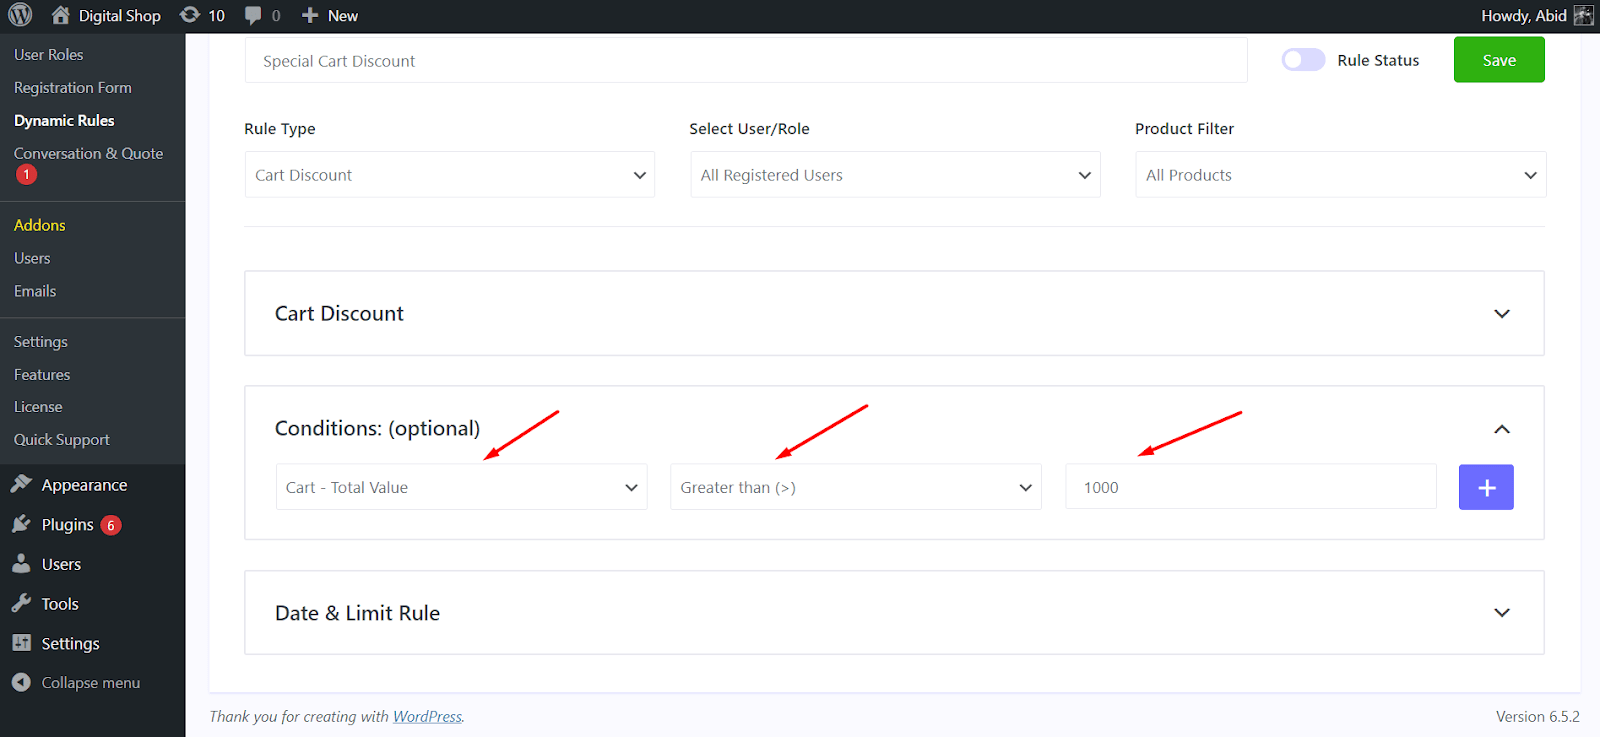
Let’s say, you want to specify that customers will only enjoy a discount if they spend 1000 USD or more on your shop.
You can easily do this by selecting the options Cart – Total Value, Greater than ( > ) and setting the amount to 1000.
Set Cart Discount Based on Product Weight
Another condition you can set to offer a cart discount is to consider the product weight. So, the cart discount will only be applied when the total weight of purchased products in the cart reaches a certain number.
To set this condition, follow these steps:
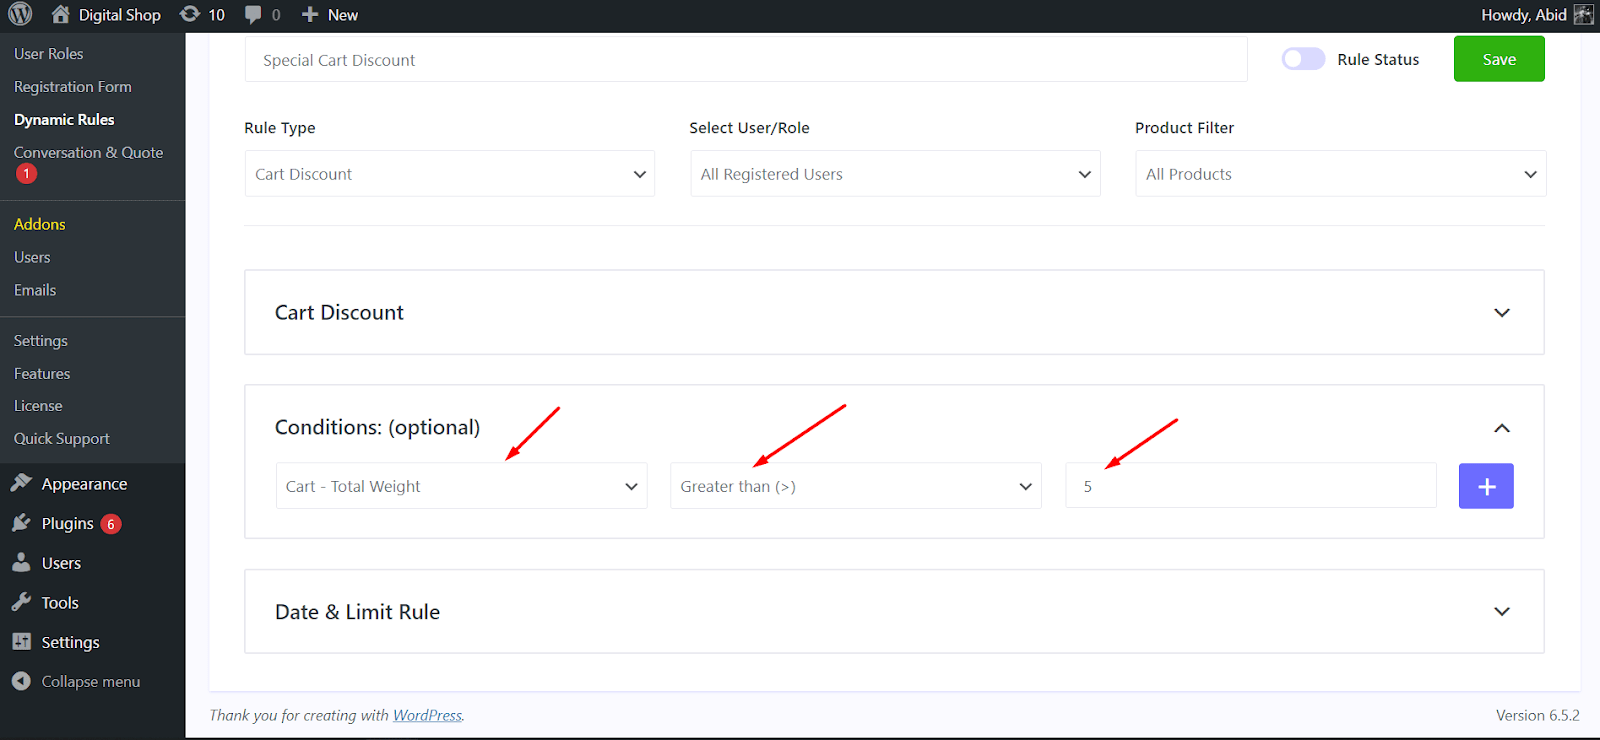
- Under the Conditions section, select Cart – Total Weight from the first dropdown menu
- In the second dropdown, select the conditions to your liking, such as Greater than or Less than
- Finally, put the desired number that will set the required weight needed for the cart discount to work
Step 7: Set Duration for the Cart Discount
You have successfully applied all the conditions, but do you want the discount offer to run indefinitely?
Of course not. That’s why you need to set a specific duration for your cart discount offer.
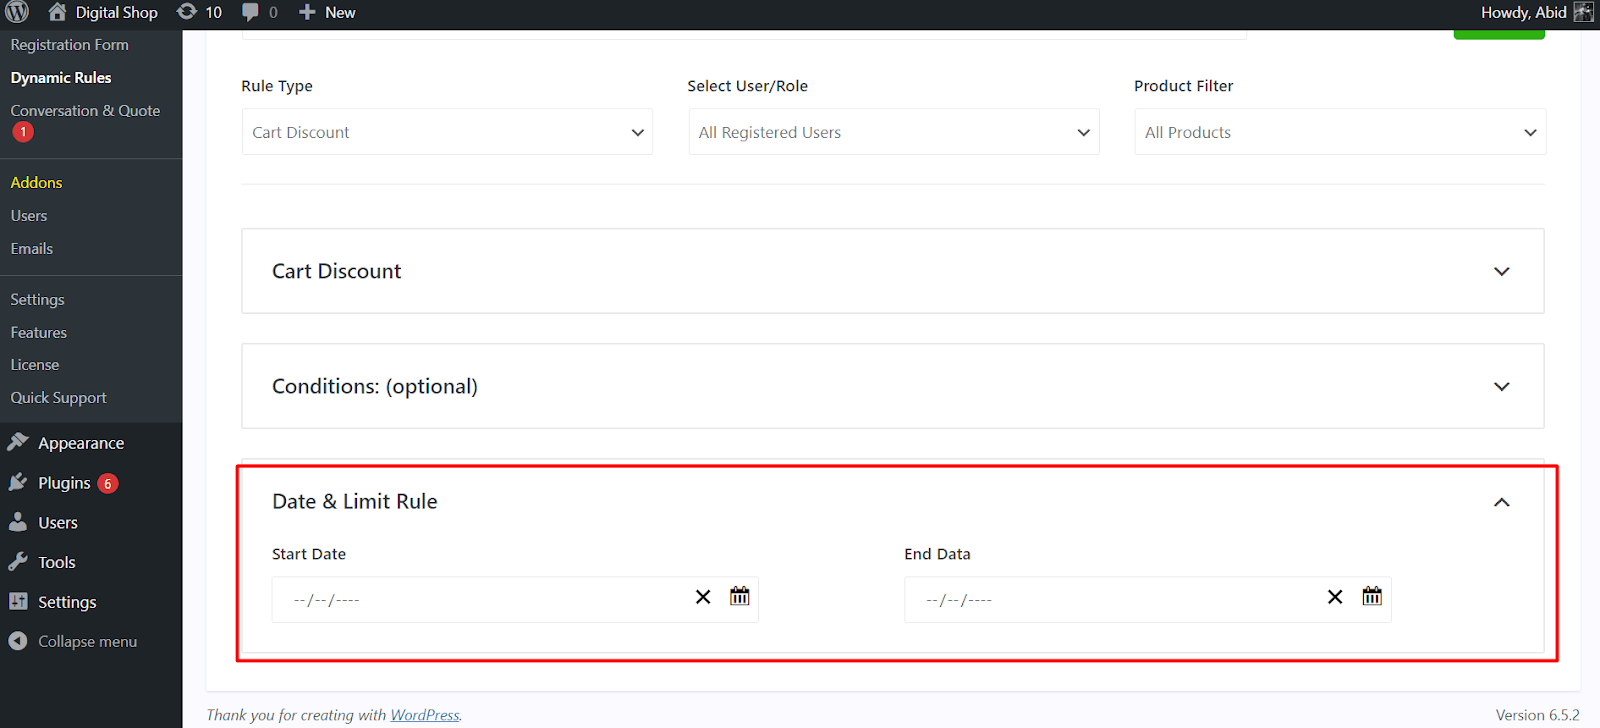
To apply the limit, follow these steps:
- Under the dynamic rule, scroll down to the Date & Limit Rule section
- Here select a start date and an end date to your liking
- Now the discount offer will only be active during the specified period
Okay, you have done it. You have successfully created and customized cart discounts for your WooCommerce store.
Now, simply click on the Save button and enable the Rule Status button to see the cart discount in action.
Final Thoughts
Hopefully, now you have a clear idea of how to set up a cart discount in your WooCommerce store. If you are ever in doubt about a specific step, feel free to refer back to this article to find the answer.

