As a wholesale store, there are many moving pieces to keep your business functional. Like that, your B2B customers also require a workforce to keep up with their market demands. To make their lives easier, you can enable the WooCommerce Subaccounts addon of WholesaleX.
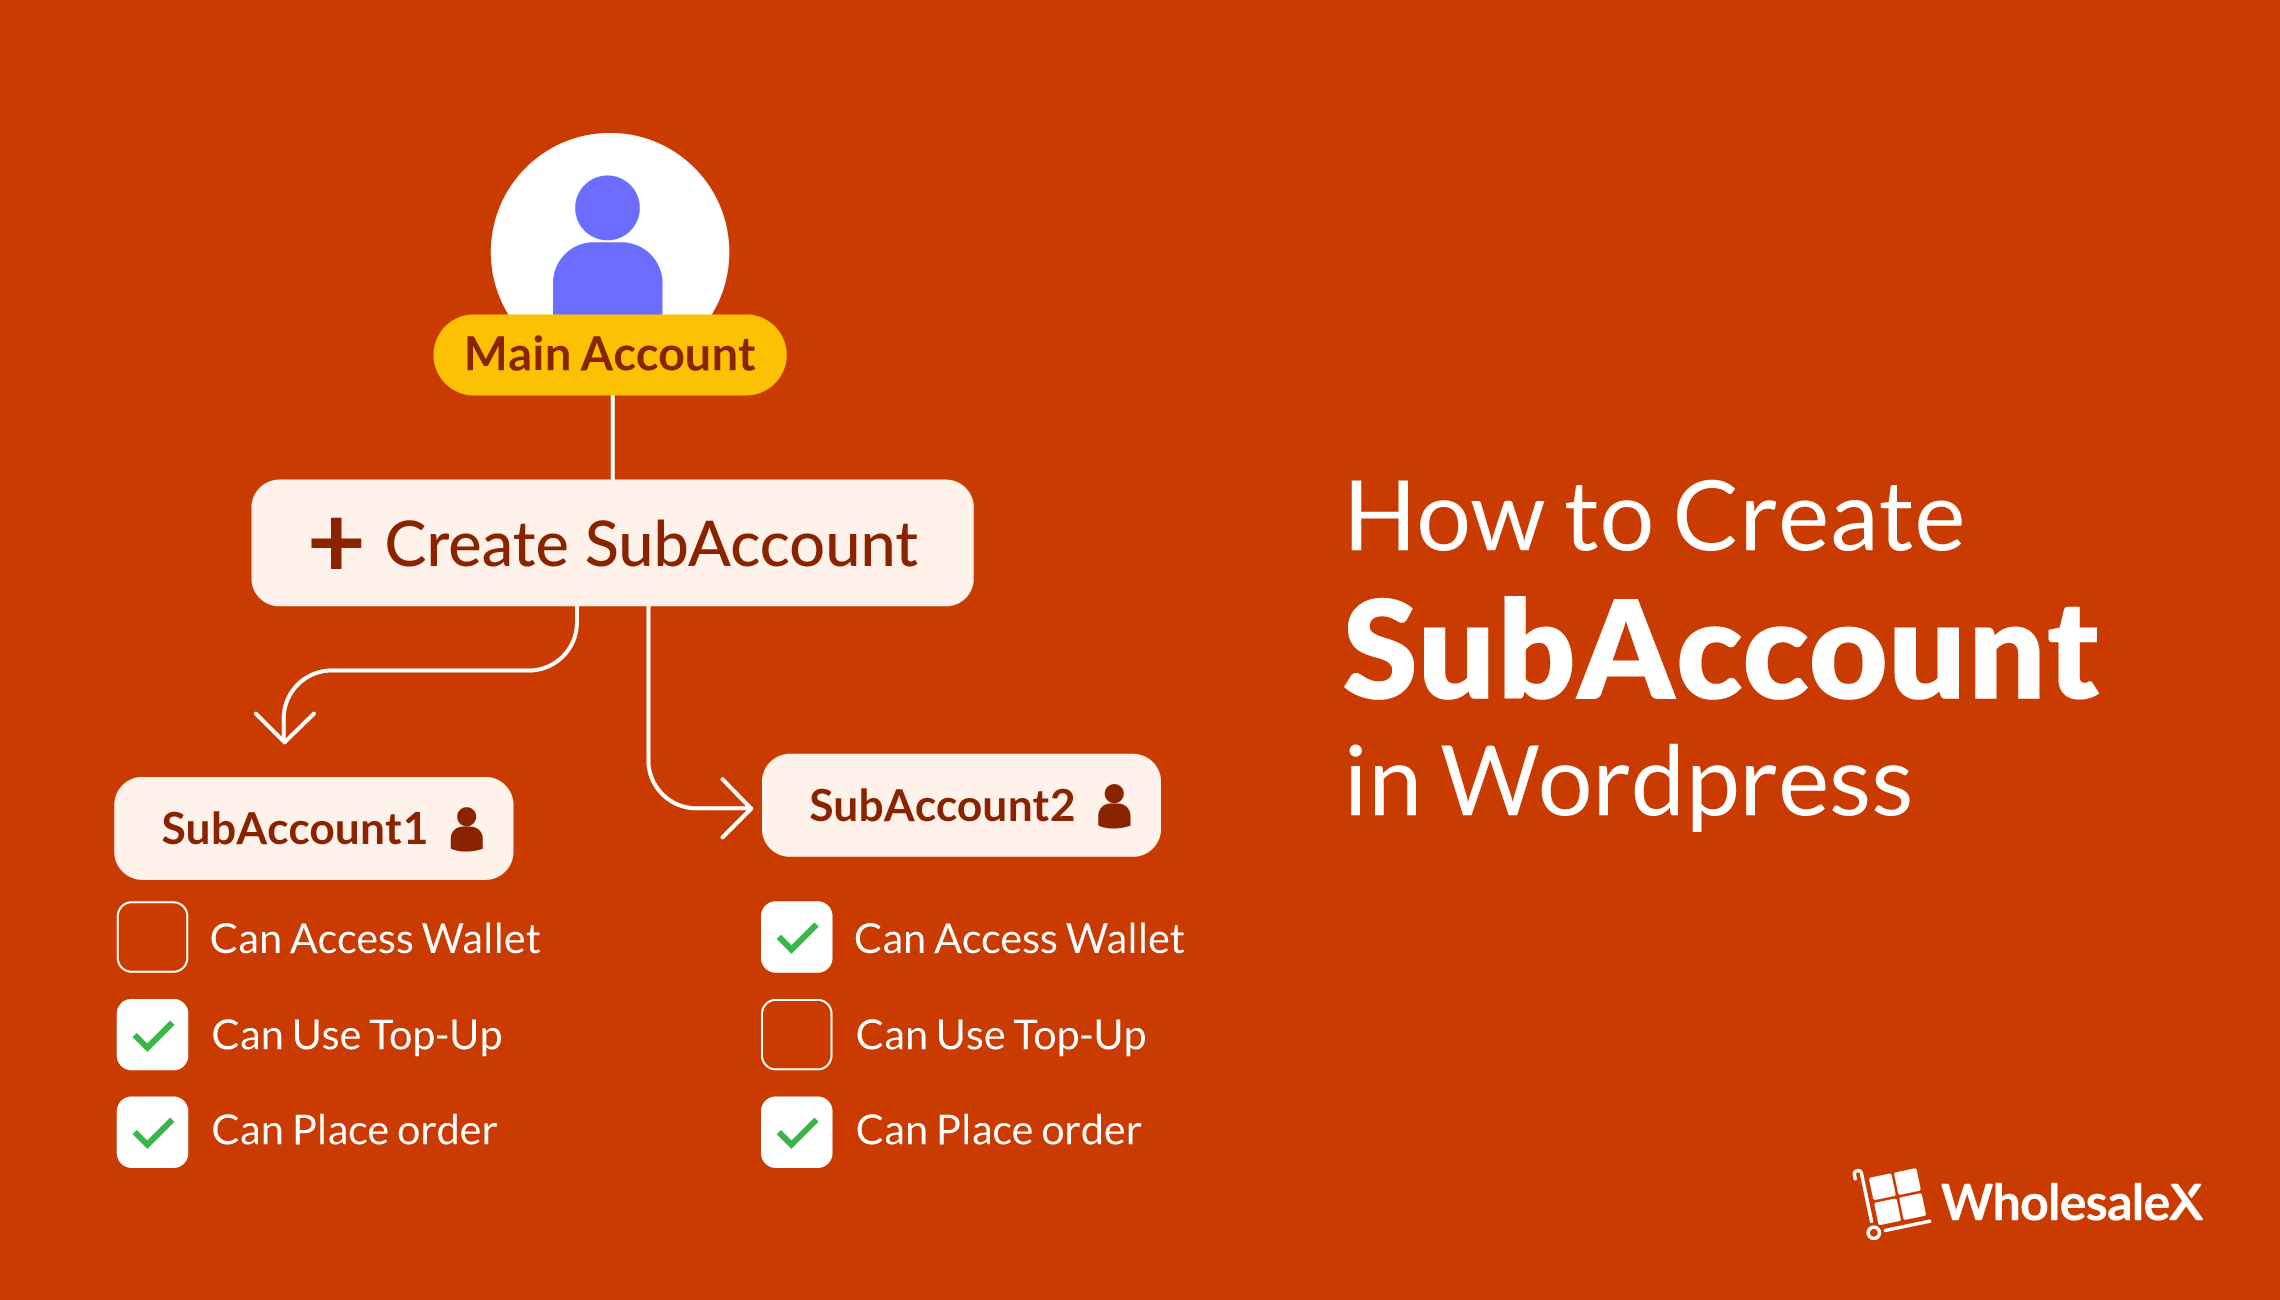
Subaccounts enable your customers to create additional accounts under their primary accounts. They can then credit/debit their in-store currency balance into their subaccounts using the WholesaleX Wallet. Allowing these secondary accounts to order/purchase products from the store on behalf of the primary accounts.
What is a Subaccount?
A subaccount is a secondary account that the B2B users of your store can create. These accounts are assigned specific permissions allowing them to carry out tasks confined by the permissions given to them.
They are several benefits for us to look at:
- It creates an economic ecosystem within your store.
- It improves the experience of your customers by streamlining the tasks.
- Each Subaacount has its balance.
- Transactions of each Subaccount can be tracked.
- It helps gain a better overview of the finances.
How to Enable Subaccounts in WooCommerce Wholesale Stores
Ensure you have the WholesaleX plugin installed and activated on your site; WholesaleX is an all-in-one solution for creating B2B and B2B+B2C hybrid stores in WooCommerce.
Step 1: Enable Subaccounts and WholesaleX Wallet Addons
First, we must enable the Subaccounts and WholesaleX Wallet addon. When we enable these addons, your users will find the subaccounts and the WholesaleX Wallet section added to their “My Account” page.
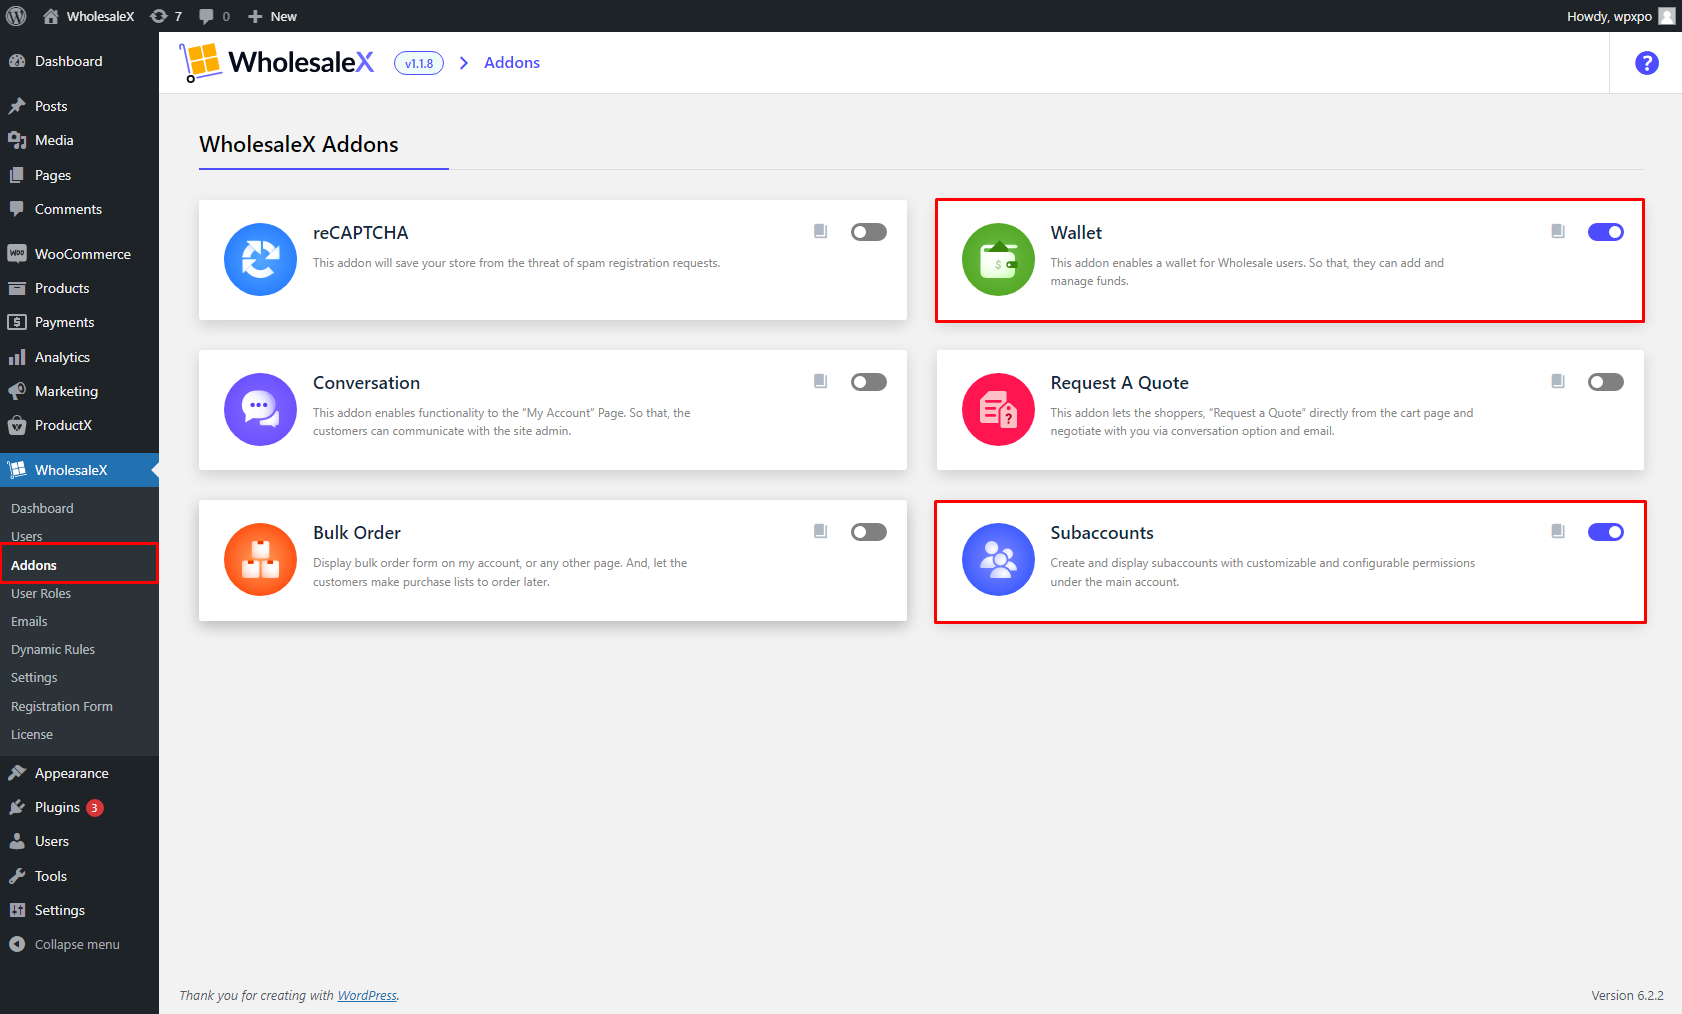
- Open your WordPress Dashboard
- Go to the Addons section of WholesaleX
- Enable Wallet and Subaccounts addons.
Step 2: Enable WholesaleX as a Payment Method
Then, we need to enable WholesaleX Wallet as a payment method. Allowing your customers to use your in-store currency as a payment method. The primary accounts can also distribute their balance to the secondary accounts.
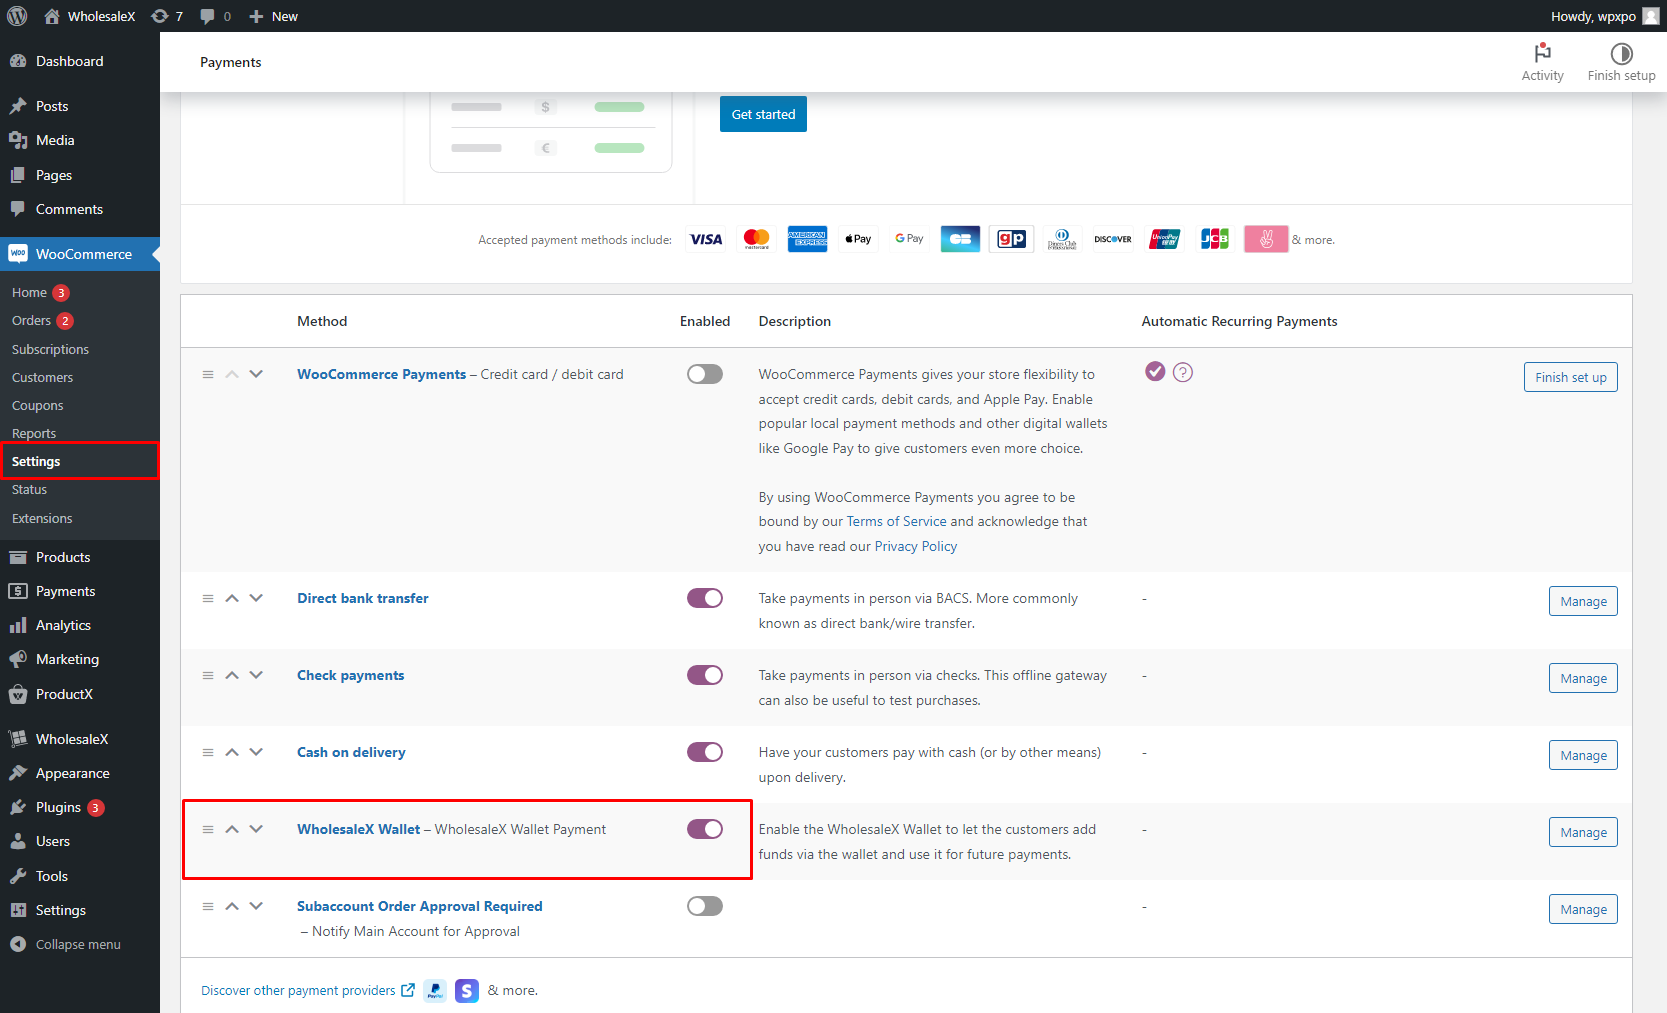
- Go to the Settings section WooCommerce
- Switch the Payment page
- Enable WholesaleX Wallet
Step 3: Select Who Can Create Subaccounts
We can decide which customers can create subaccounts. You can do so by checking the Enable Subaccounts Creation Option for This Role from the User Roles section of WholesaleX. You can also restrict specific users from creating a secondary account.
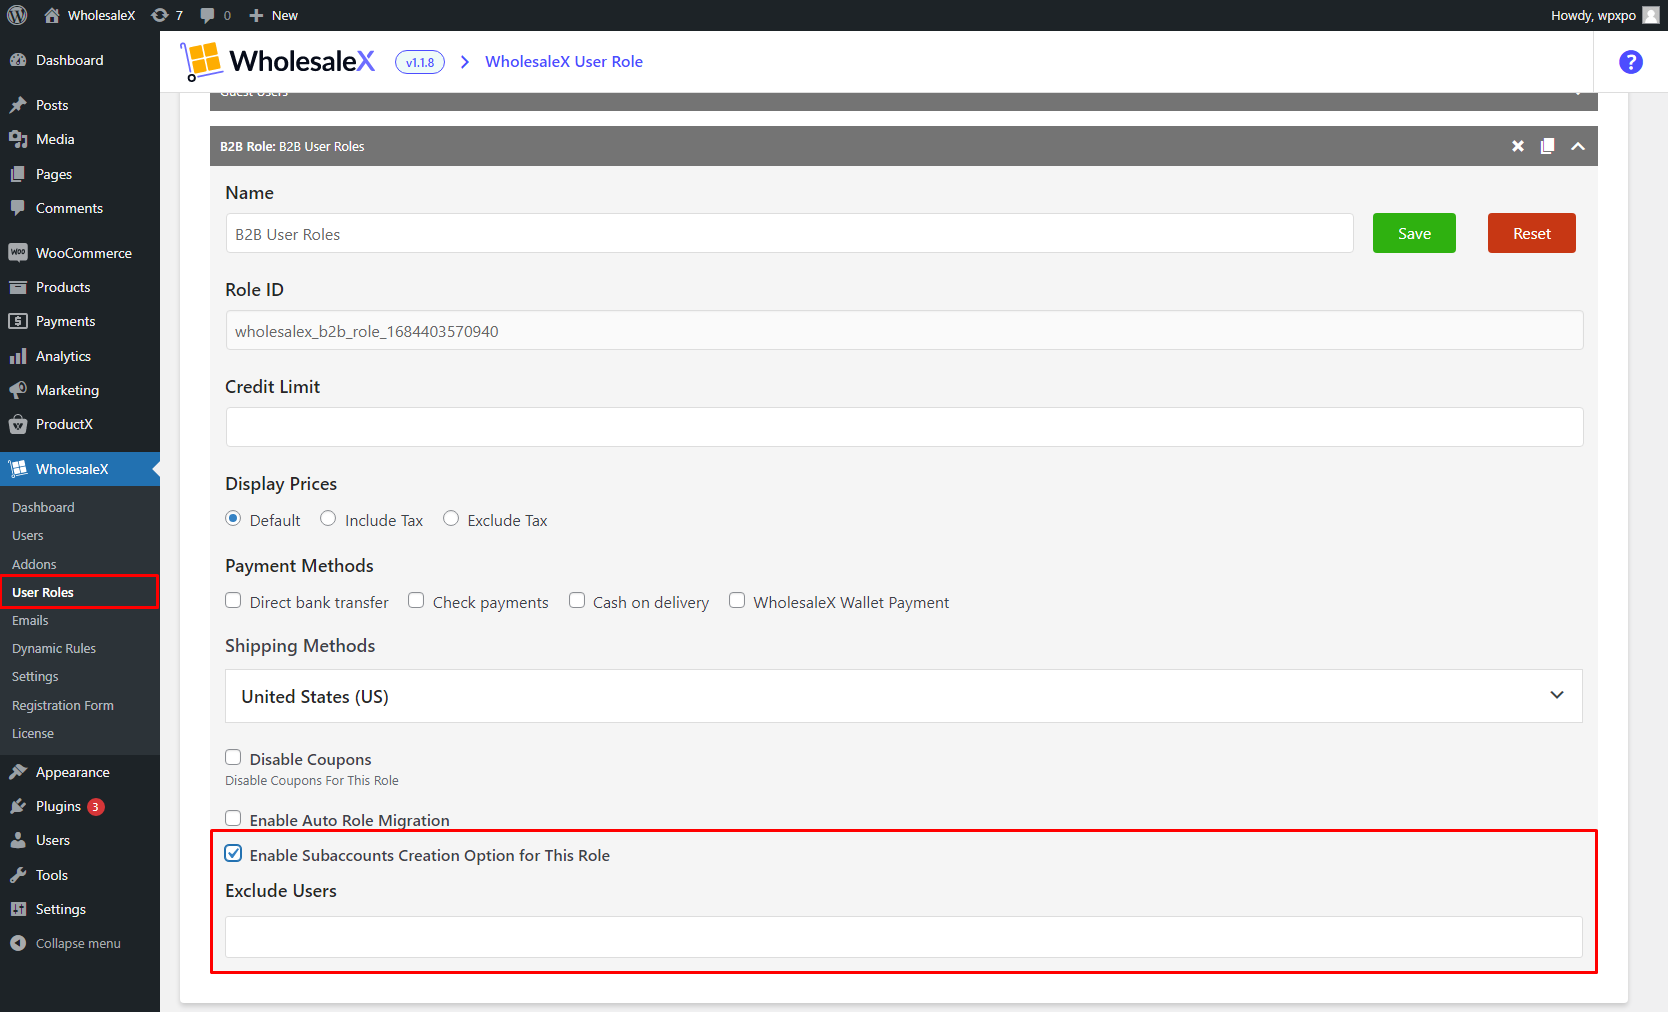
- Go to the User Roles section of WholesaleX
- Expand the desired User Role
- Check the “Enable Subaccounts Creation Option for This Role”
- Insert the Username you want to exclude from that role.
Check out our blog post to learn more about the User Roles feature. We already covered that in a previous post. You can also check out the video on our youtube channel.
That’s it! Your customers can now create and manage subaccounts. They can also use your in-store currency to order/purchase items from your store.
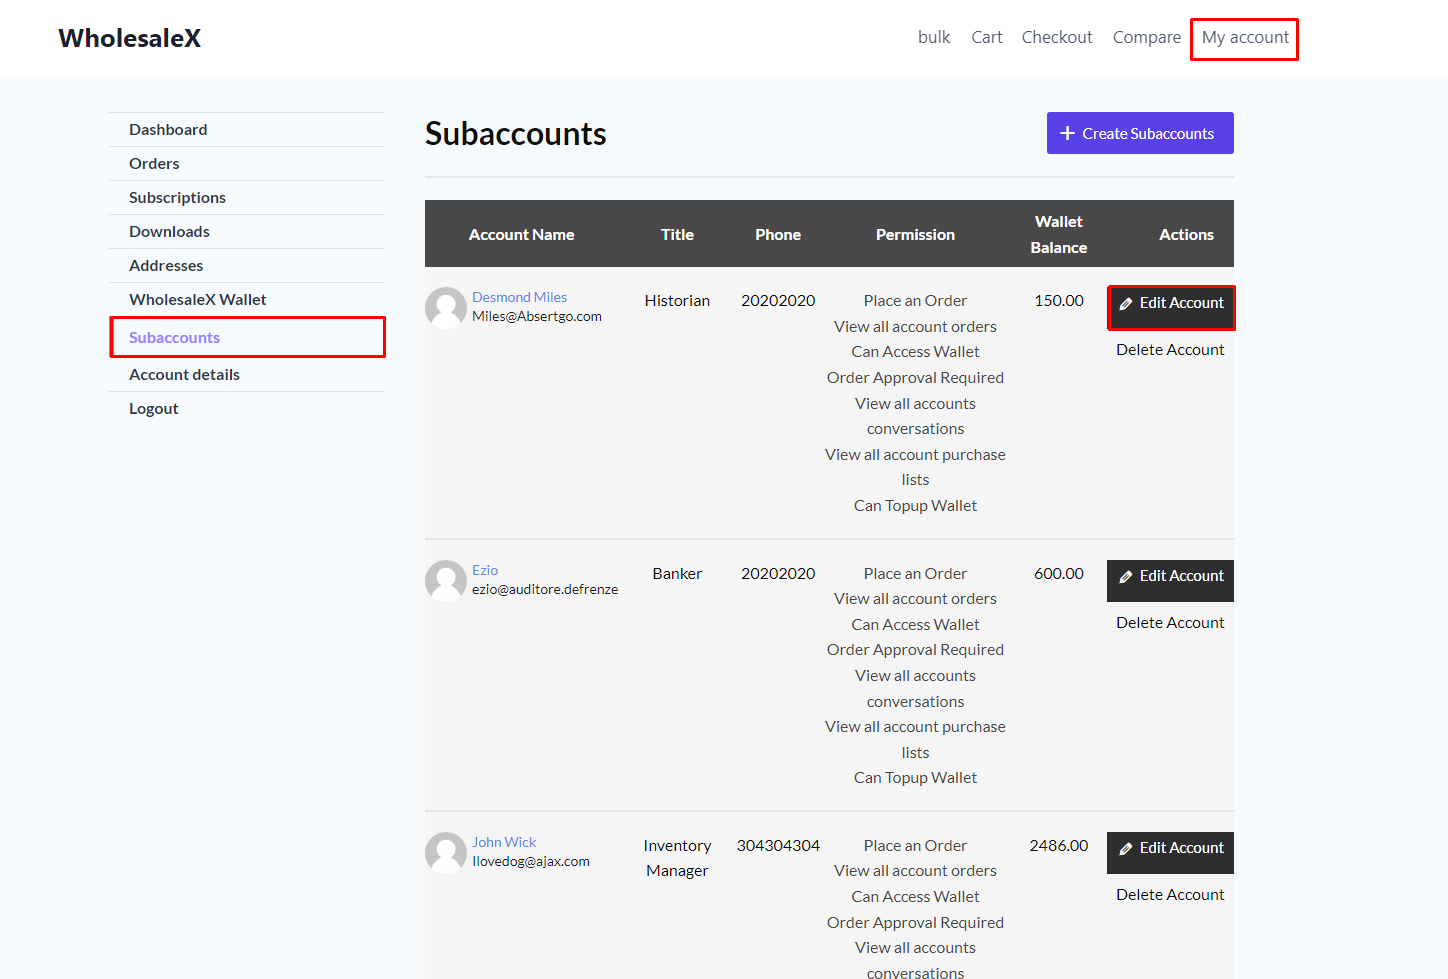
How Can your Customers Manage Subaccounts
Let’s look at it from a B2B user’s perspective. As you can see, the subaccounts section has been added to the “My Account” page.
Your customers can see the preexisting subaccounts and their titles, Contact Number, Permission, and WholsaleX Wallet Balances.
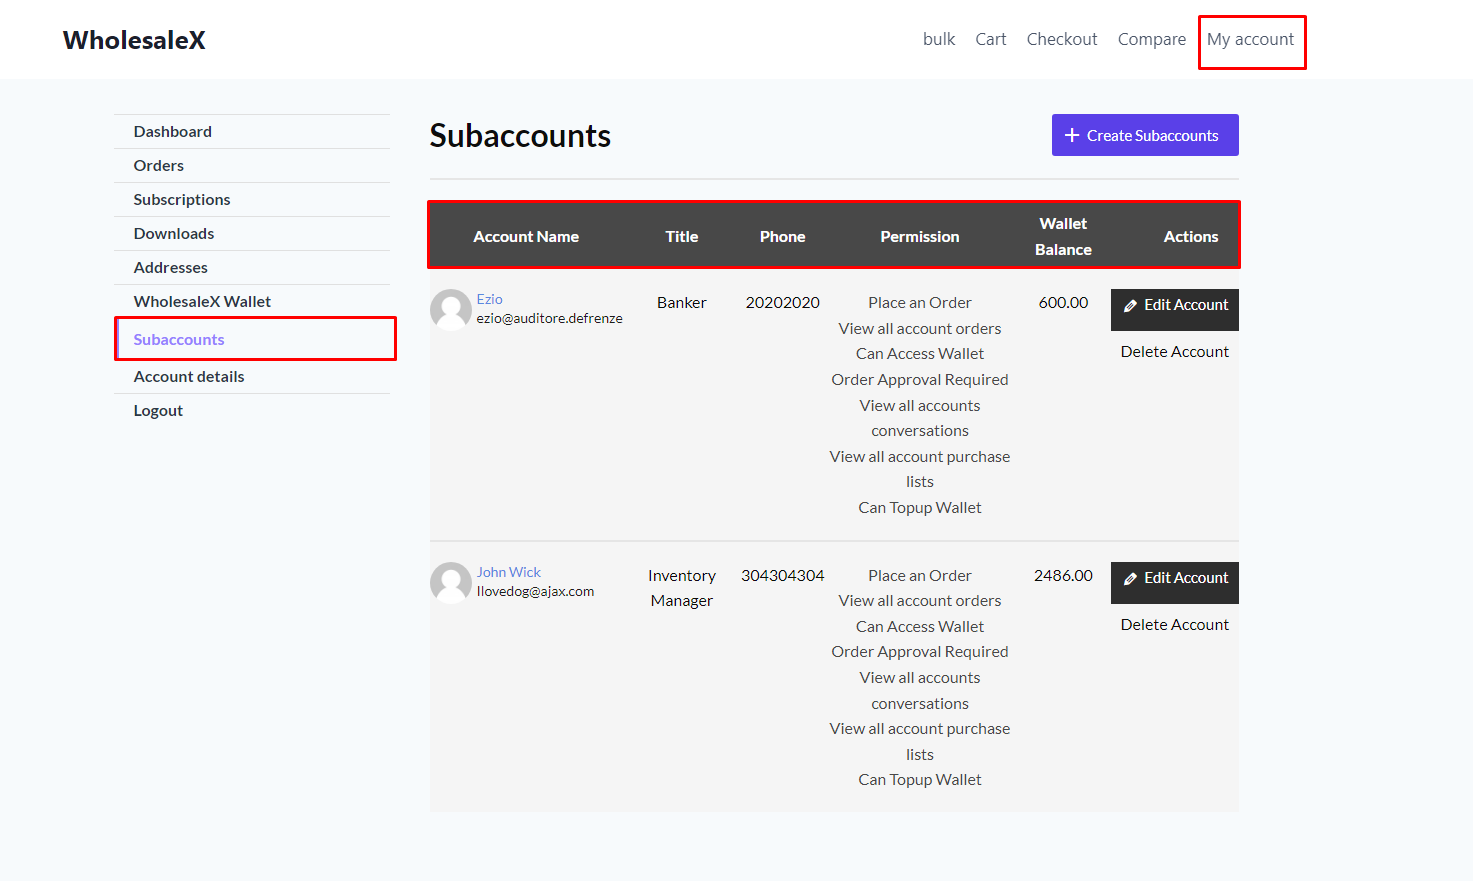
They can easily create and manage multiple subaccounts, giving them separate responsibilities and permissions. Let’s start by creating a subaccount and then we will show you how to edit existing subaccounts.
Creating a Subaccount
It is relatively simple to create a new subaccount. First, we must go to the subaccounts section from our my account page. Then we will click on the Create Subaccount button.
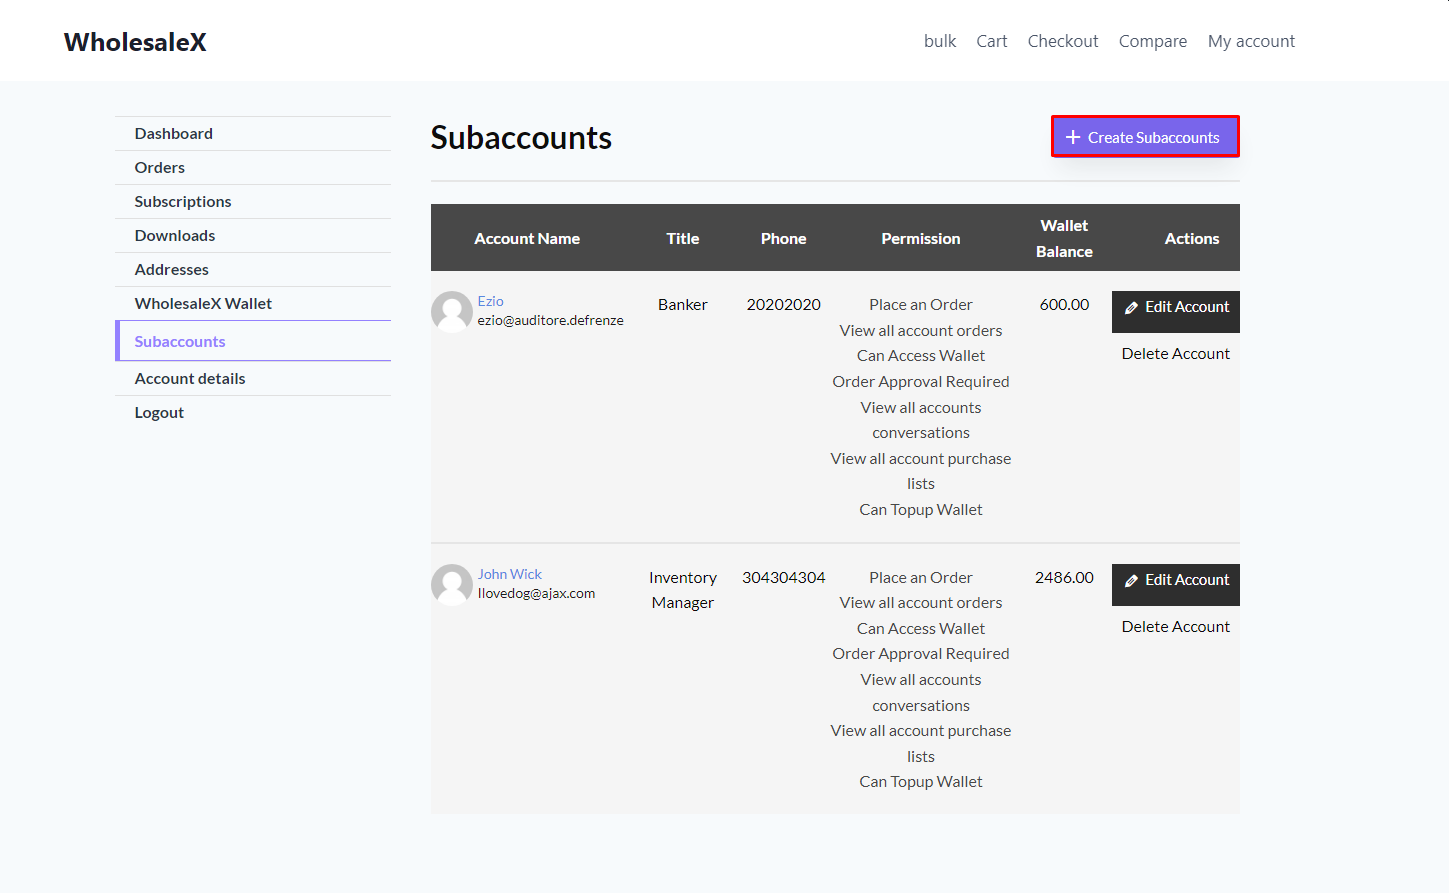
- From your My Account” page, go to the “Subaccounts” section
- Click on the “Create Subaccounts” Button
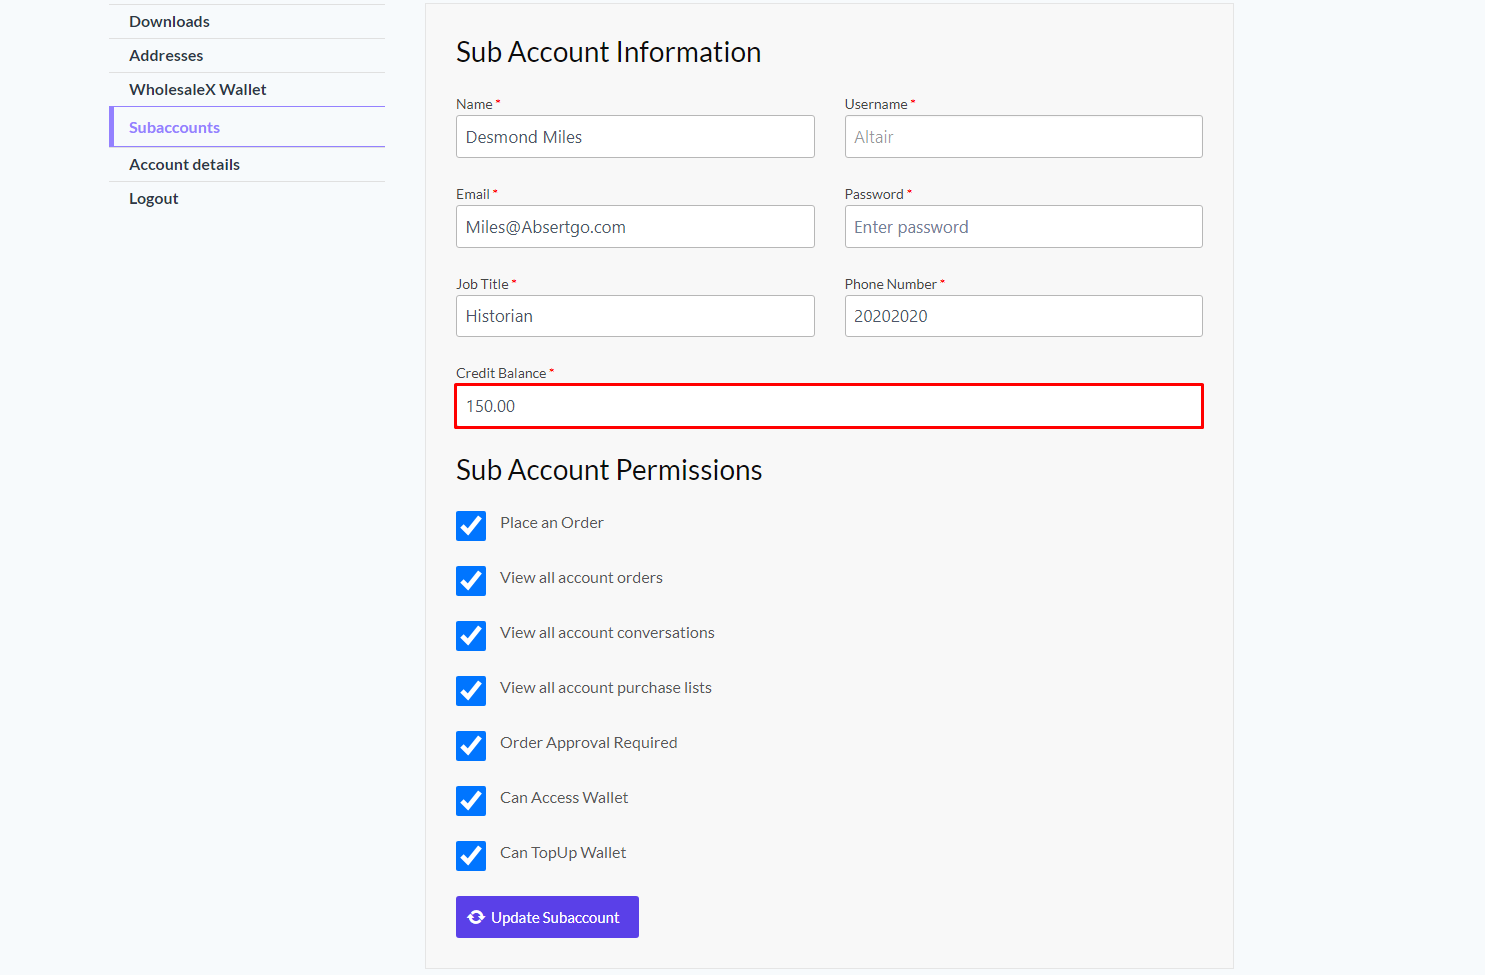
Now, we must fill in the necessary information.
We can also set a balance for the account. Remember that the balance added here will be deducted from the primary account.
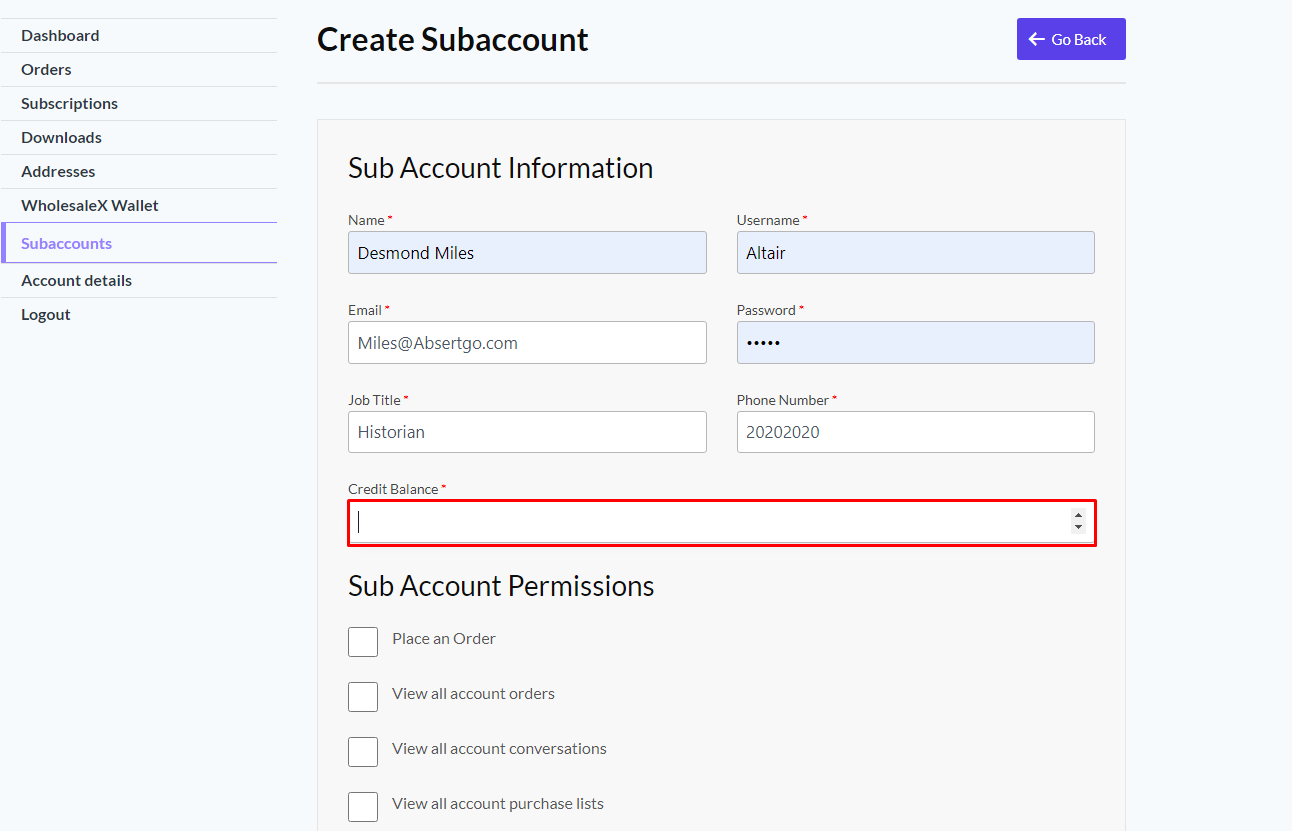
- Enter the amount of balance you want this account to have
Then, they can set the permissions that this account will have.
- You can permit them to place an order
- View all account orders
- View all account conversations
- View all account purchase lists
- If they require Order Approval
- Whether they Can Access Wallet
- Can they TopUp Wallet
Once they’re done with the permission, click on the Create Sub Account for its completion.
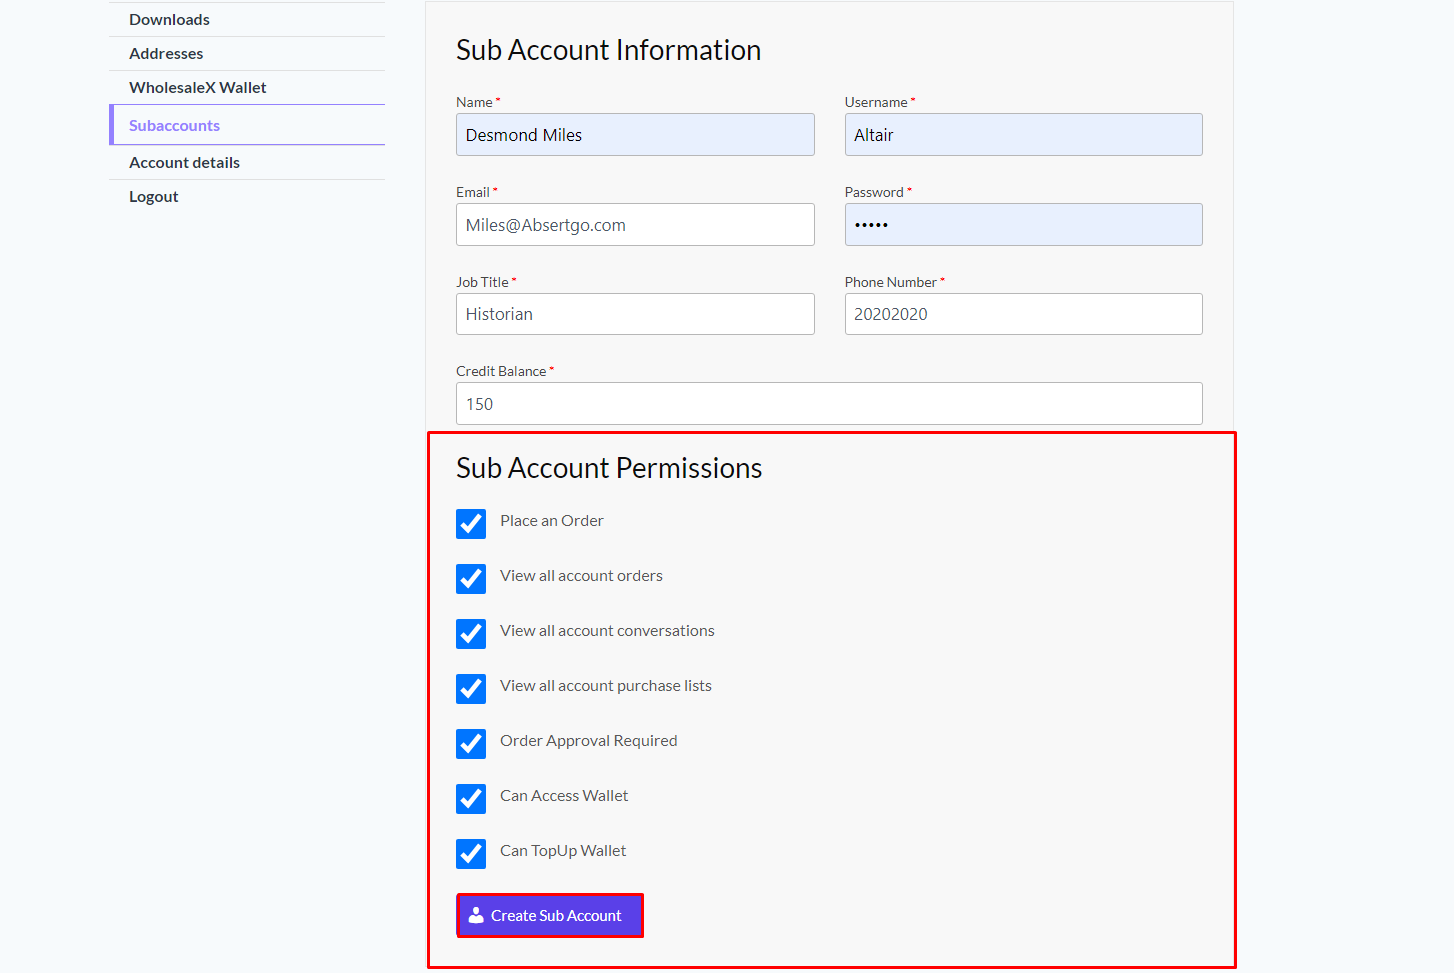
- Check the boxes next to the corresponding permission.
- Click on the Create “Sub Account” button
As a site admin, you can also decide whether the subaccounts need approval for order. To do so, Go WooCommerce > Settings > Payments.
Enable or Disable Subaccount Order Approval if you want subaccounts to require approval from their parent’s accounts to make a purchase. Then click on the save changes button.
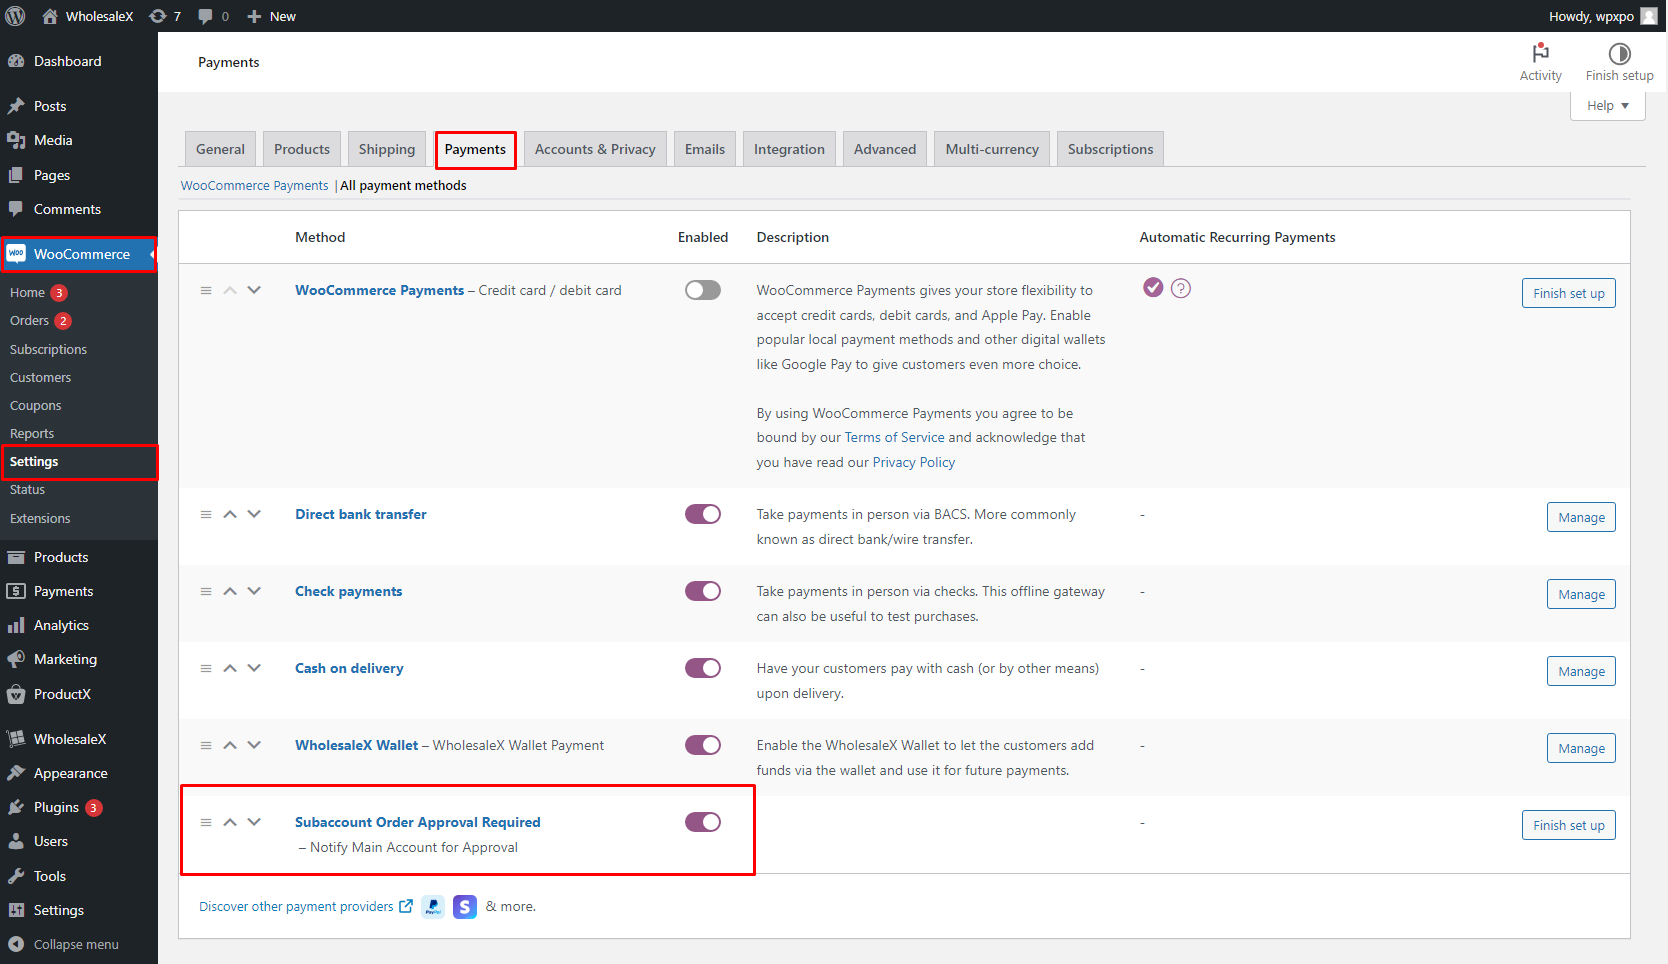
- From your WordPress Dashboard, Go to the settings section of WooCommerce
- Switch to the Payment page
- Enable “Subaccounts Order Approval Required“
Editing a Subaccount
To edit a preexisting subaccount, they must click the Edit Account button adjacent to the account. They will be taken to the page where they can edit the account.
- From the My Account” page, go to the “Subaccounts” section
- Click on the “Edit Account” button next to account you want to edit
Then they can edit the basic information of the subaccounts, like their title, phone number, email address etc.
More importantly, they can also Credit/Debit balance from their account. The balance will be automatically adjusted in the Wallet of the primary account along with the transaction history.
They can also grant or revoke the permission given to this account. Check/Uncheck the necessary boxes; the changes will take effect immediately.
Make the necessary changes, then click on the Update Subaccount button.
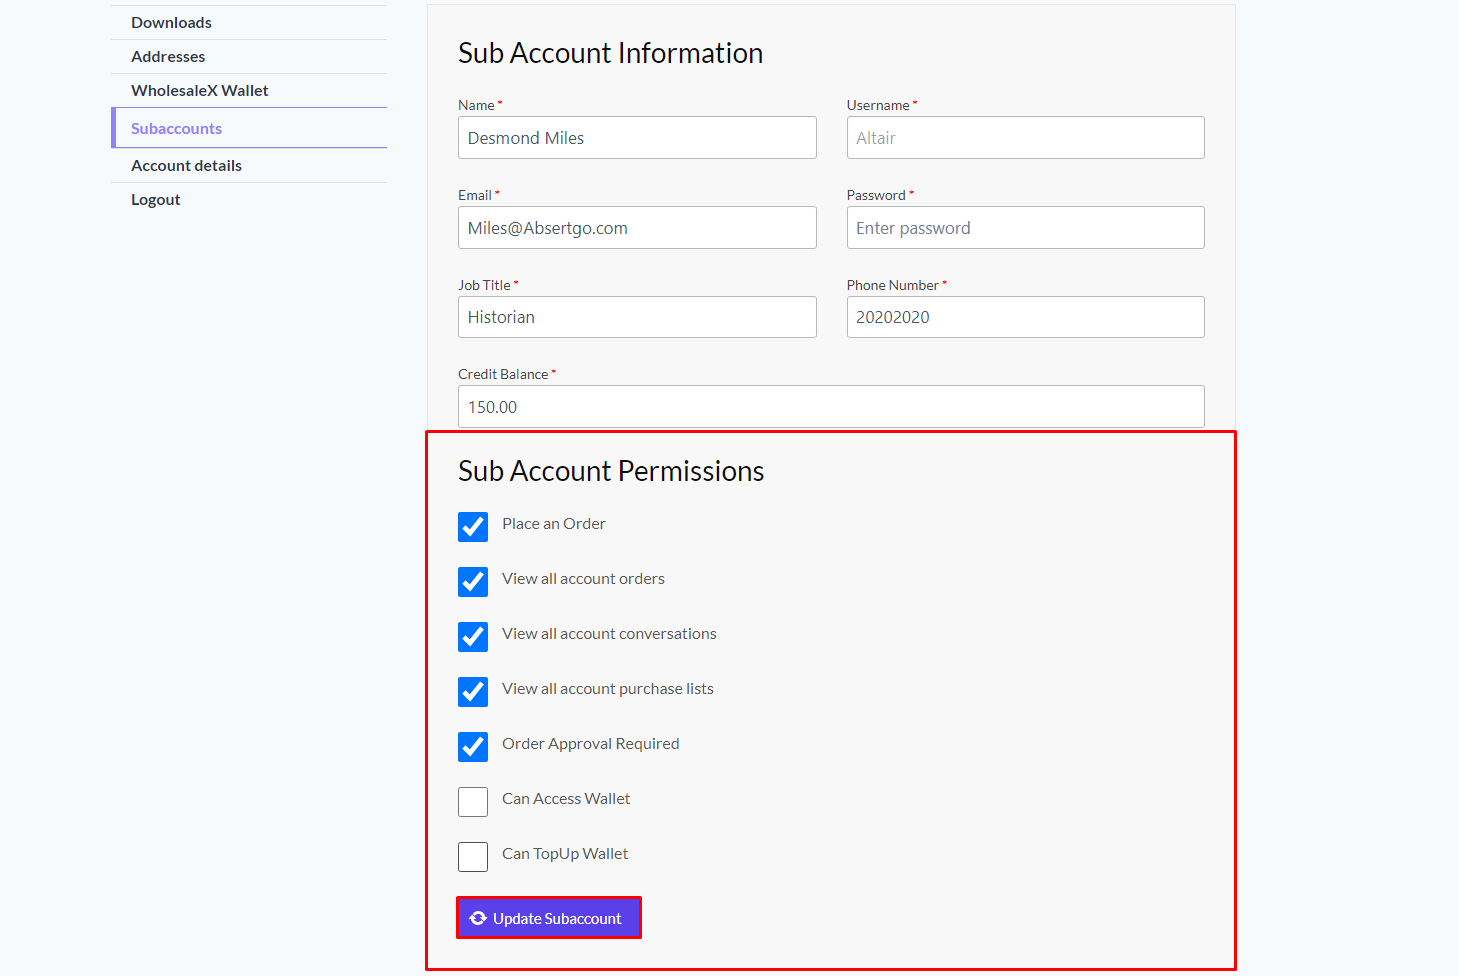
- Make the necessary changes and click on the “Update Subaccount” button
They can also delete a subaccount by clicking the “Delete Account” button under the “Edit” button. Remember that this action is irreversible, as the users will be deleted from the site’s database. The balance of the deleted account will be added to the primary account’s Wallet.
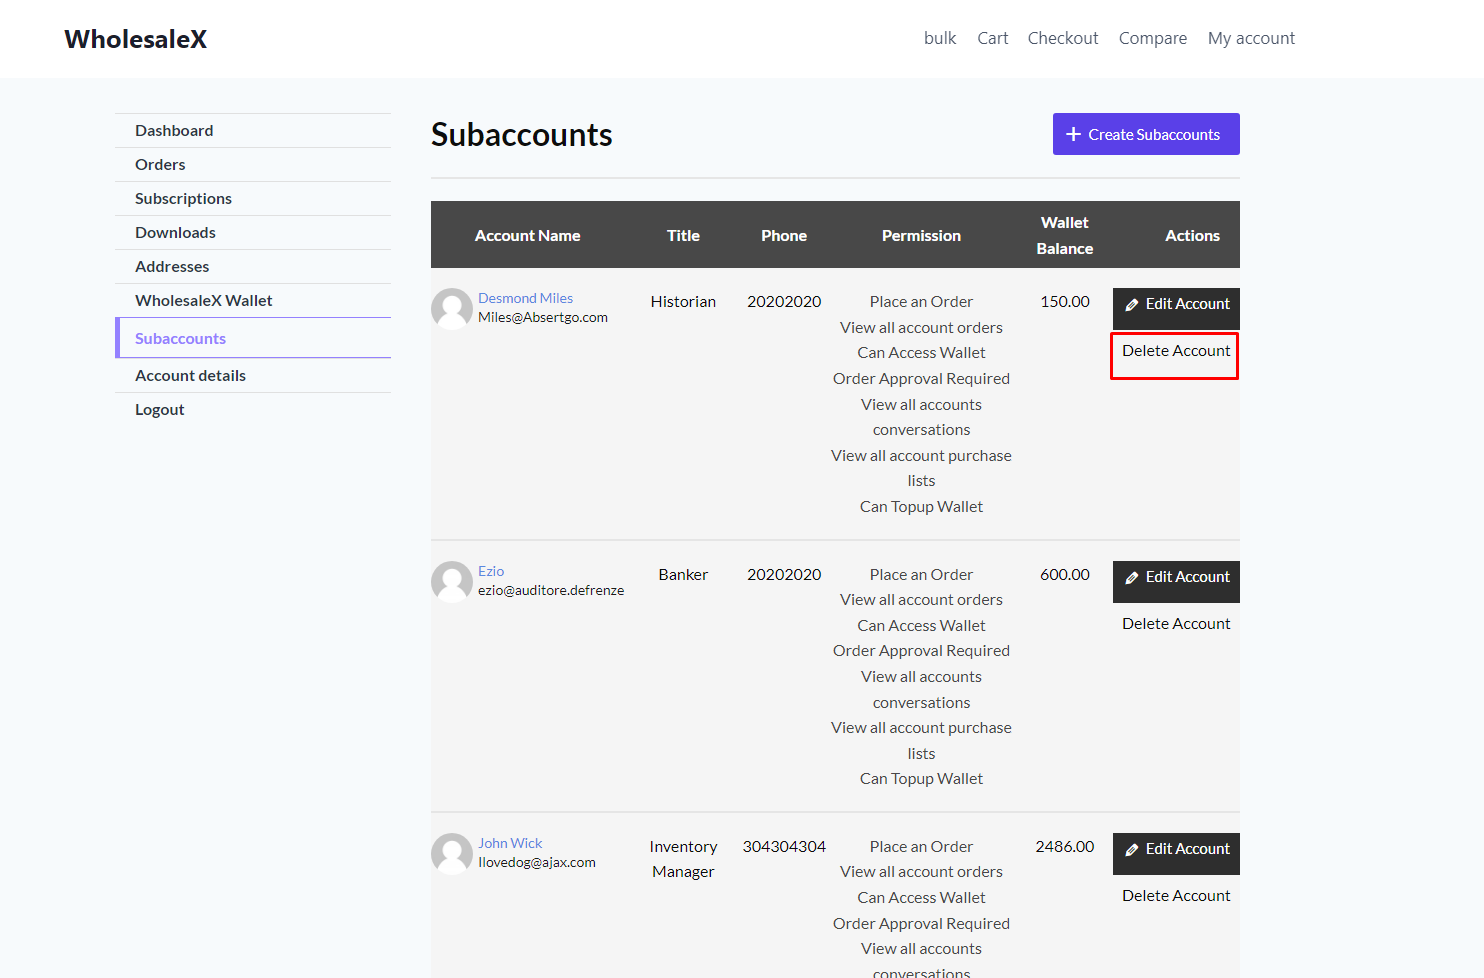
- From your “My Account” page, go to the “Subaccounts” section
- Click on the “Delete Account” button next to the account
How Can Subaccount Holders Use Their Account?
After creating a subaccount, mail will be sent to the email address and the login credentials. The email holder can log in as a registered user of the website. They can now order/purchase and create a purchase list. They can also check their orders, WholesaleX Wallet balance, Addresses, etc. from their “My Account” Page.
How Can a Subaccount Request Approval for Their Orders?
As we have seen earlier, subaccounts can be restricted from placing orders independently with the “Order Approval Required” permission. The Subaccount can place an order, but the primary account holder must screen it.
When a secondary account requests an order approval, the primary account can find the request in the Wholesale Wallet section from their “My Account” page. The order will finally occur when the primary account accepts the request.
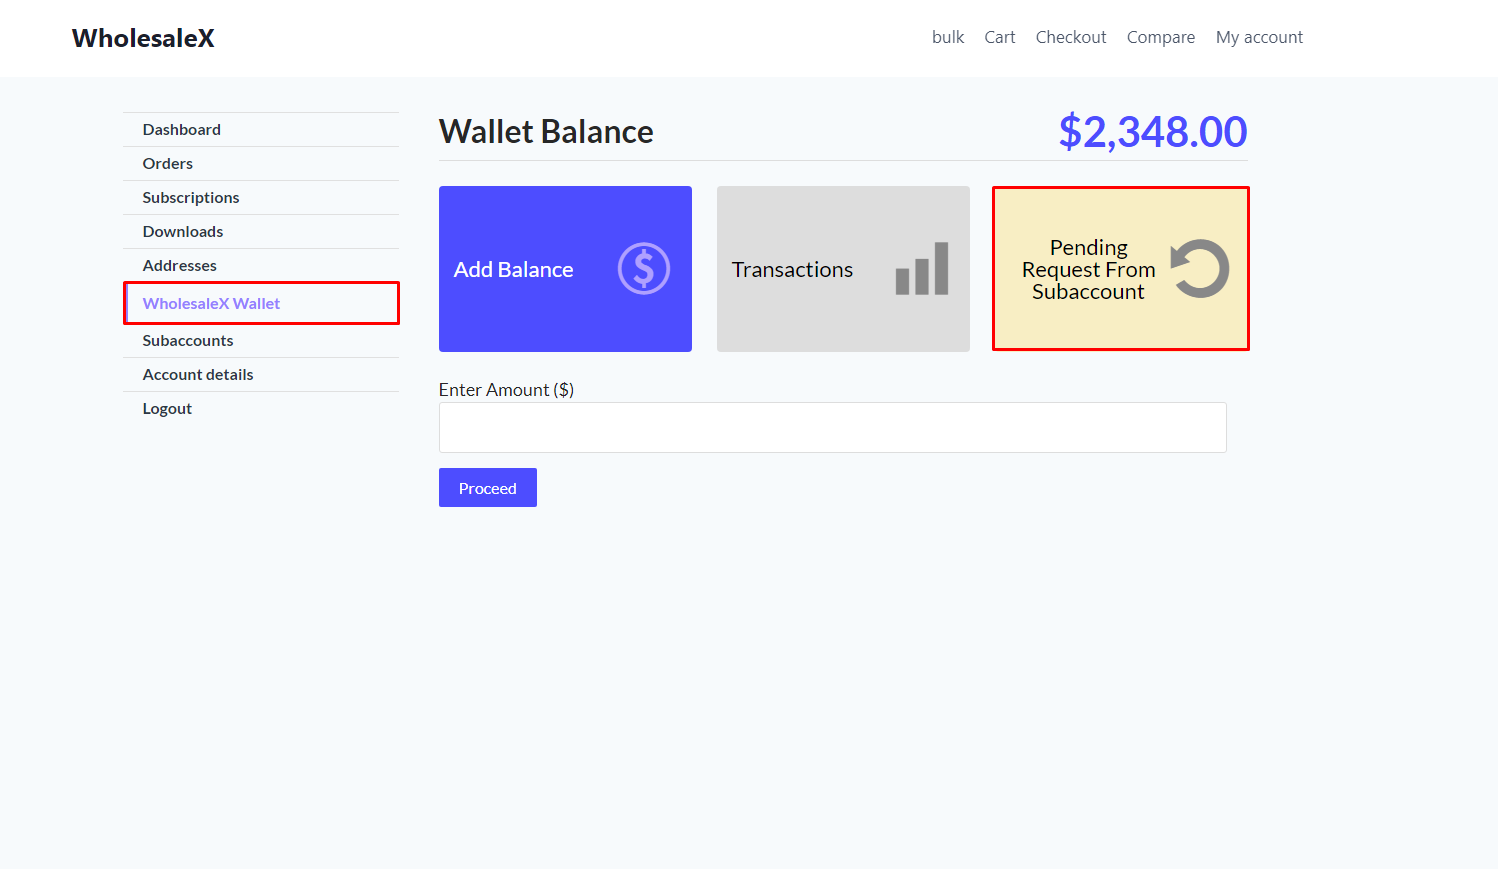
So the primary account holder must approve the order to let the subaccount holder complete the order by making the required payment.
However, the primary account holder can also pay to complete the order.
How Do We Get Notified of Subaccount Activities?
Managing the subaccounts can be tiresome on its own; WholesaleX comes with an Email system to ease up the constraints of the primary account. We can set up five custom mail templates to manage the process more efficiently. There are already a few basic templates to ensure smooth communication between the primary and secondary account holders.
However, we can personalize the email templates. Before learning how to personalize the email template, we need to know when these emails are sent and prompt.
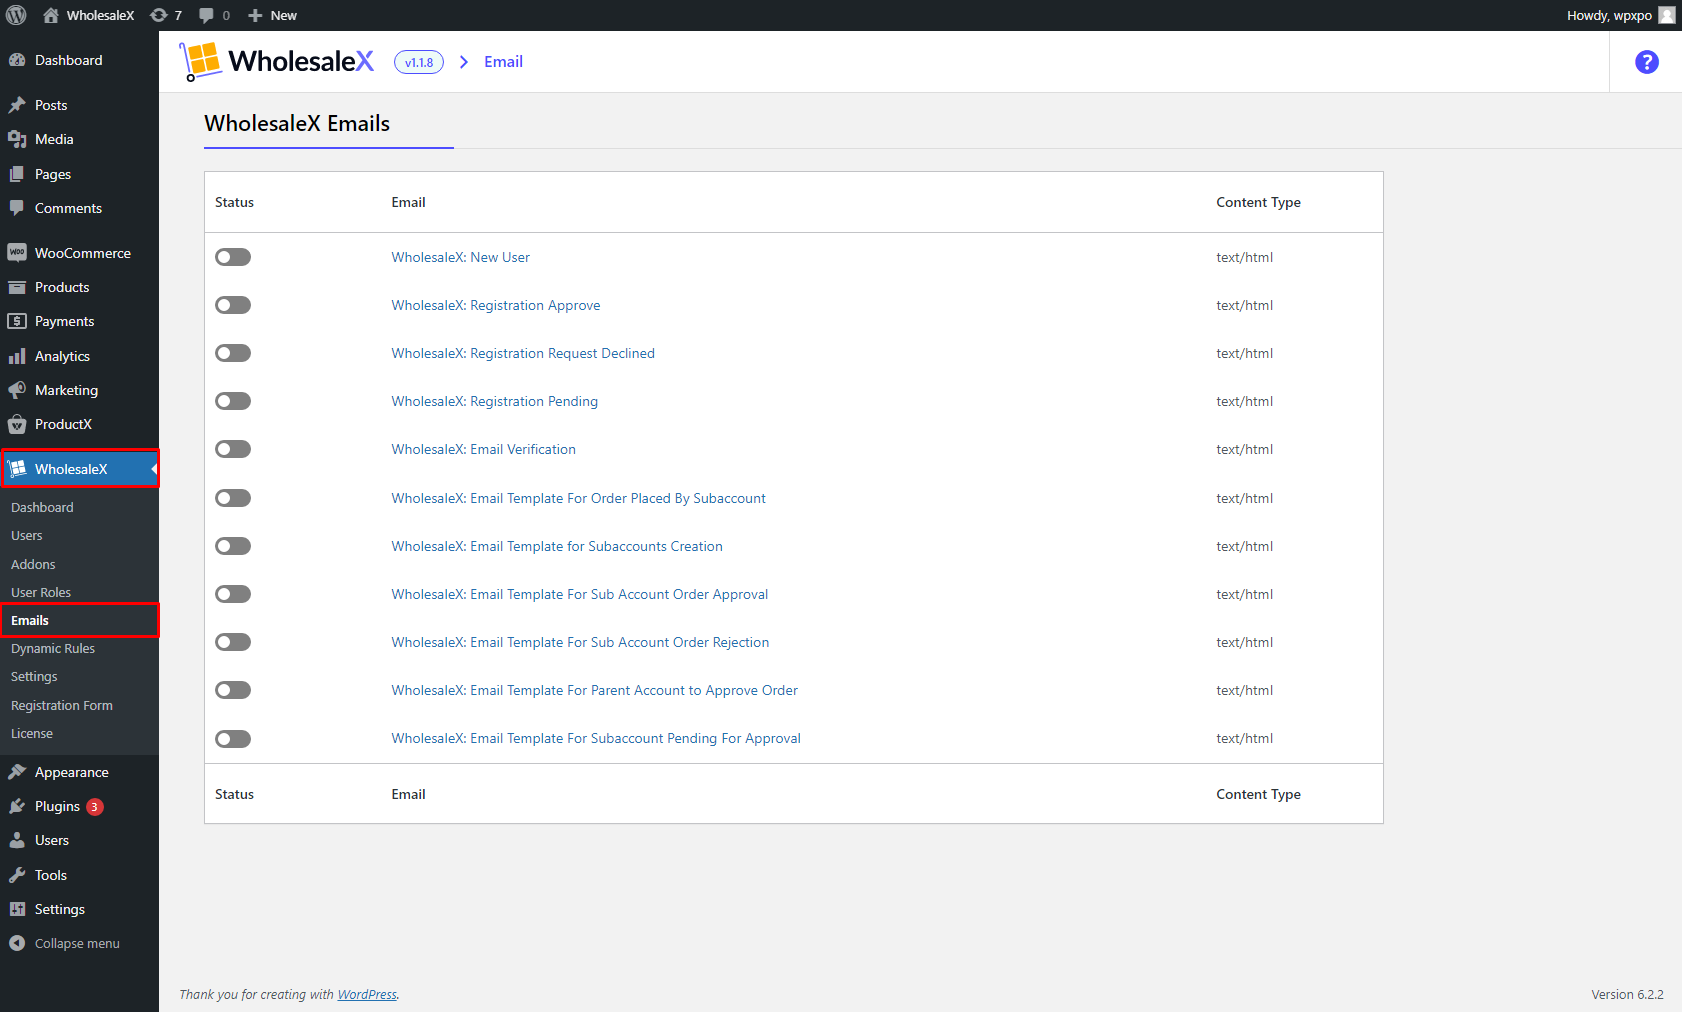
Email Templates for Subaccounts
To find the email templates, go to the “Email” section of WholesaleX. Here, you can see all available options for sending emails. You can deactivate or activate them as per your requirements. And click on any of the available templates to see the content.
Now, let’s explore and understand the purpose of the email templates available for the Subaccounts feature.
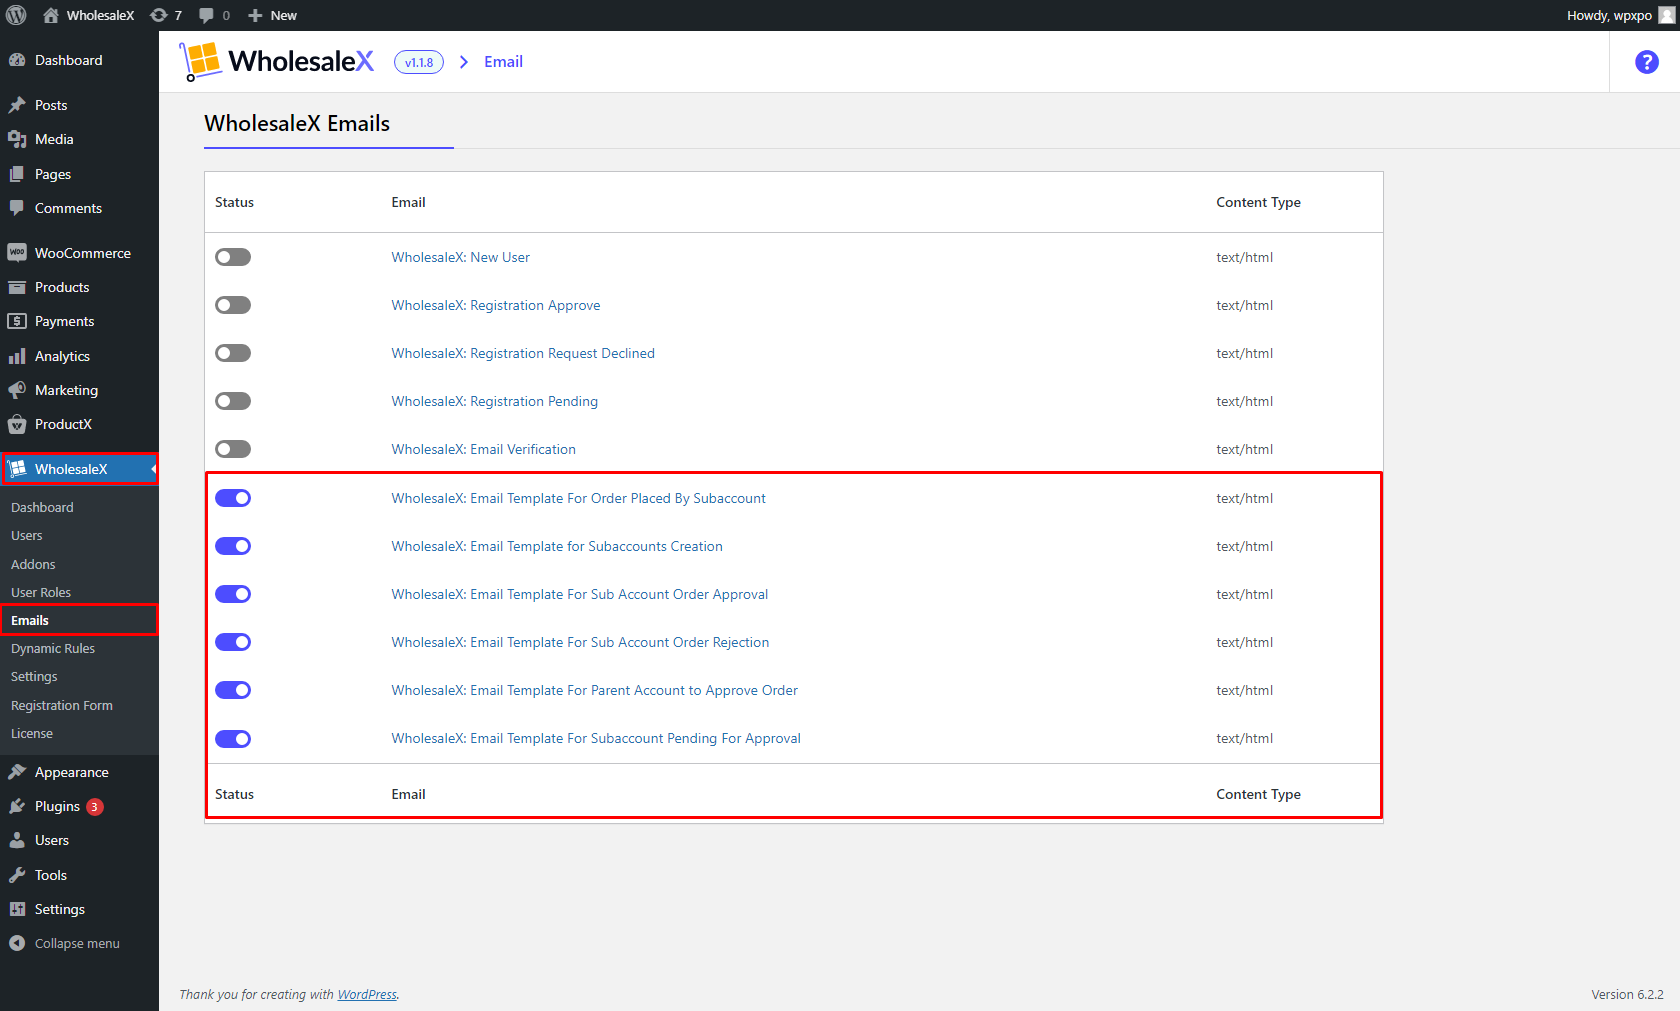
Email Template for Subaccounts Creation
This mail is sent to the email address used for creating the Subaccount. This mail is sent after the creation of the secondary account. Considering this is an account creation mail, it also contains login credentials.
Email Template For Order Placed By Subaccount
The primary account holder receives an email informing them that one of their subaccounts has placed an order. It includes the order number and the name of the Subaccount utilized to place the order.
Email Template For Subaccount Order Approval
This email is sent to confirm the approval of the order request made by a subaccount holder.
Email Template For Subaccount Order Rejection
This email is sent to notify the secondary account holder that their request has been denied.
Email Template For Parent Account to Approve Order
This email notifies the primary account holder when a subaccount holder sends an order approval request.
Here you can see a ready email template. You can edit the email subject and contents as well. We have included some Smart tags to make things simpler for you. After editing any template, you must click the “Save Changes” button to update it.
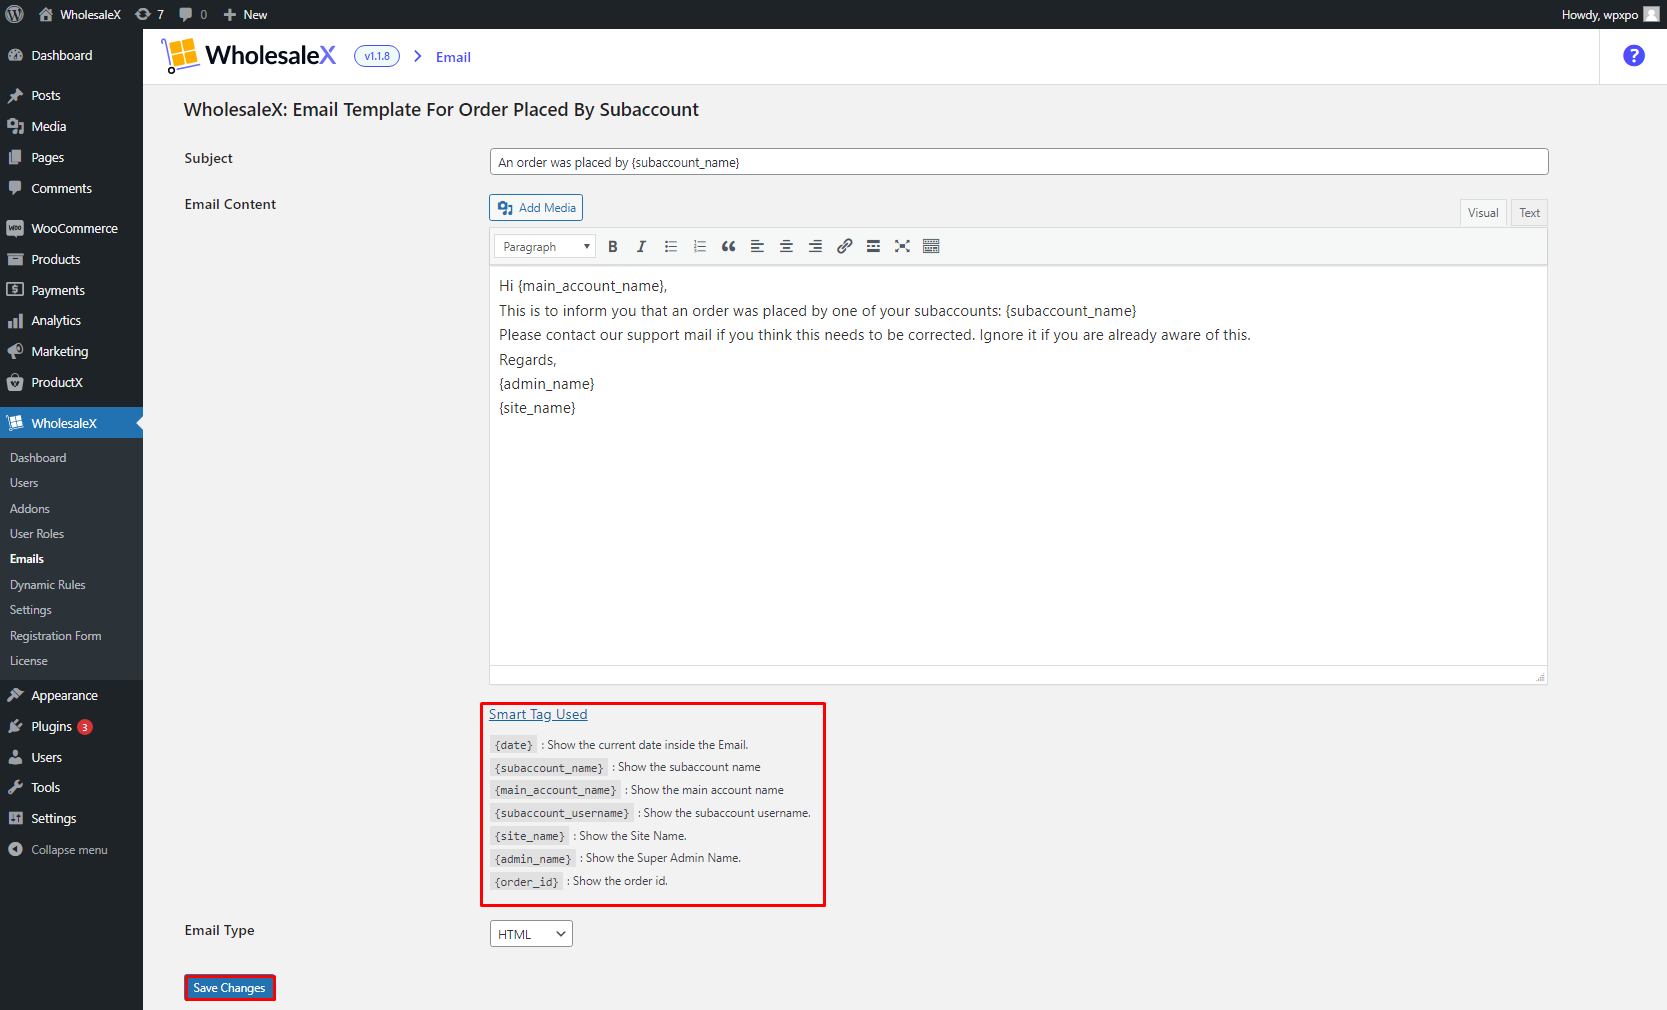
- Click on the email template that you want to edit
- Make the necessary changes
- Click on the Save Changes button
Conclusion
That’s all from this blog post. We hope we’ve provided all the necessary steps for you to enable subaccounts in your WooCommerce B2B stores. If you still have questions about the WholesaleX plugin, feel free to comment below or check out our youtube channel. You can also contact our support team for more detailed information. Get the WholesaleX plugin today to transform your existing WooCommerce store into a wholesaling powerhouse.