A custom WooCommerce registration form can greatly enhance your customers’ experience and make your store more efficient. Whether you’re collecting additional information, offering a streamlined login/registration process, or ensuring security, customizing your form is key.
There are several ways to create a custom registration form in WooCommerce:
- Native WooCommerce Settings: This is the simplest method. You can enable registration fields directly through WooCommerce settings without any code.
- Code Snippets: If you’re comfortable with a little coding, you can add custom fields or alter the form’s layout by modifying your site’s
functions.phpfile. - Plugins: For advanced features like custom fields, approval workflows, and security measures, using a plugin is the most flexible option. With plugins, you to design a tailored registration form easily.
Customizing your WooCommerce registration form allows you to add fields like Phone Numbers, Business Names, or Tax IDs, separate login/registration for wholesale customers, and even set up manual or automatic approval processes. This level of customization makes the registration experience smoother, more relevant, and secure for your users.
The Default Registration Form in WooCommerce
The WooCommerce registration form is a basic form that allows customers to create an account on your online store. It’s typically found on the My Account page, where users can enter their details, like email address, password, first name, and last name.
Once registered, customers can log in to track their orders, manage personal information, and complete future purchases faster.
How to Enable the Registration Form from WooCommerce Settings?
By default, WooCommerce shows the registration form in the My Account page in any store. Any guest user can view the form on that page.
However, you can manually enable the registration form if it wasn’t already. All you need to do is go to WooCommerce >> Settings >> Accounts & Privacy.
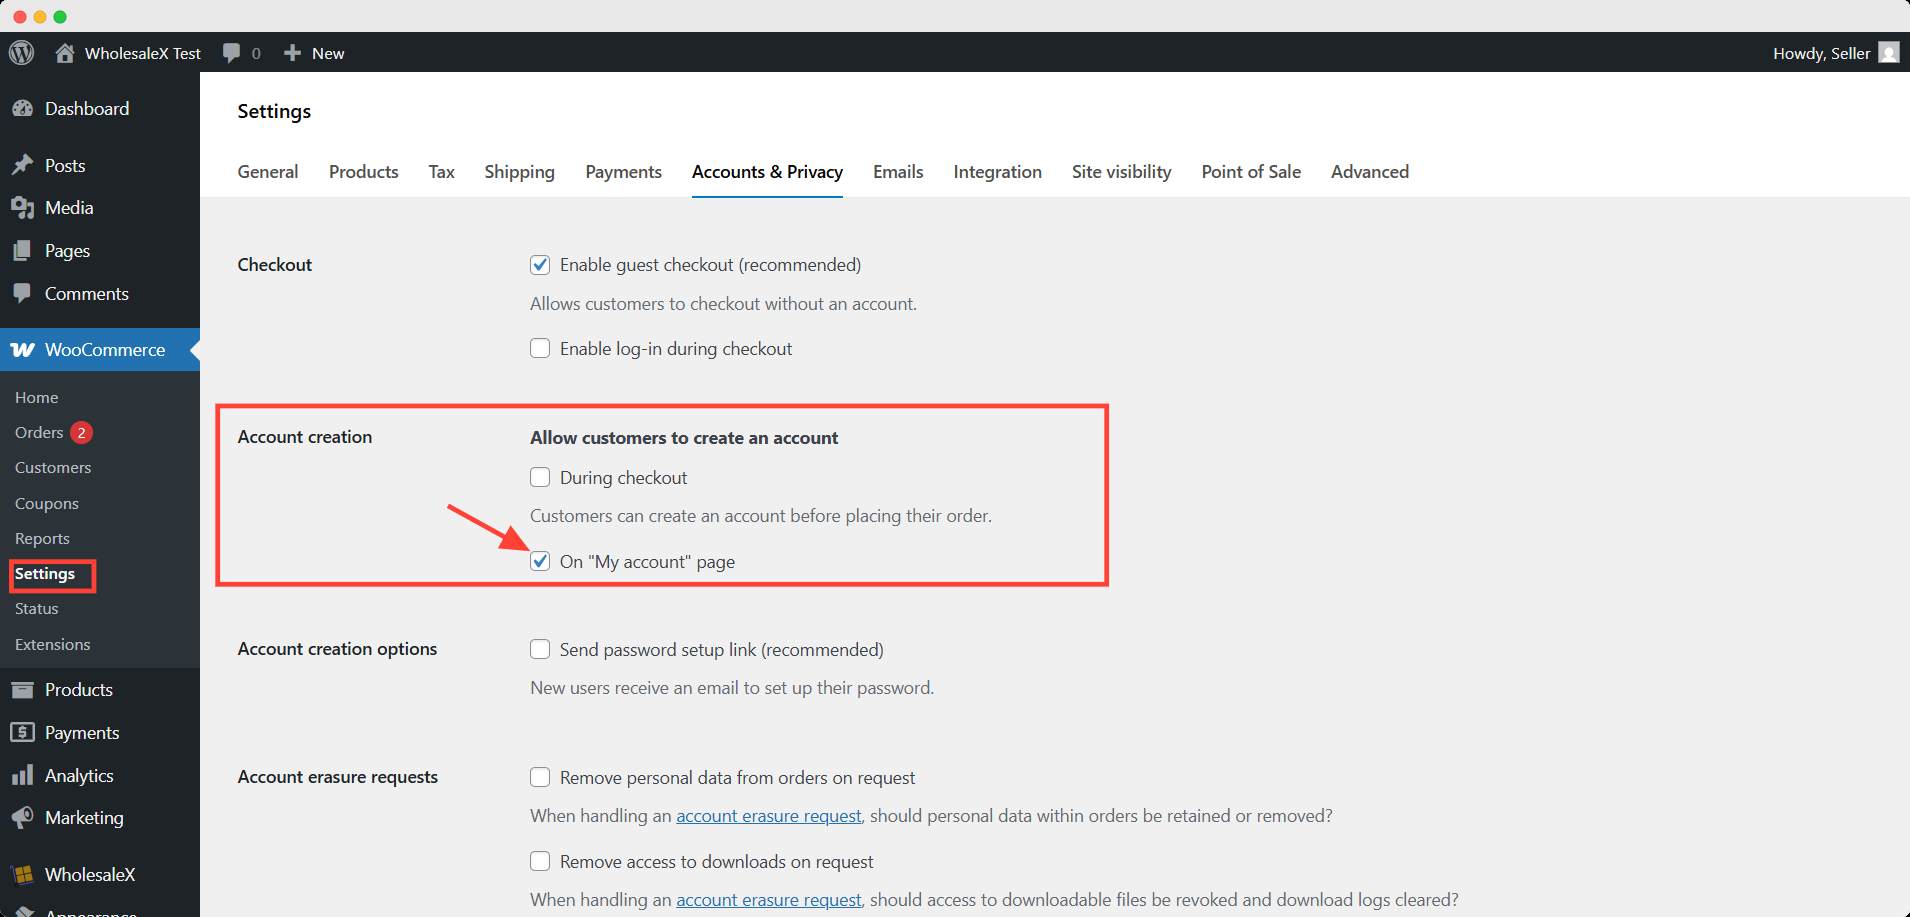
Here, you will see the option of allowing user to create their account. Check the ‘My Account’ option; the registration form will be on that page.
To prevent the creation of malicious or spam accounts, you can uncheck the box. This way, nobody else would find a way to create their account.
Why Customize the Default Registration Form?
While the default WooCommerce registration form is great for basic setups, many stores need more flexibility. Customizing the registration form allows you to:
- Collect more detailed information: For example, ask for phone numbers, business names, or VAT numbers (especially important for wholesale customers).
- Improve user experience: Separating the login and registration pages can make the process clearer, especially for stores with different types of customers (B2B vs B2C).
- Enhance security: You can add extra fields for verification or security measures like CAPTCHA and email verification.
Customizing the WooCommerce registration form ensures that your store meets the unique needs of your customers and your business.
How to Create a Custom WooCommerce Registration Form with a Plugin
Using a plugin to create a custom WooCommerce registration form is one of the easiest and most efficient solutions for store owners.
Plugins simplify the process by providing drag-and-drop interfaces, pre-built templates, and advanced customization options without needing any coding knowledge.
They also offer additional features like security (CAPTCHA), role management, and custom field support, which are difficult to implement manually.
For WooCommerce users, plugins allow you to quickly design a form tailored to your store’s needs, ensuring a smooth user experience and saving valuable development time.
Plugin Comparison: Which One is Right for You?
Here’s a comparison of four popular plugins for customizing WooCommerce registration forms. We’ll focus on the key features relevant to registration forms, such as custom fields, security, ease of use, and role management.
| Feature | WholesaleX | Themegrill | Custom Registration Forms Builder | User Registration for WooCommerce |
|---|---|---|---|---|
| Custom Fields | ✅ Full support for adding custom fields (text, dropdown, checkbox, etc.) | ✅ Add custom fields easily (text, checkbox, radio, etc.) | ✅ Supports custom fields, but limited options compared to others | ✅ Add custom fields (text, dropdown, radio, etc.) |
| Field Validation | ✅ Advanced validation options (required, email, custom regex) | ✅ Basic validation (required) | ✅ Custom validation support | ✅ Built-in validation options |
| Role Management (B2B/Wholesale) | ✅ Manage roles for wholesale customers; manual/automatic approval | ❌ Limited role management; basic registration only | ❌ No built-in wholesale or role management | ✅ Assign user roles during registration |
| Security (CAPTCHA/Spam Prevention) | ✅ Supports CAPTCHA/Turnstile integration | ❌ No CAPTCHA support | ❌ No built-in security features | ✅ CAPTCHA support available |
| Redirect After Registration | ✅ Ability to redirect users to specific pages after registration | ❌ No redirection options | ✅ Redirection options for different user roles | ✅ Redirect after registration is available |
| Ease of Use | ✅ Very user-friendly, easy drag-and-drop form builder | ✅ Easy to use for beginners | ✅ Simple interface, but more complex than others | ✅ Simple, intuitive builder for beginners |
| Pre-built Templates | ✅ Multiple pre-built templates available for quick setup | ✅ Basic templates available | ❌ No pre-built templates | ❌ No pre-built templates |
| Price | Free with premium options | Free with some features in the premium version | Paid (No free version) | Paid (No free version) |
Why WholesaleX is the Best Option
While all four plugins offer useful features, WholesaleX stands out as the best option for creating a custom WooCommerce registration form, especially for stores with wholesale customers.
Here’s why:
- Complete Customization: WholesaleX offers full support for custom fields, allowing you to collect any information you need from customers, whether it’s for retail or wholesale.
- Role Management for Wholesale: Unlike the other plugins, WholesaleX lets you easily assign custom roles to users, such as “wholesale customer,” and even set up manual/automatic approval processes.
- Built-in Security Features: WholesaleX integrates with CAPTCHA and other spam prevention tools to ensure your registration form stays secure.
- Redirect Options: After registration, you can direct wholesale users to specific pages, such as a wholesale product catalog or special deals.
- Ease of Use: Its drag-and-drop interface makes it easy to create and customize the registration form without any coding knowledge.
Step-by-Step Guide to Create a Custom WooCommerce Registration Form Using WholesaleX
Now that we’ve seen why WholesaleX is the top choice, let’s dive into how to set it up for your store. Here’s a step-by-step guide:
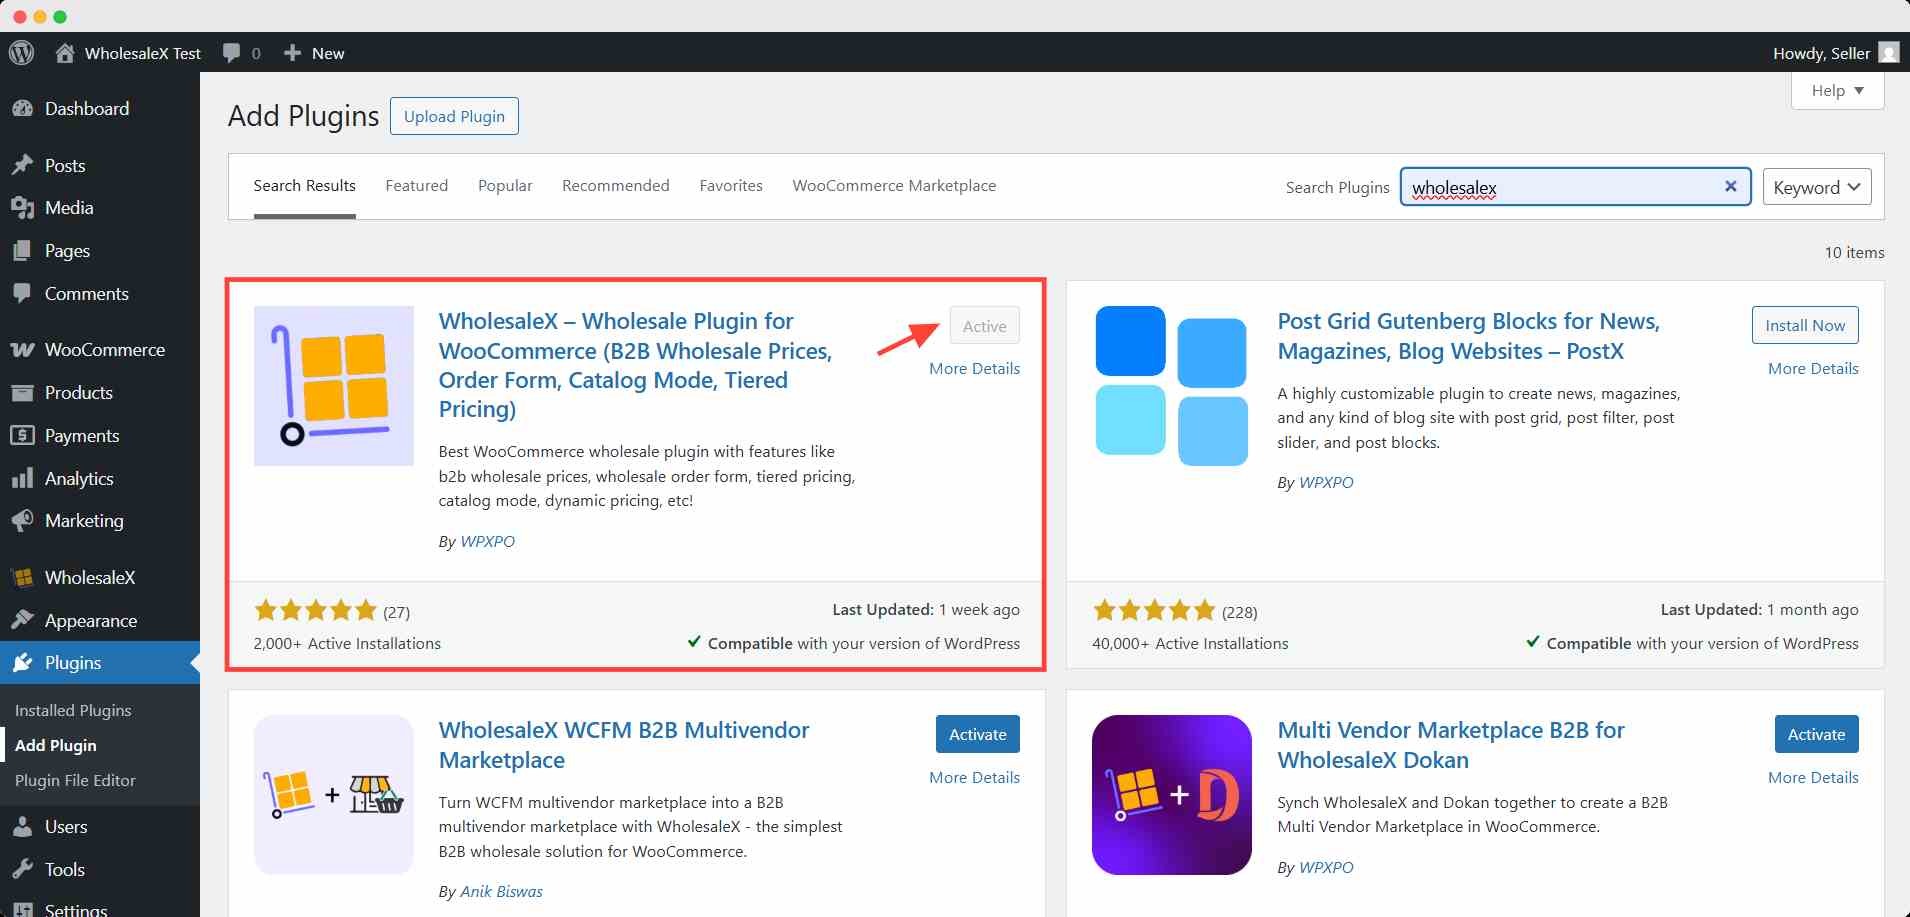
- Install and Activate WholesaleX Plugin
Go to your WordPress dashboard and navigate to Plugins > Add New. Search for WholesaleX and click Install Now, then activate it.
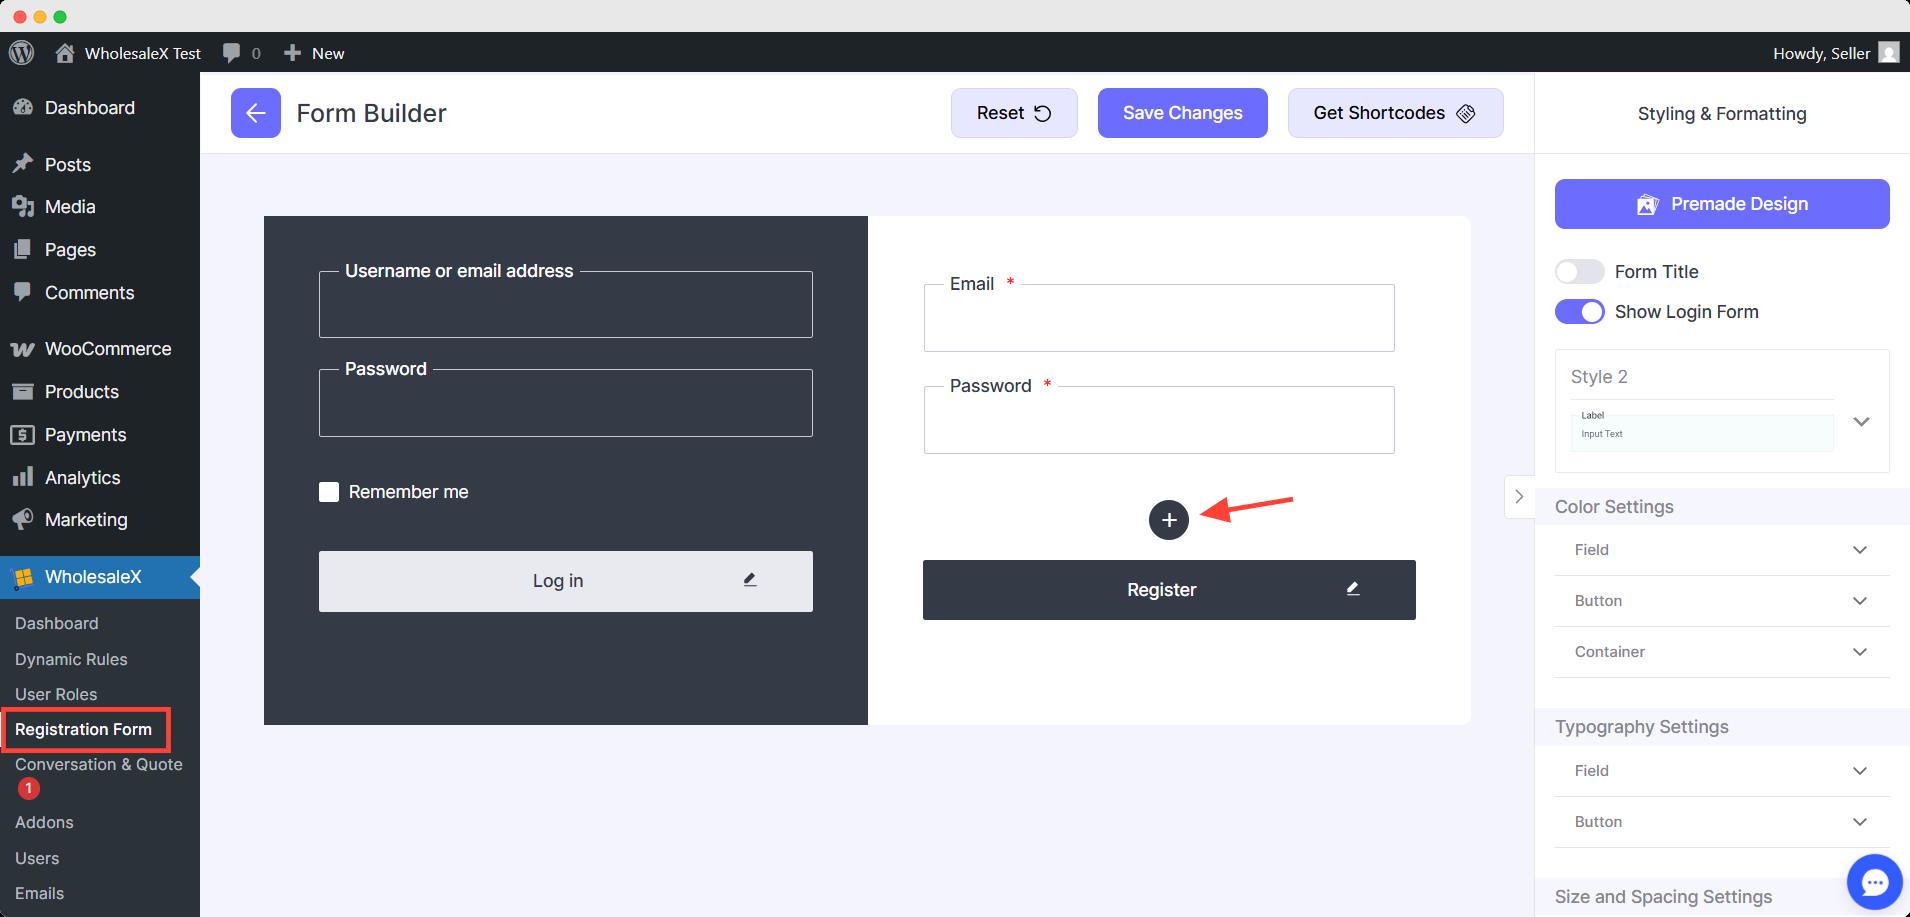
- Create Your Custom Registration Form
Now head over to the WholesaleX > Registration. Here, you will see the form builder interface.
Click the +(plus) icon to add the fields you need.
- Customize the field(optional)
After that, you can edit the fields if you need. You can change the position of the fields by dragging and dropping them to your desired position.
You can change the appearance (color, typography, visuals) with one click. To that, go to the premade template and import any of the designs you like.
Otherwise, you can customize each element to present your brand image and aesthetics.
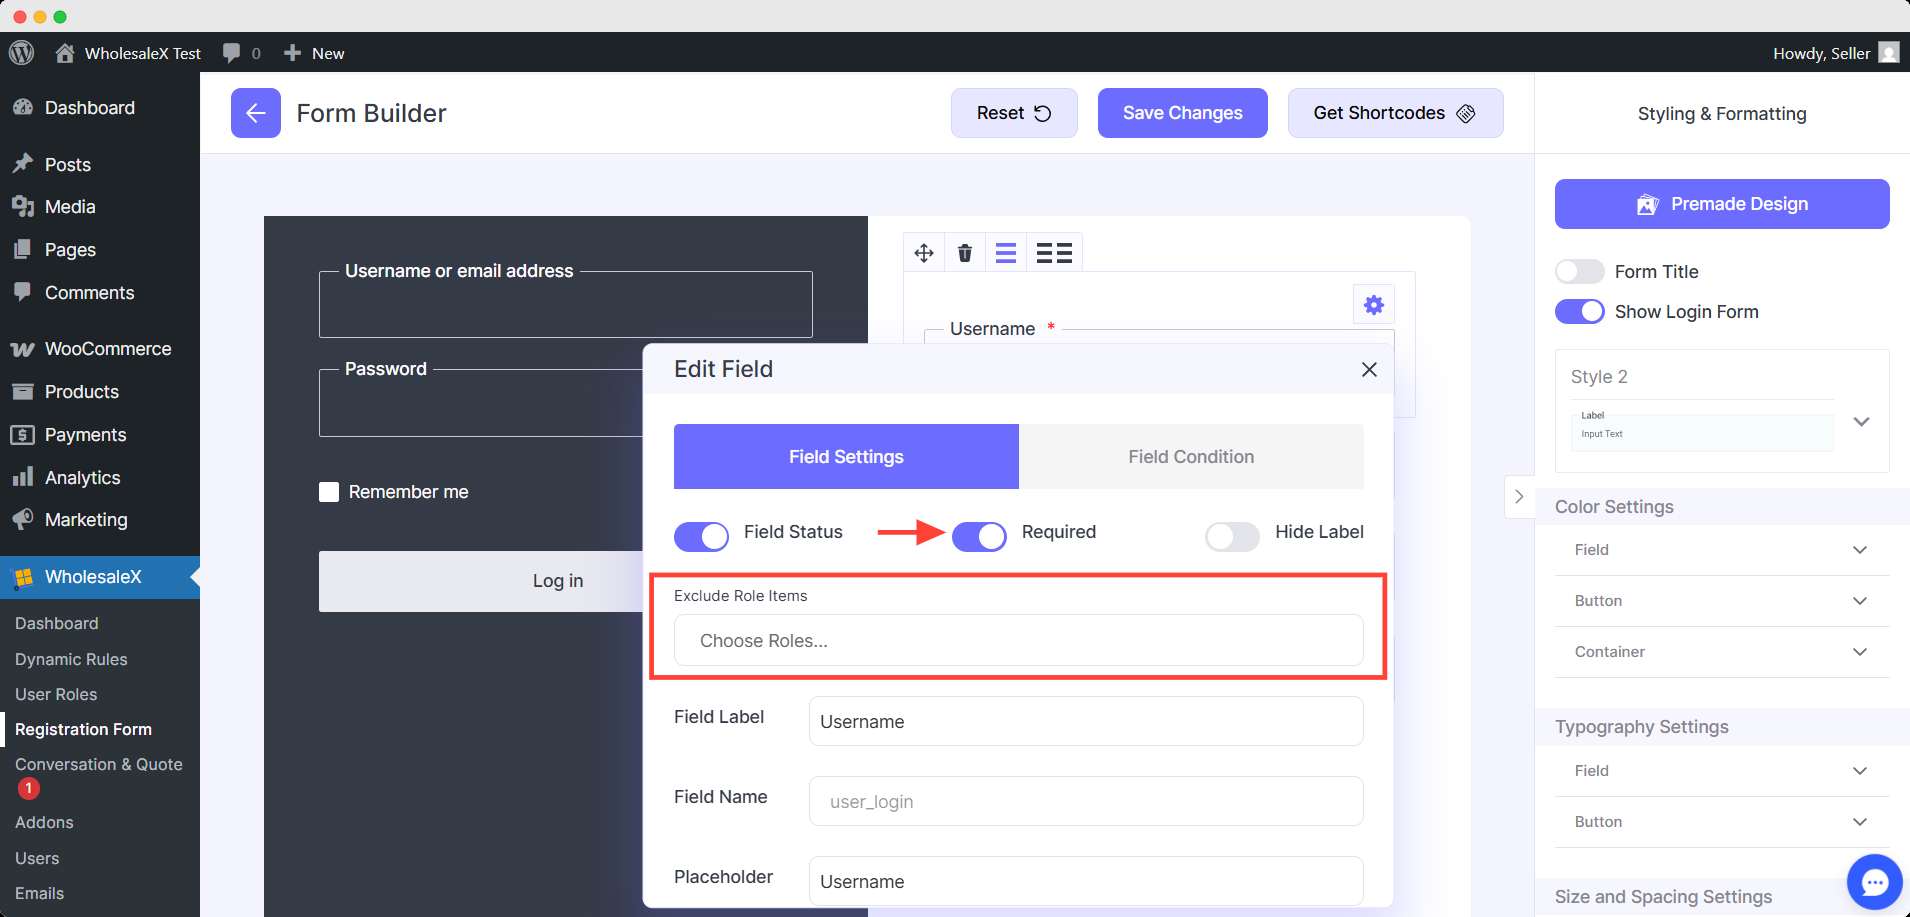
Additionally, you can change the settings of added custom blocks to make them required or hide them from any specific user role.
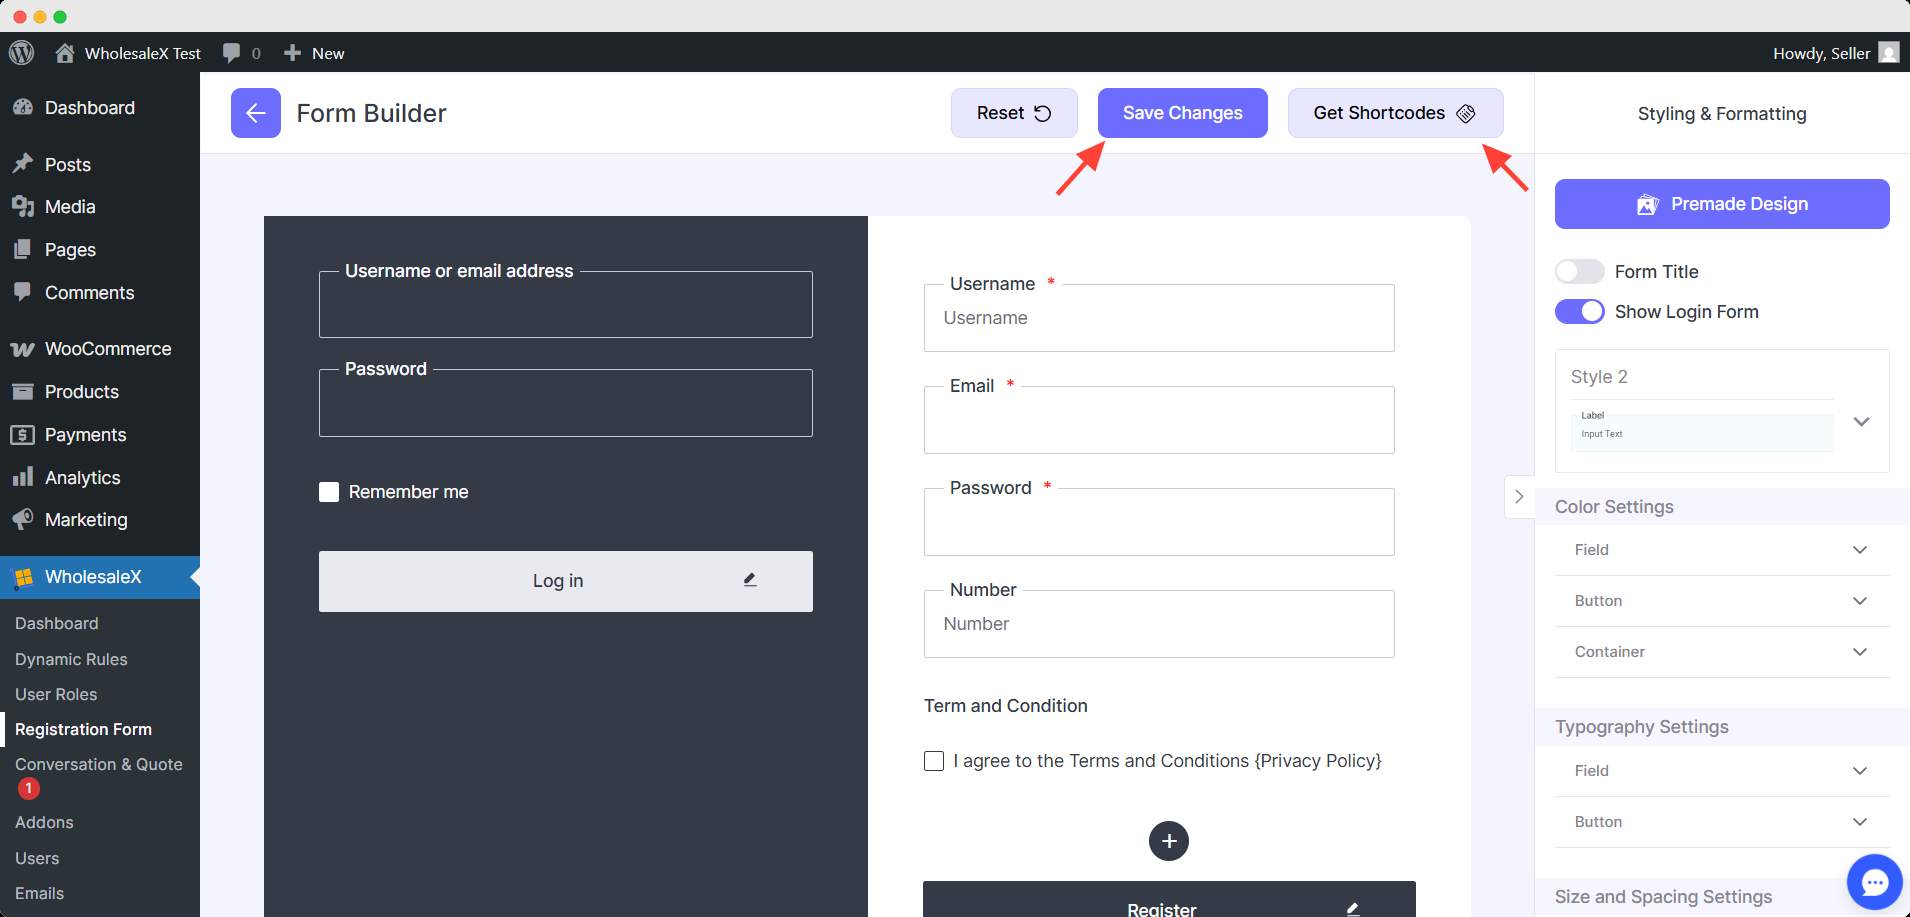
- Save the Form
Finally, when you are satisfied with your form, click the Save Changes button. If you like to have a shortcode of the form, click the get shortcode button.
With WholesaleX, you can easily create a custom WooCommerce registration form that meets your store’s needs. The user-friendly interface and advanced features make it the best choice for customizing WooCommerce registration forms.
How to Add Custom Fields to the Default WooCommerce Registration Form
While the default WooCommerce registration form works fine for basic setups, adding custom fields helps you collect more information from your customers. This will make your store more organized and customer profiles more valuable.
For example, you can include fields like:
- Phone Number for contact or delivery purposes
- Date of Birth for personalized offers
- Business Name or Tax ID for B2B and wholesale customers
With WholesaleX, you can add the custom fields of your existing form to the default WooCommerce registration form.
To do that, click on the gear of your chosen custom field. Scroll down the settings and you will find the WooCommerce option.
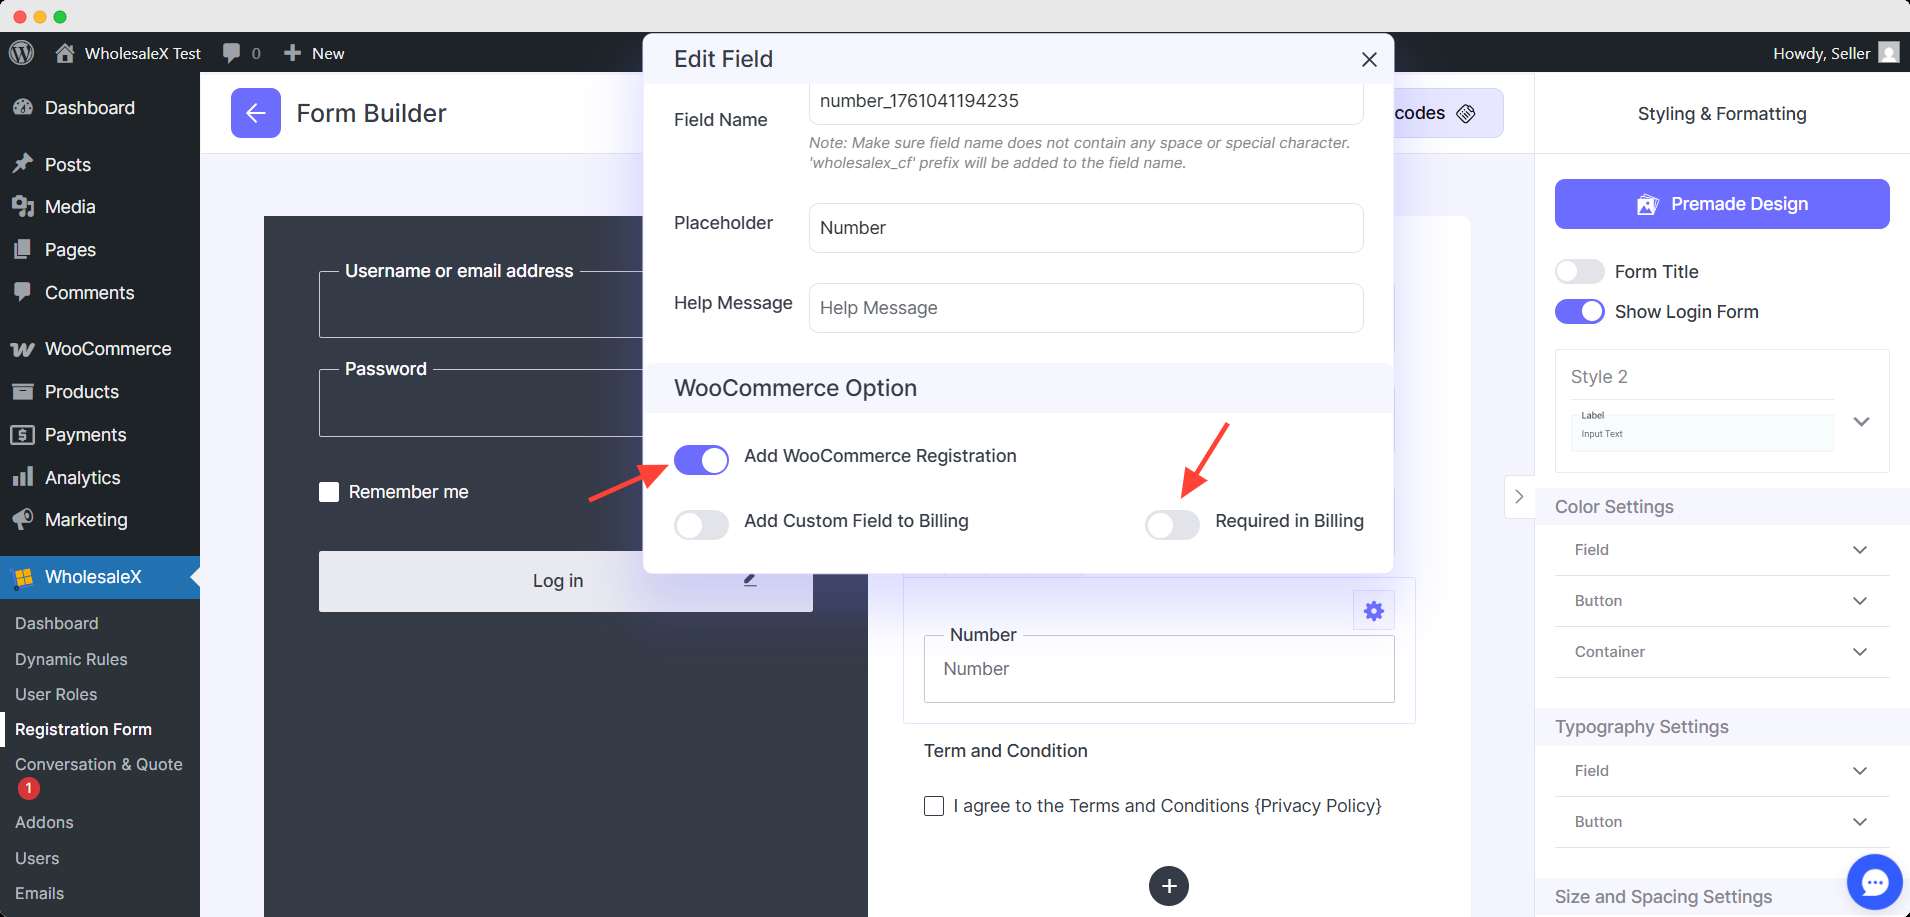
Enable the WooCommerce registration to show the field in the default form.
💡 Pro Tip
To add this field to the checkout billing form, enable the Add Custom Field to Billing option. Also, you can make the field required if you want from these settings.
Can I Create a Separate Login & Registration Page in WooCommerce
Separating the login and registration pages can significantly improve your customer experience, especially if you’re catering to different types of users. For example, wholesale customers often require a different registration flow than retail customers.
When you combine both forms on one page, it can confuse customers and result in a less smooth registration process.
By having distinct login & registration pages, you create a clearer user journey. It also allows you to tailor the registration forms to suit different customer groups, such as B2B (wholesale) or B2C (retail).
For instance, a Wholesale Registration Form could ask for additional details like a VAT number, business address, and tax ID. On the other hand, a Retail Registration Form might only need basic details like name, email, and password.
How to create a Separate Registration form
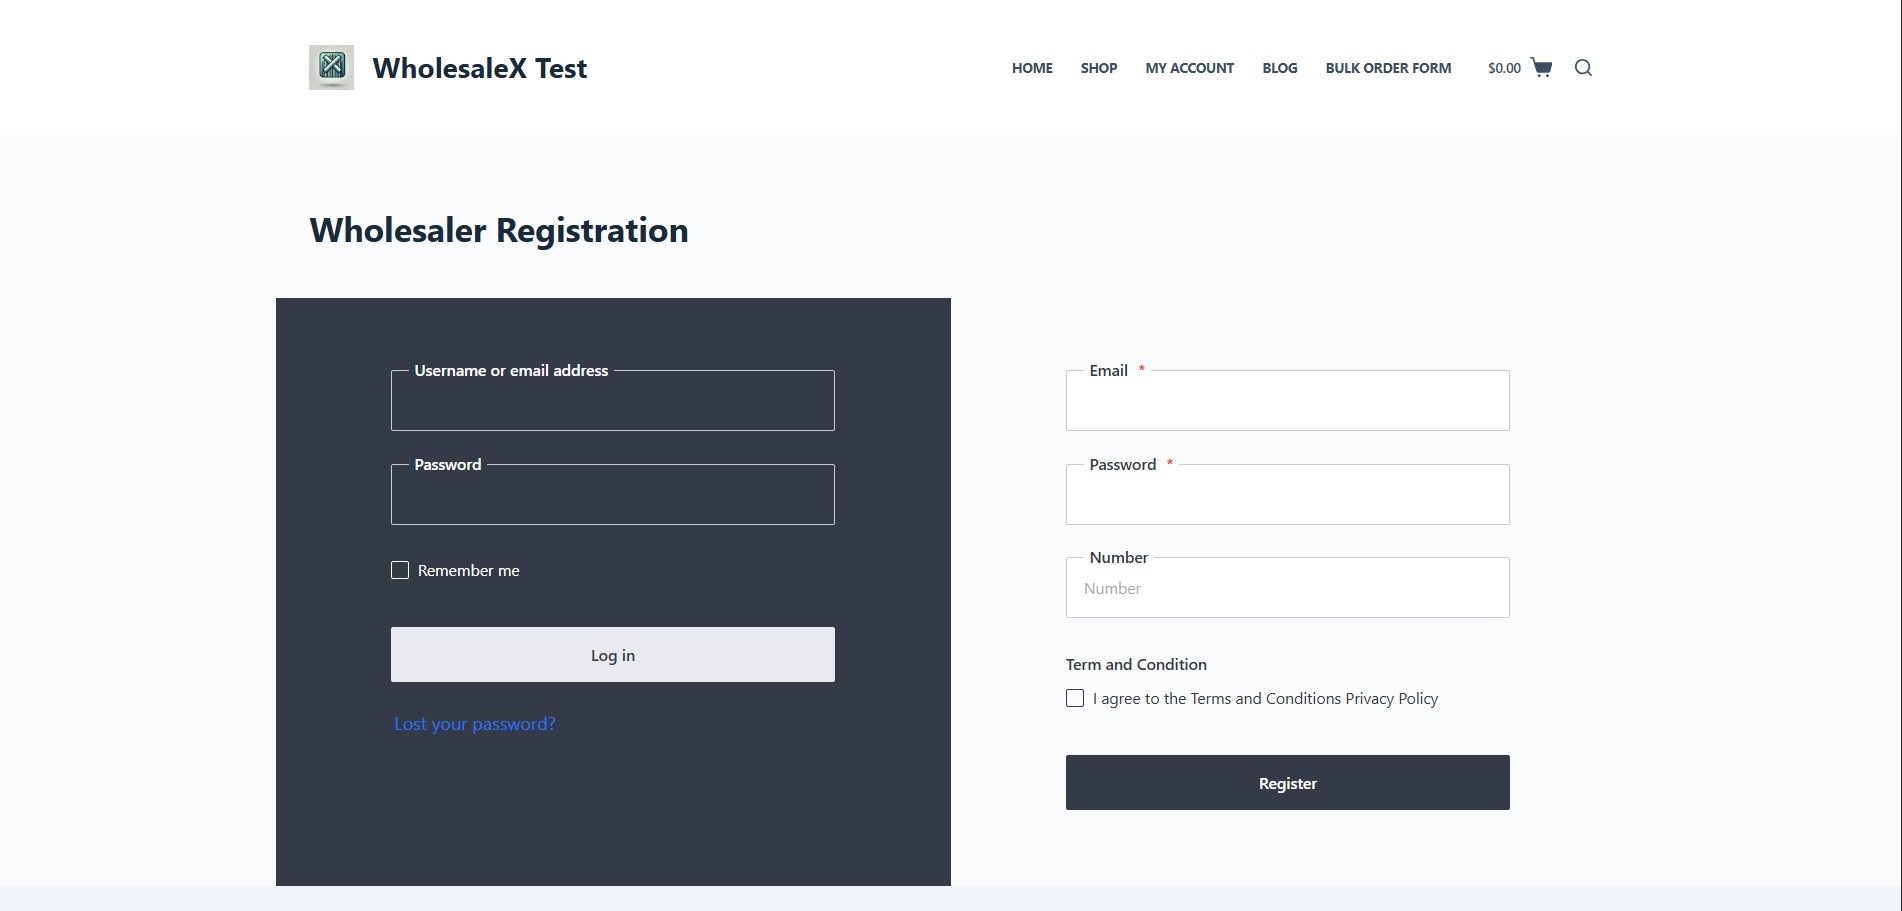
With WholesaleX, you can easily create a separate login & registration form by adding a shortcode.
First, you have to get the desired shortcode from the form builder. Here, you can have a unique shortcode for each user role.
Why would you need this?
If you have multiple wholesale/B2B client tier that offers unique pricing conditions. In that case, you may need to acquire unique information depending on the user role.
So you have to create a separate page for registration for a particular user role and hide unnecessary or confidential fields from them.
To demonstrate, I want to create a registration form only for the Wholesale user role. But the user role doesn’t need to fill in the username field. So I excluded the field for the user role.
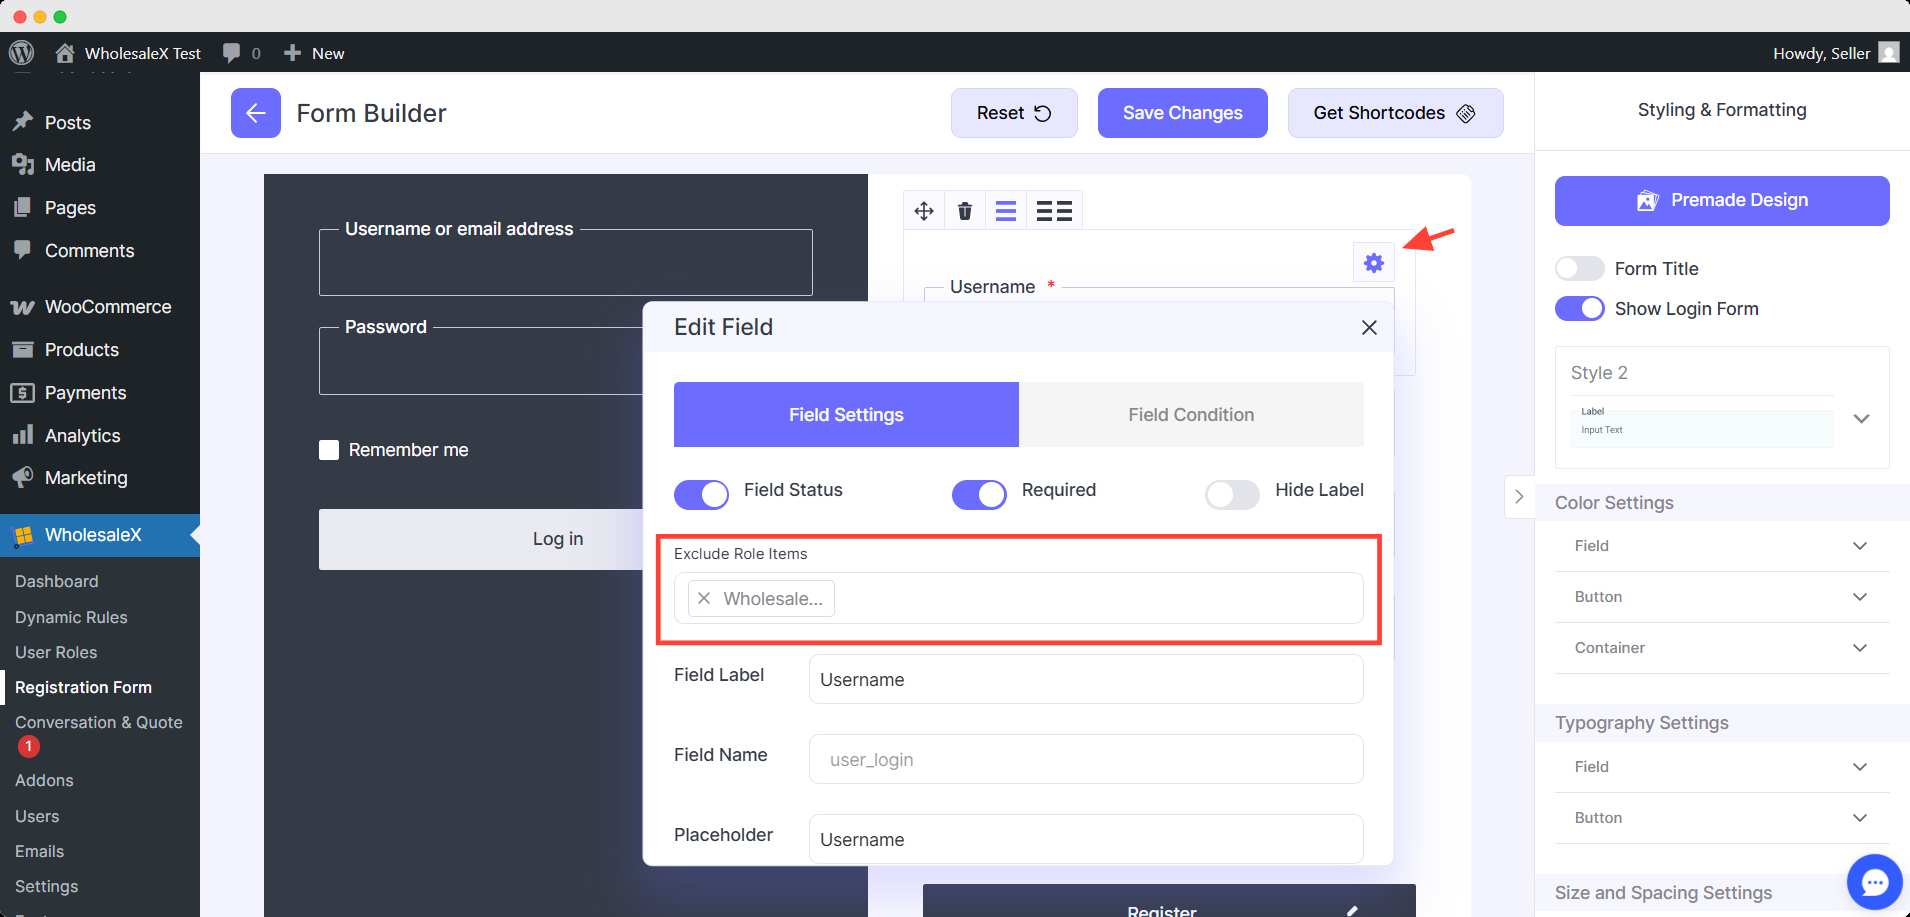
Then, I have to get the shortcode for the wholesaler user role. And paste it on the page.

This way, you can create a separate registration form for wholesalers without showing them unnecessary fields.
How to Add Security to Your WooCommerce Registration Form
When it comes to online registrations, security is non-negotiable.
Your WooCommerce registration form collects sensitive data like emails, phone numbers, and even business information. If left unprotected, it can become a target for bots, spam accounts, or data breaches.
Why Security Is Crucial for Your Form
A secure registration form doesn’t just protect your store; it builds trust with your customers. Here’s why security should be your top priority:
- Protects user data: Keeps customer information safe from unauthorized access.
- Prevents spam/bot registrations: Stops fake accounts that can clutter your database.
- Maintains site performance: Fewer spam entries mean faster, cleaner user management.
- Ensures compliance: Helps align with data protection regulations like GDPR.
In short, a secure registration form keeps your WooCommerce store professional, reliable, and trustworthy.
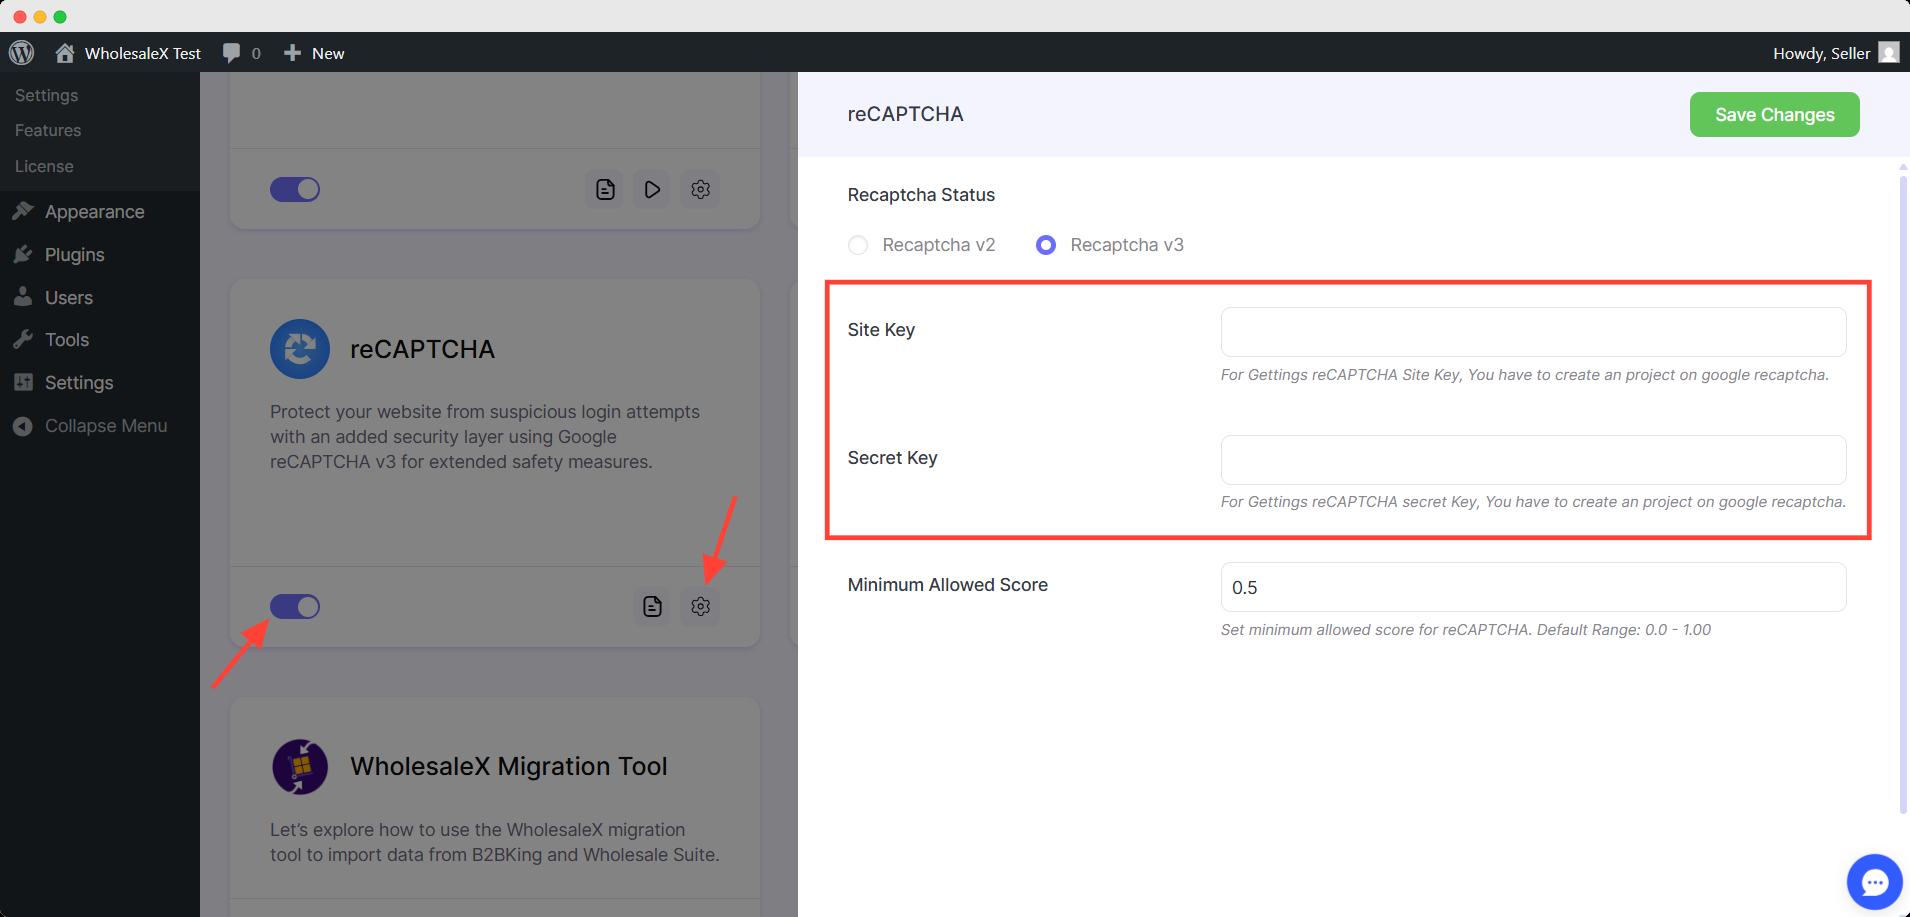
With WholesaleX, you can ensure the security of your store and users’ data with reCaptcha addon.
Just turn on the addon of WholesaleX and click the gear icon. Here, add the site key and secret key that you can generate from the Google reCAPTCHA service.
Troubleshooting WooCommerce Registration Form Issues
Even with everything set up correctly, it’s not uncommon to face small hiccups with your WooCommerce registration form. From missing fields to redirection problems, these issues can disrupt your users’ experience or prevent registrations altogether.
Let’s go over the most common problems and how to fix them.
| Issue | Possible Cause | Quick Fix |
|---|---|---|
| Registration form not showing | Form not enabled in settings, theme, or plugin conflicts | – Go to WooCommerce → Settings → Accounts & Privacy and enable “Allow customers to create an account.” – Switch to a default theme (like Storefront). – Deactivate plugins one by one to find the conflict. |
| Custom fields are not saving | Incorrect PHP hooks or code errors | – Verify your hooks (e.g., woocommerce_created_customer). – Fix syntax or missing field names. – Re-save the form or clear the cache if using a plugin. |
| Redirection is not working after registration | Wrong URL or caching issue | – Check the redirection URL in plugin settings. – Exclude registration pages from cache. – Use the Redirection plugin or the WholesaleX redirect feature. |
| CAPTCHA is not working | Invalid keys or conflicting scripts | – Recheck the site key and secret key. – Ensure your site uses HTTPS. – Disable any other CAPTCHA-related plugin causing conflict. |
FAQ: WooCommerce Registration Form
How do I enable WooCommerce registration?
Go to WooCommerce → Settings → Accounts & Privacy and check the option “Allow customers to create an account on the My Account page.” This will activate the default WooCommerce registration form for new users.
Can I add custom fields to WooCommerce registration?
Yes. You can add extra fields like Phone Number, Business Name, or Tax ID using code snippets or plugins. A plugin such as WholesaleX makes it easier with a drag-and-drop form builder and built-in validation options.
How do I separate login and registration pages in WooCommerce?
You can create two separate pages and add the respective shortcodes. With plugins like WholesaleX, you can generate distinct shortcodes for different registration forms or user roles, such as retail or wholesale users.
How can I secure my WooCommerce registration form?
Implement Google reCAPTCHA or Cloudflare Turnstile to block bots and spam submissions. It’s also a good practice to enforce strong passwords and limit login attempts for additional security.
How do I handle wholesale registrations and approval?
For B2B or wholesale stores, you can use a plugin like WholesaleX to create role-based registration forms. It also allows you to set up manual or automatic approval workflows, ensuring only verified users gain access to wholesale pricing or restricted products.
Conclusion
Customizing your WooCommerce registration form is more than just a design upgrade. It’s a way to enhance user experience, strengthen security, and collect the information your business truly needs.
By adding custom fields, enabling role-based registrations, and implementing security tools like CAPTCHA, you create a registration process that’s both efficient and trustworthy.
Whether you’re running a simple retail shop or a full-scale wholesale store, a tailored registration form helps you onboard customers smoothly and maintain better control over your user base.
For more helpful tips, stay connected with our LinkedIn Newsletter.
2 Comments
Leave a Reply
You must be logged in to post a comment.
Christopher Prince
October 2, 2023Great explanation of the registration form.
What I am interested in:
1. The logic for having one registration form for B2B and B2C users? The drop down to select role is a bit much for B2C users I think, that makes me prefer the WooCommerce form for B2C users. What stops a B2C user initiation the B2B process in the WholesaleX option?
2. I cannot see anywhere how the presentation of the Wholesale X form can be styled so that it inherits the Site them with colours and headers etc?
Omith Hasan
October 3, 2023Thank you for your appreciation.
I understand your logic regarding the dropdown to select roles for B2C users. Here’s a few things I can suggest:
1. You can create 2 separate forms for B2B and B2C users and create separate pages or both sections on the same page.
2. You can use the default WooCommerce registration for B2C users.
3. B2C users can use the store without registration if you enable the B2B+B2C hybrid mode from settings. In that case, users without roles will not get the B2B discounts but still can see and purchase the products at regular prices. (Note: If you enable “Make the store private,” then the store will only be exclusive to registered users.)
I hope that clarifies everything.
We don’t have any styling options for the registration form to keep it simple. It simply inherits the color of the themes you are currently using. But you can submit your suggestions here: https://getwholesalex.com/roadmap/. The developer team always monitors these suggestions and implements them accordingly.
Thank you for using WholesaleX, and if you have any issues, please let us know.