Don’t want to read the full post?
Let your favorite AI assistant summarize it for you 👇
While setting up my WooCommerce store, I stumbled on the shipping setting. It was alone complicated enough but with shipping tax I felt overwhelmed at that time.
I’ve finally cracked the process through extensive research, trial and error, and hands-on application in my store. Looking back, I realize there’s a much more efficient way to set it up.
That’s why I am creating this blog for beginners to easily set up their shipping tax. By following these simple steps anyone can do it:
✅ Enable Taxes in WooCommerce
✅ Set Up Tax Options correctly
✅ Select the Right Tax Class for shipping
✅ Enter Shipping Tax Details accurately
✅ Save and Apply the tax settings
Additionally, I have mentioned some plugins to manage shipping tax in WooCommerce and some common issues to avoid.
So without any further ado 👏
What is The Shipping Tax in WooCommerce?
Shipping tax is an extra charge applied to shipping costs, domestically or internationally, or both. The applicable tax rate may vary based on factors such as product type, shipping destination, or order value.
In WooCommerce shipping taxes are applied to the shipping cost during the checkout page. The seller can confirm whether tax is applicable or not and the tax rate. Customers bear this extra charge.
Why is it important?
Most store owners apply shipping taxes in WooCommerce to stay compliant with regulations. But why do they have to do it? The reasons are as follows:
- Compliance with Tax Laws: Store owners have to comply with government-imposed tax laws. Many countries have imposed taxes on shipping costs. To maintain that regulation they have to impose the shipping tax.
- For International Business: When sellers participate in the international market they also have to follow the regulations of other country’s import tax.
- Transparency for Customers: Customers need to understand where their money goes. Adding tax will improve the authenticity and reliability of the store too.
- Avoiding Legal Risk: Without proper tax documentation, customs, or transportation agencies might not allow the product to move. It will hamper the business financially and legally.
How Do You Set Up Shipping Taxes in WooCommerce? [Step by Step Guide]
You can add shipping tax easily in WooCommerce by following the steps. Let’s dive right in 🚀
Step 1: Enable The Tax Rates
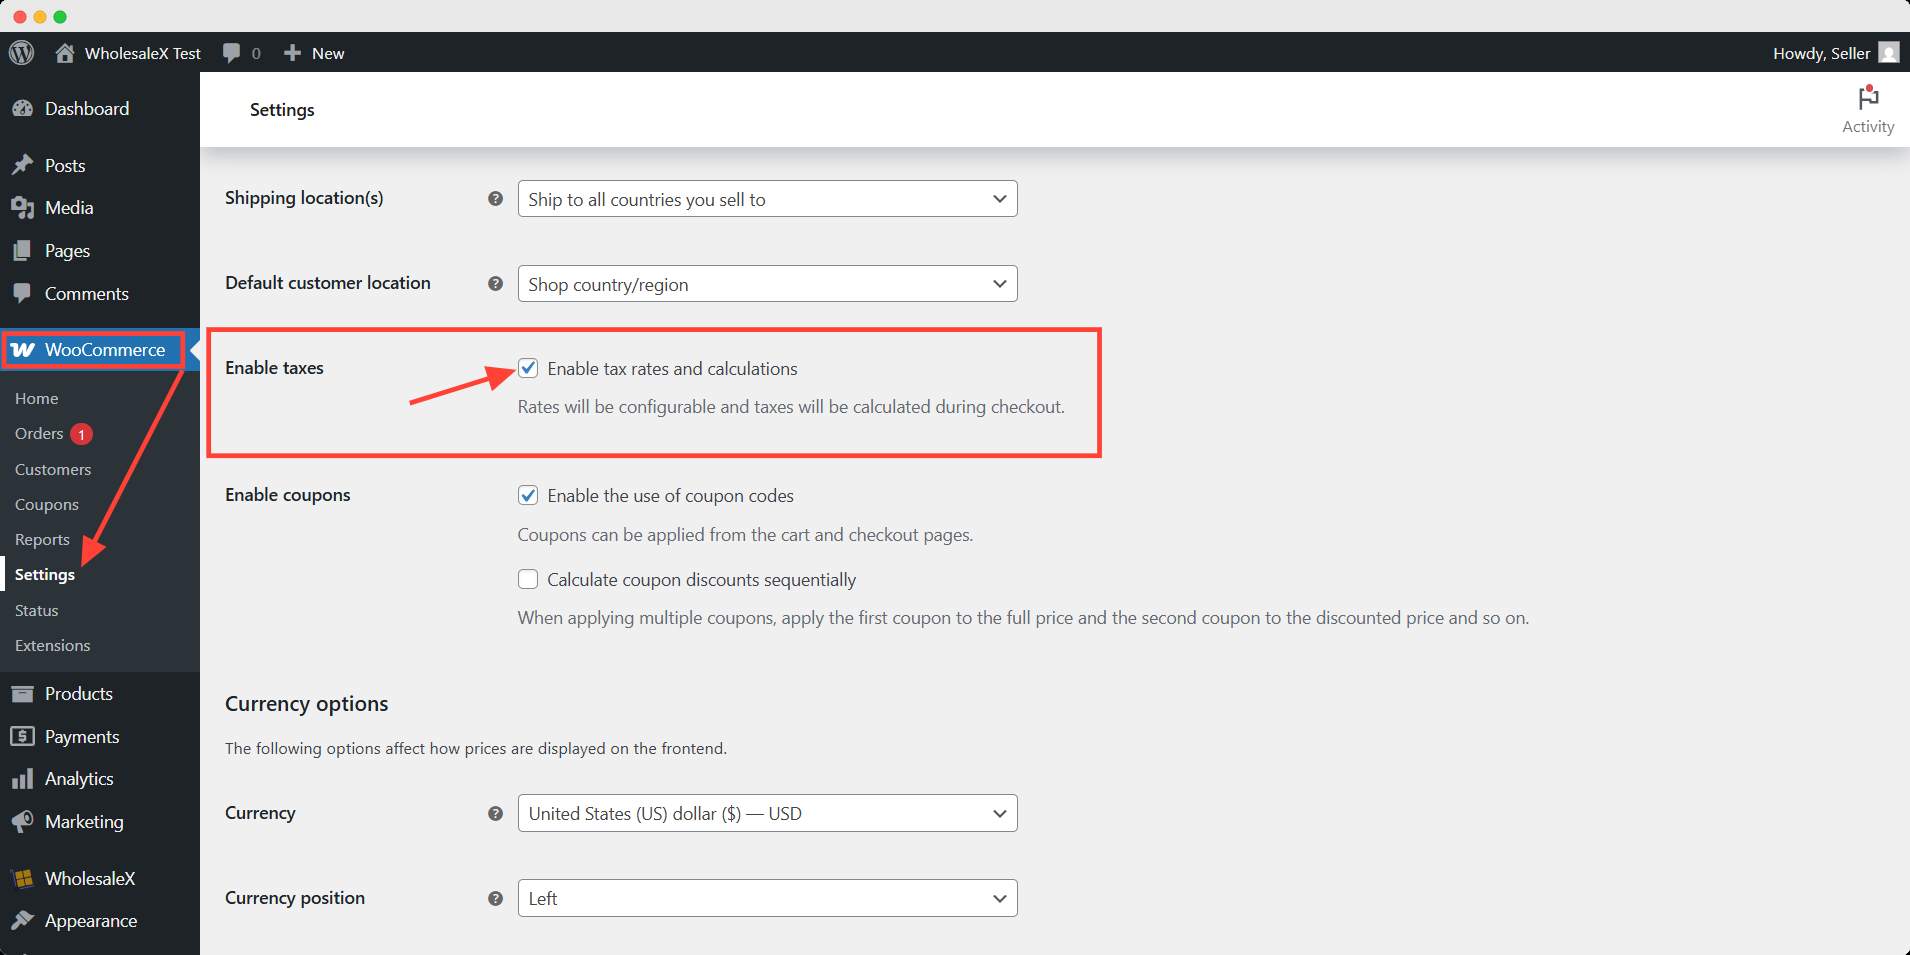
First, you need to enable tax for your store. To do that, go to WooCommerce settings. It will open the general setting.
Scroll down and find the Enable Taxes option. Check the box.
Toggling on the tax in WooCommerce setting will let you apply the tax rates and calculations during checkout.
Step 2: Configure The Tax Options
After enabling, you will find an added tab in the settings named Tax, click it. Here you can find all the basic options related to tax. Let’s go through one by one.
Prices entered with tax
This option decides if the product price is shown including tax or excluding. Select your preferred option.
Calculate tax based on
Here, you can select how you want the tax calculated. It can be based on customers’ shipping address, billing address, or store location.
Shipping tax class
Shipping tax class means which class is applicable for tax calculation. For shipping tax, you have to select the standard rate.
Additional tax classes
By default, there are two additional tax classes are added in WooCommerce. You can add another class if you need to apply this to your products.

Rounding
If you check this box, you will get the rounded tax value at the subtotal level instead of each item line.
Display prices in the shop
You can choose to show the price with or without tax on the shop page.
Display prices during cart and checkout
You can choose to show the price with or without tax on the cart and checkout page.
Price display suffix
You can add any text to display after the price like, included tax or excluding VAT, etc.
Display tax totals
It means you can show a total tax amount or breakdown of each category of tax applied.
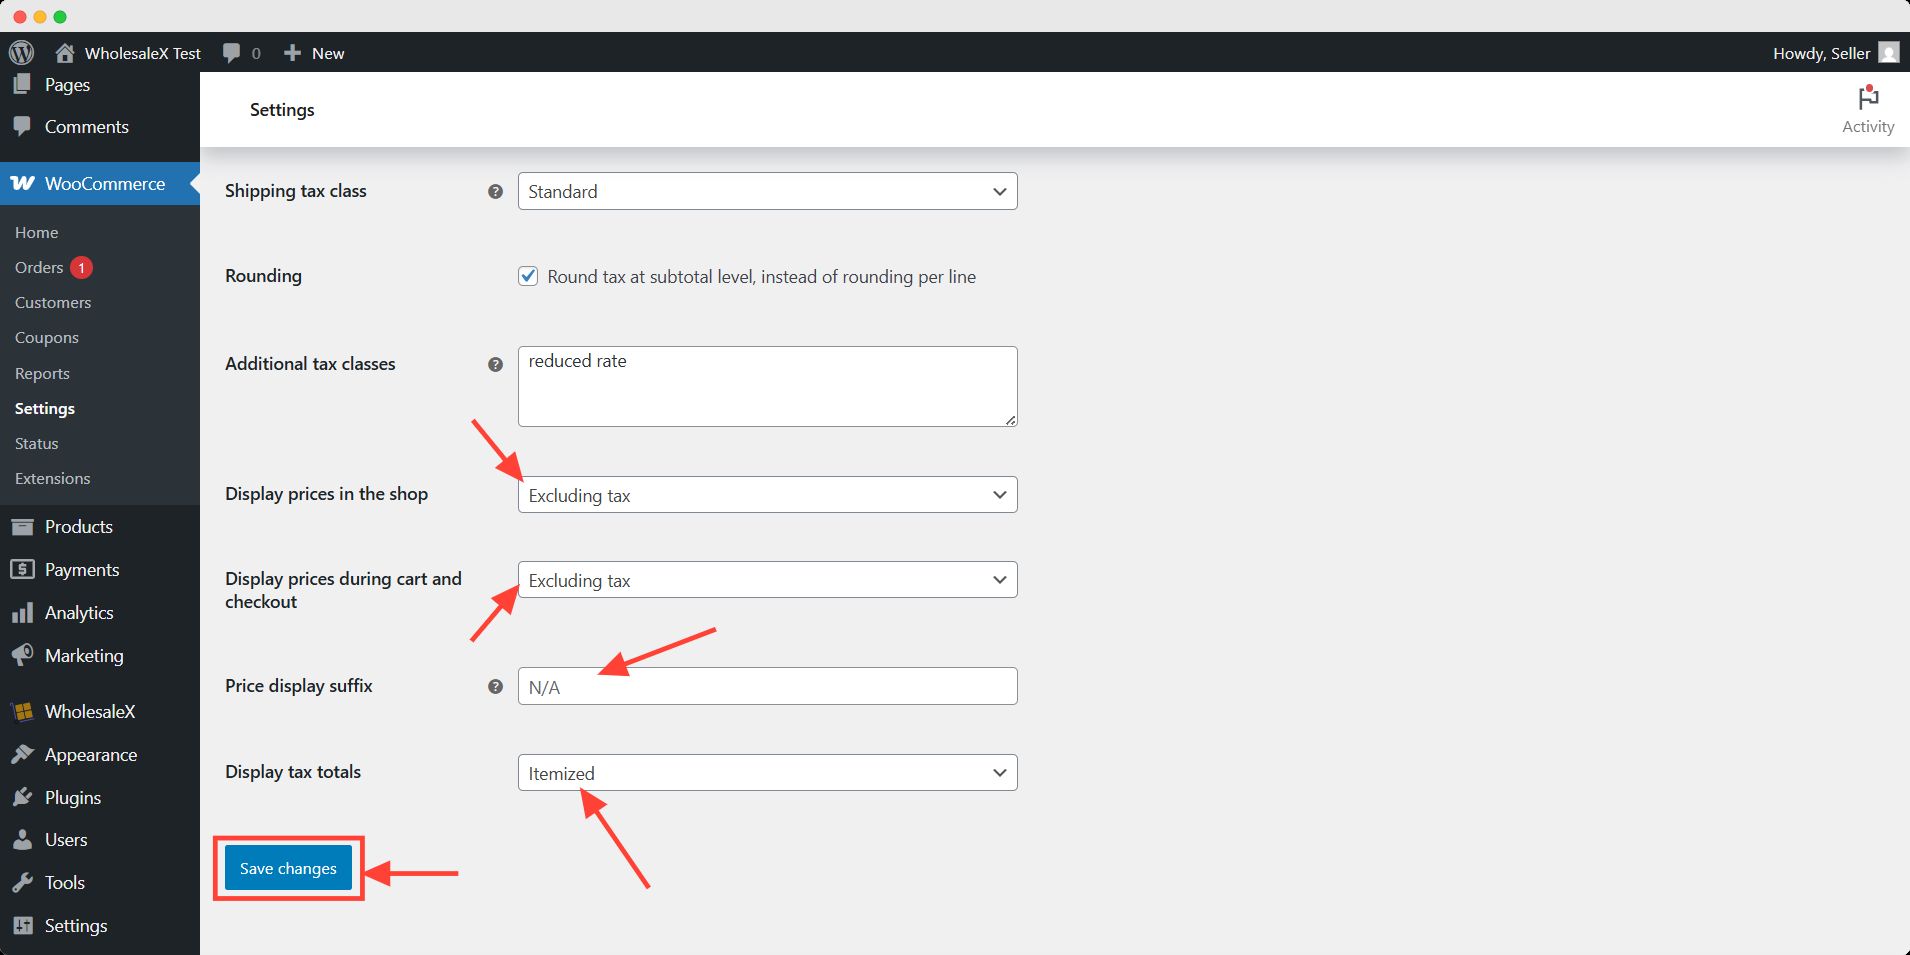
After setting all the options don’t forget to hit the save changes button.
Step 3: Setting Up The Standard Tax
Now head over to the standard tax tab. Here you will see rows of different tax rates applied in your store. You can additionally tax rates or delete existing ones.
To add a shipping tax, enter details such as the country code, state code, tax rate percentage, tax name, etc.

Here I set the shipping tax rate of 8.80% on shipping for the USA as VAT.
💡 Pro Tips
You can import tax rates via a CSV file. This way you don’t have to manually add every tax rate.
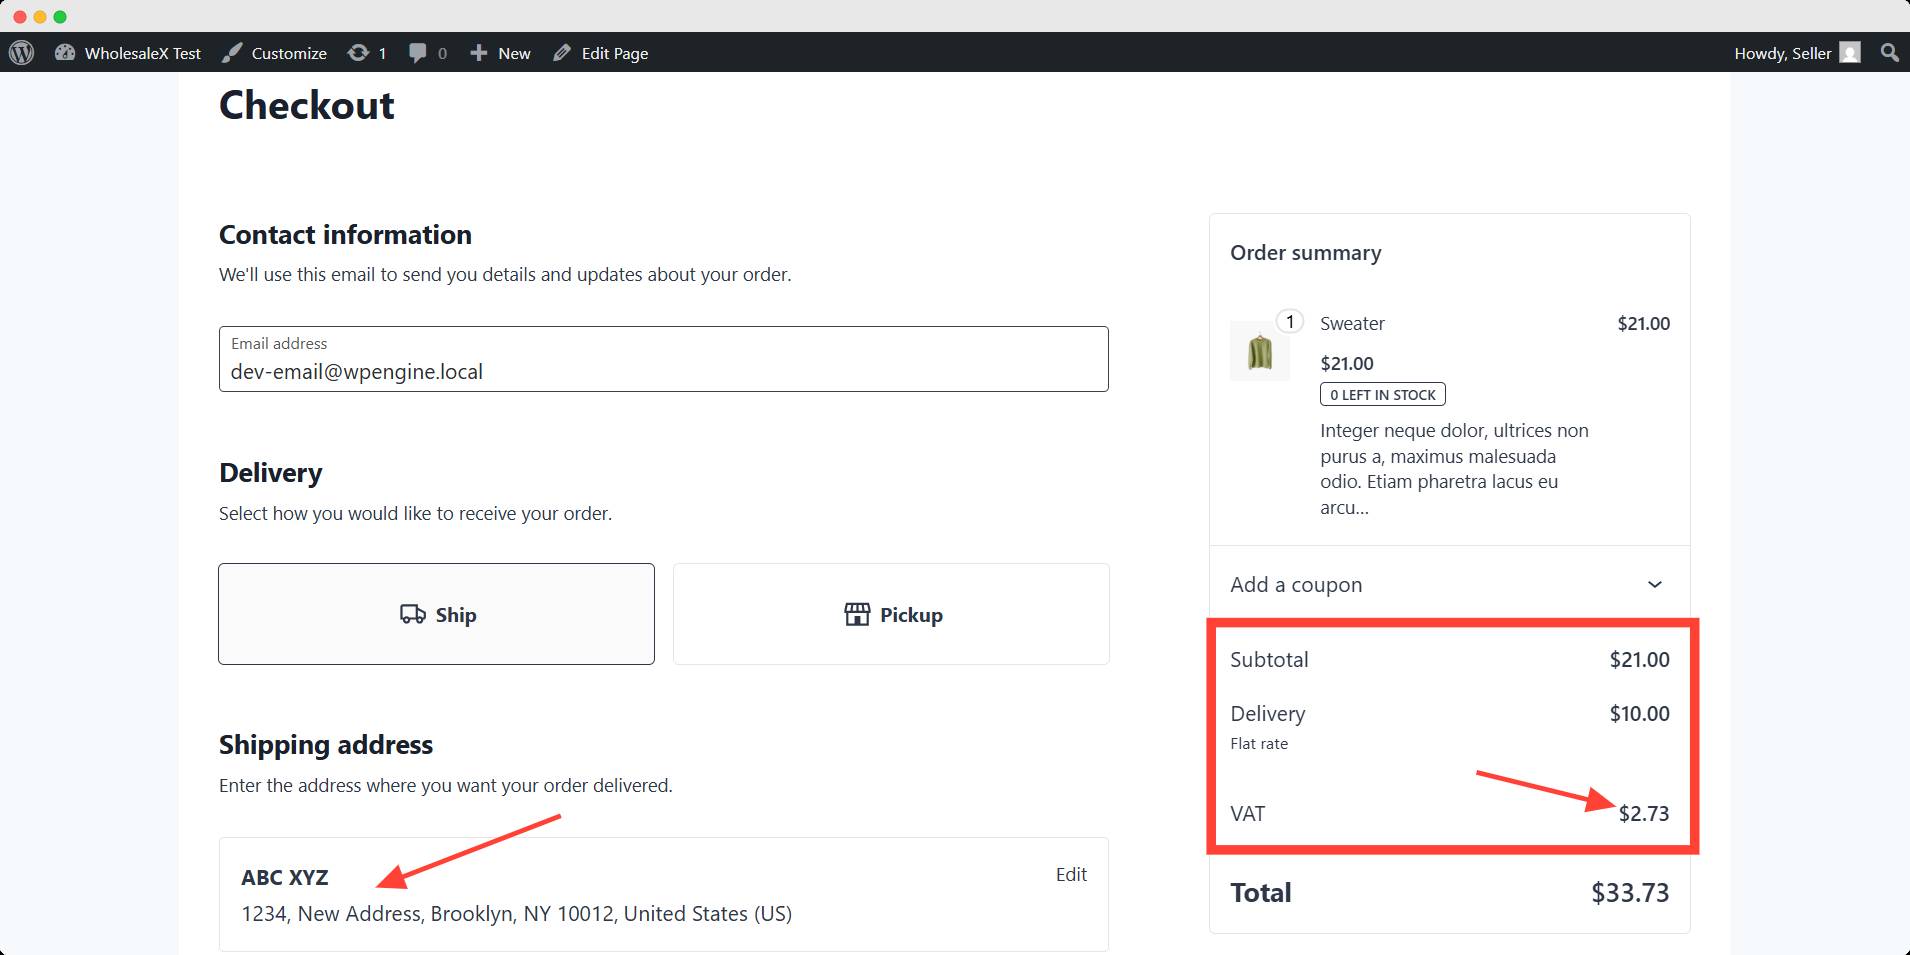
Now your shipping tax is set. You should test if the tax that applies to your given configuration is functioning.
Here, I set the tax rate for the USA as 8.80%. On the checkout page, the VAT has been applied to the shipping.
Want to make shipping effortless in your WooCommerce store?
Use WowShipping — the smarter way to set accurate rates and keep customers moving through checkout.
When shipping feels this easy, more visitors turn into buyers.
How Do You Override Tax Settings for A Specific Product/User
When you apply shipping tax in your WooCommerce store, it will be applicable for all users and products by default. You can’t set any exemption for a specific user/product from WooCommerce.
To do that you will need another plugin — WholesaleX. It is the simplest WooCommerce B2B solution to create B2B and B2B + B2C hybrid stores.
With WholesaleX’s dynamic rule feature, you can override the tax setting from WooCommerce. You can exempt tax for your preferred user role and product. Let’s see how to override the existing tax setting.
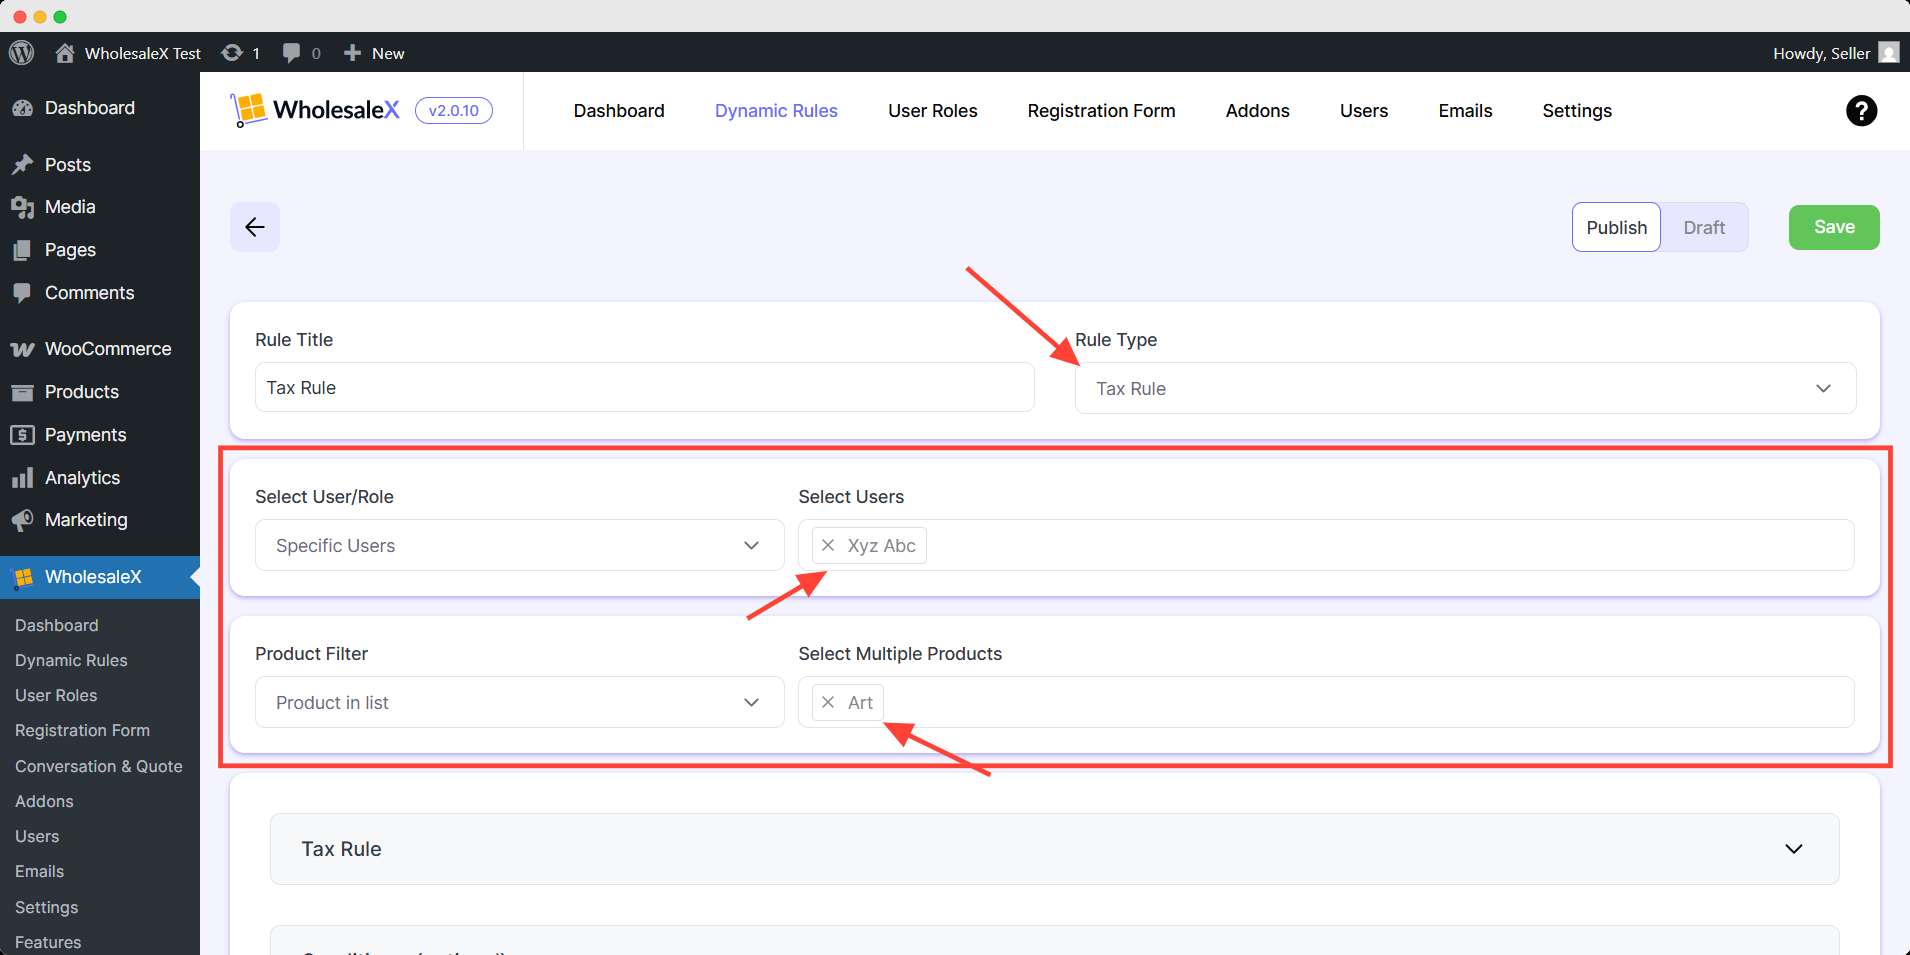
Step 1: Create a New Tax Rule
First, you have to create a new dynamic rule. In this new rule, you have to select the rule type — Tax Rule.
Then, in the user and product filter field, select your preferred user/role and product.
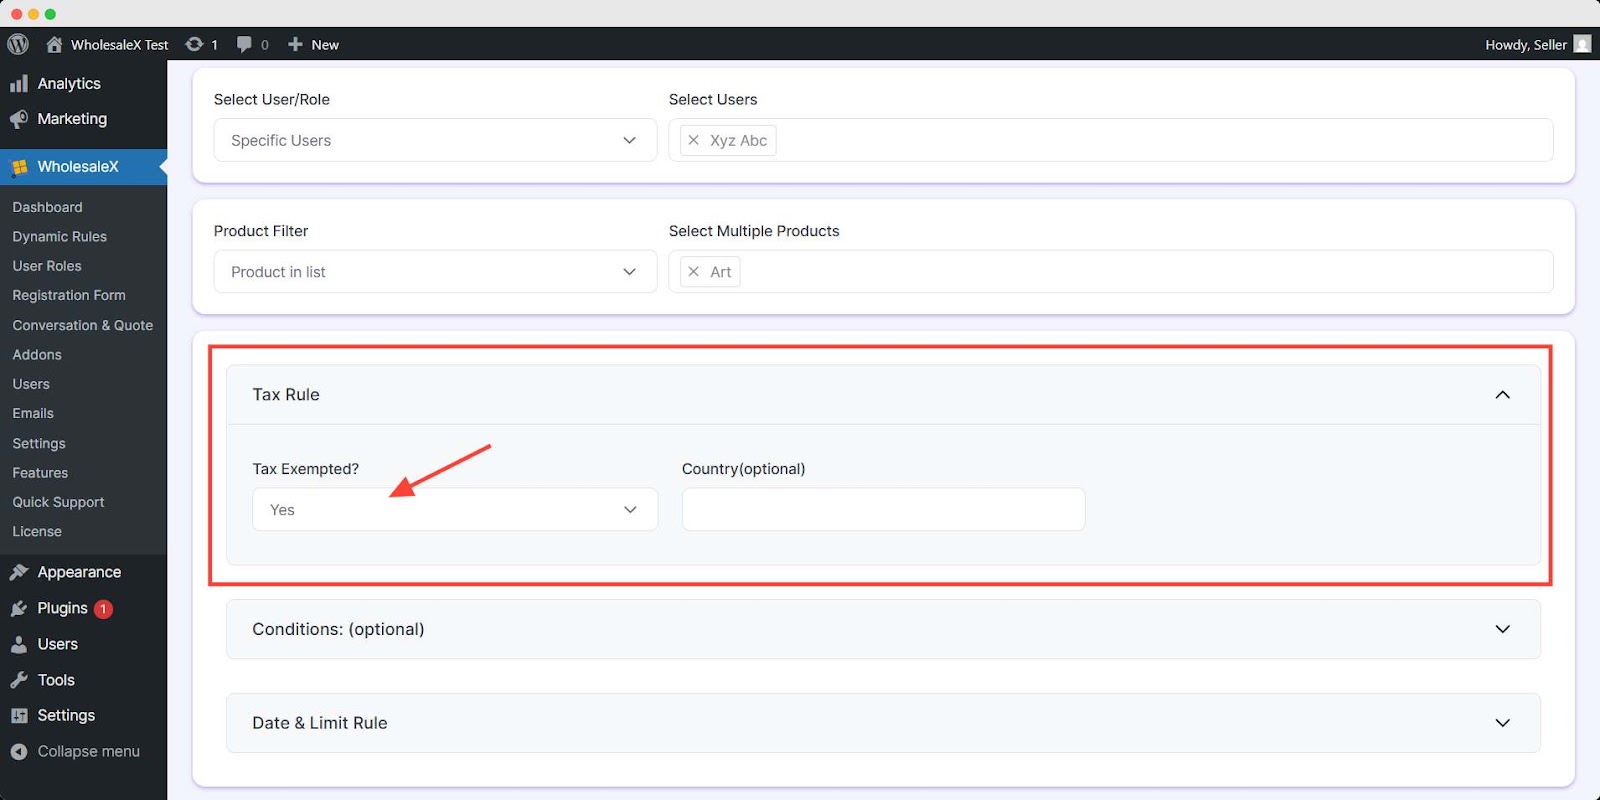
Step 2: Configure the Tax Rule
Now expand the tax rule field. Here you will find an option for tax exemption. Choose yes from the options.
💡 Pro Tips
If you select No, you can manually choose which tax class to apply for your store. This will override the default WooCommerce tax settings and use only the one you selected.
After choosing yes you can set an optional setting for selecting a country. It will make the tax-exempt only for the given countries.
After finishing the tax rule configuration toggle the publish button on and hit save. It will activate this dynamic rule for your store.
This way you can exempt the tax for your preferred user/product by overriding the default WooCommerce setting.
👉 Real-life example: You can add disability VAT exemption in the UK by using WholesaleX easily.
Popular Plugins for Shipping Tax in WooCommerce
If you require more complex and multiple tax rates for your store, you should use an additional plugin. These plugins will help you control and automate your tax-related calculations efficiently.
There are several plugins in the WordPress repository that will be helpful for you. I will discuss these plugins briefly for your convenience.
WooCommerce Tax
- Free, official WooCommerce solution
- Accurate for US/EU
- Limited global tax support
- Not suited for complex stores
TaxJar
- Real-time tax rates
- Supports automated filing
- Paid TaxJar account needed
- US-focused
Avalara AvaTax
- Global tax compliance
- Powerful automation
- Premium pricing
- Too complex for small stores
Quaderno
- MOSS-compliant
- VAT/GST-ready
- Requires paid plan
- Not ideal for US-only businesses
Tax Exempt
- Allows manual & automatic exemptions
- Great for B2B stores
- No tax calculation feature
- Focused only on exemptions
Common Problems with Shipping Taxes in WooCommerce
Following these steps will set your shipping tax effortlessly but sometimes there might be some issues for first-timers. Let’s see what the common problems are and how to solve them.
| Issues | Probable Cause | Solution |
|---|---|---|
| Shipping Tax Not Calculating for Certain Locations | Incorrect tax rate settings or missing location-based tax rules. | Check your tax rate settings under WooCommerce → Settings → Tax → Standard Rates. Ensure you’ve added the correct country and state codes. |
| Shipping Tax is Not Showing Separately in Checkout | Display settings might be configured incorrectly. | Under WooCommerce → Settings → Tax, check the Display tax totals setting. Select Itemized to show separate tax amounts. |
| Tax Calculation is Incorrect for Shipping | The tax calculation method is incorrect. | Go to WooCommerce → Settings → Tax and review the Calculate tax based on option. Try switching between billing address, shipping address, or store base address. |
| Tax Not Being Charged on International Orders | Tax rates for international locations are missing. | Add country-specific tax rates under WooCommerce → Settings → Tax → Standard Rates to ensure that taxes apply to international customers. |
Related Blogs That You Will Find Helpful
FAQs
Can I offer free shipping and still charge taxes on it in WooCommerce?
Yes, you can charge taxes with free shipping only if your local tax laws allow it. For instance, California law requires sales tax on shipping charges when the item itself is taxable.
Can I set up different shipping taxes for different product categories in WooCommerce?
Yes, you can assign different tax classes to specific products and set unique rates for each. Like, if anyone sells tax-exempt and taxable products together, they are to be assigned to a different class.
How do I test if my shipping taxes are working correctly in WooCommerce?
You should test if your shipping taxes are functioning. Simply add a product to the cart, go to checkout, and check if the tax applies correctly. You can try different locations for accuracy too.
Does WooCommerce automatically calculate shipping taxes?
No, you need to manually set tax rates or use an additional plugin for automation.
Why can’t I find any tax-related tab in WooCommerce shipping?
You have to enable the tax option in the general settings of WooCommerce. The Tax tab won’t be visible unless you enable it.
How do I handle taxes in WooCommerce?
To handle taxes in WooCommerce, go to WooCommerce → Settings → Tax. From there, you can enable taxes, set tax calculation methods, add standard or custom tax rates, and control how taxes are displayed at checkout. You can also define tax classes like standard, reduced rate, or zero rate.
Can WooCommerce calculate tax automatically?
Yes, WooCommerce can calculate taxes automatically if you enable geolocation-based tax settings or integrate with a service like WooCommerce Tax (powered by Jetpack). This allows real-time tax calculation based on customer location without manual setup for each region.
How to switch between inclusive/exclusive tax display?
You can control this under WooCommerce → Settings → Tax → Tax Options. Use the Prices entered with tax setting to choose whether product prices include or exclude tax. Then, decide how prices and taxes are displayed on the shop, cart, and checkout pages using the display settings.
Conclusion
Setting up shipping tax in WooCommerce might seem tricky at first. But following the steps makes it a smooth process.
You can also use plugins to simplify tax management and avoid common mistakes.
Whether you’re selling locally or internationally, getting your shipping tax settings right helps you stay legally compliant and maintain customer trust.
With these steps, setting up WooCommerce shipping taxes is no longer a hassle. Take action now and ensure your store is compliant and ready to scale! 🚀
For more helpful tips, stay connected with our LinkedIn Newsletter.