While researching WooCommerce shipping, I stumbled on the shipping zones setup in the early phase. Then I felt curious about how it works and why we should configure it properly.
From the research, I found all about WooCommerce shipping zones and learned how to set them up. By following these steps, you can do it too:
✅ Install and activate the WooCommerce plugin
✅ Access the shipping settings
✅ Creating a new shipping zone
✅ Set the name and regions to the shipping zone
✅ Add a shipping method to fulfill the process
I have also found out about other plugins to control shipping zones more extensively and learnt to avoid some common mistakes. Read this blog and you will get a clearer idea of shipping zones than ever before. 👇
What are Shipping Zones in WooCommerce?
Shipping zones in WooCommerce are groups of regions (countries, states, or postal codes) where specific shipping methods apply.
For example, you can add a local pickup method only for your store’s surrounding area by adding a zip code.
Why Proper WooCommerce Shipping Zones Matter?
Setting up shipping zones properly in WooCommerce is vital for running a successful online store. Here’s why:
- Accurate Shipping Costs: It ensures that your customers are charged correctly based on their location.
- Tailored Shipping Options: Set specific shipping methods for different locations, such as free shipping for the home country or a flat rate for international customers.
- Improved Customer Experience: You can create a smoother checkout process by giving them relevant shipping options. It will reduce cart abandonment eventually.
- Better Shipping Strategy: You can set different rates for different zones, optimize shipping costs, and increase your profit margin in the process.
Now that you know the importance of the shipping zone better, you have to learn the setting process. Let’s do that ⬇️
How to Set Up Shipping Zones in WooCommerce [Step-By-Step Guide]
Follow this step-by-step guide to set up your WooCommerce shipping zones with ease.
Step 1: Go to the WooCommerce shipping settings
To begin, you need to access the WordPress dashboard of your store and then click the WooCommerce option on the tab. Then click the settings option. It will take you to the detailed section for all types of settings.

Go to the shipping tab on the settings option. From here, you can create a shipping zone.
Step 2: Add a new shipping zone
In the shipping option, you will see a list of added zones in your store. Click the add zone button to create a new shipping zone.
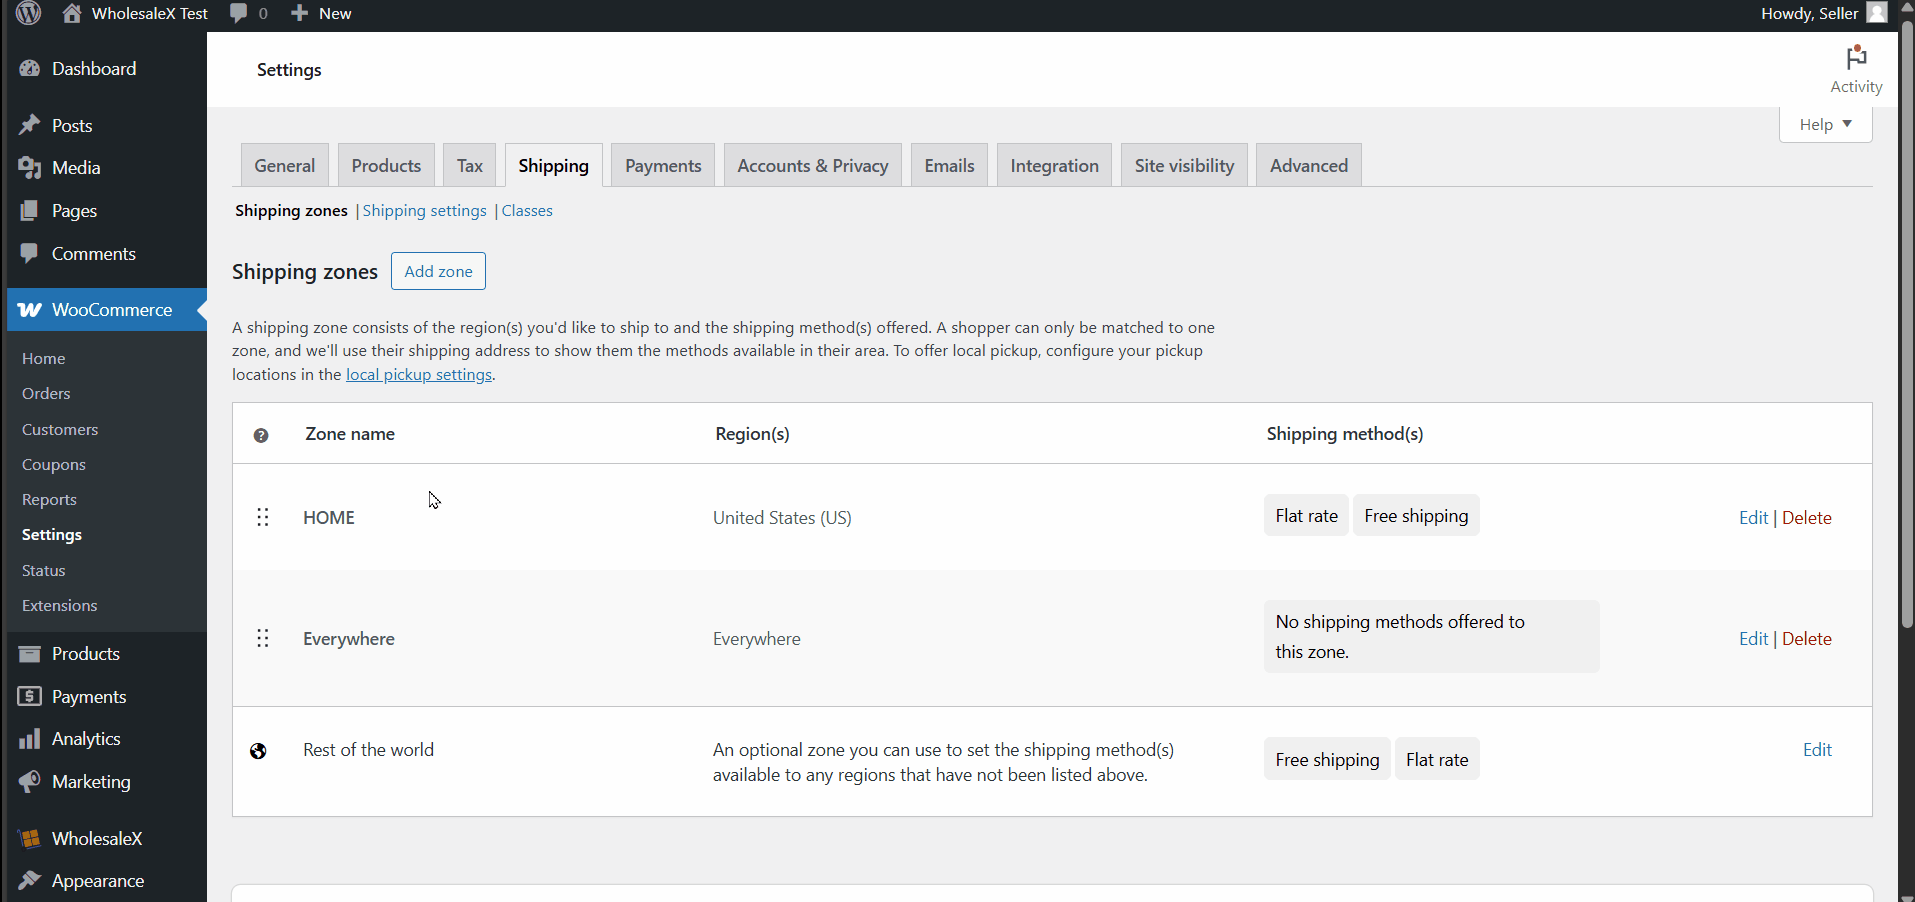
It will take you to an interface where you have to configure all the necessary details.
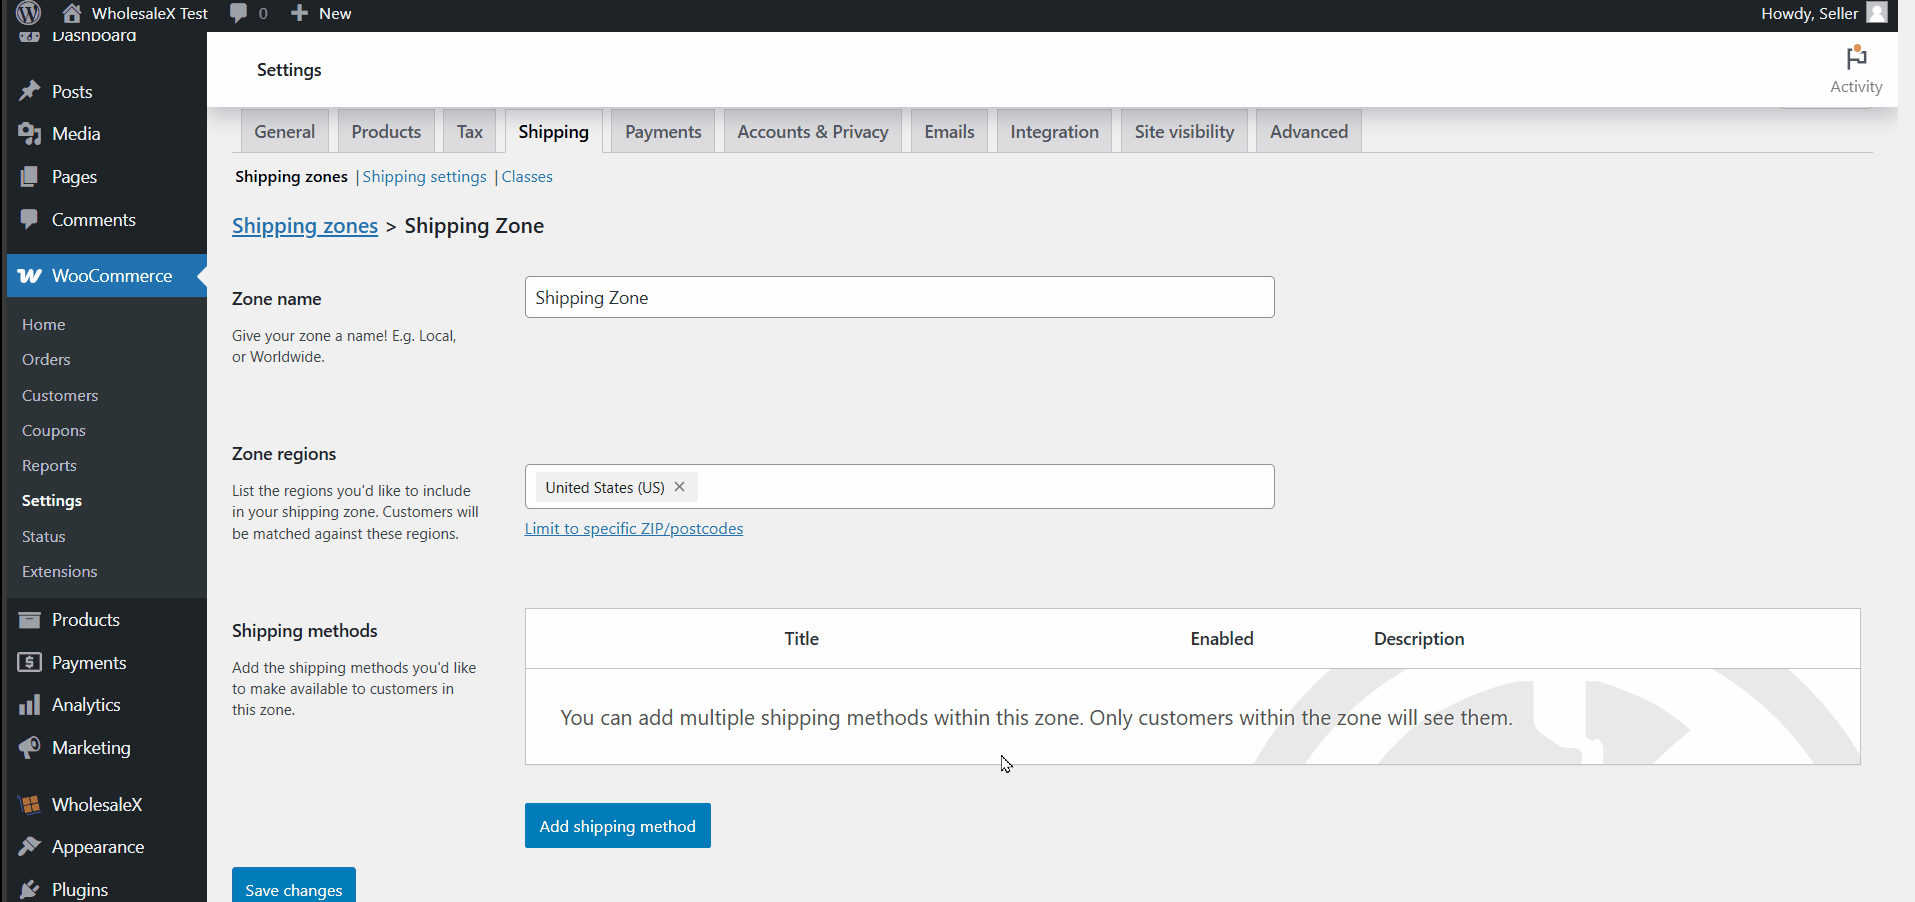
Step 3: Add shipping zone details
Now you should set a name for this zone. The name will indicate which setting and facility a customer is getting.
You also have to add zone regions. It will specify which geographical area this setting will apply to. You can select all countries, different continents, countries, or even cities within a country. Choose your preferred region.
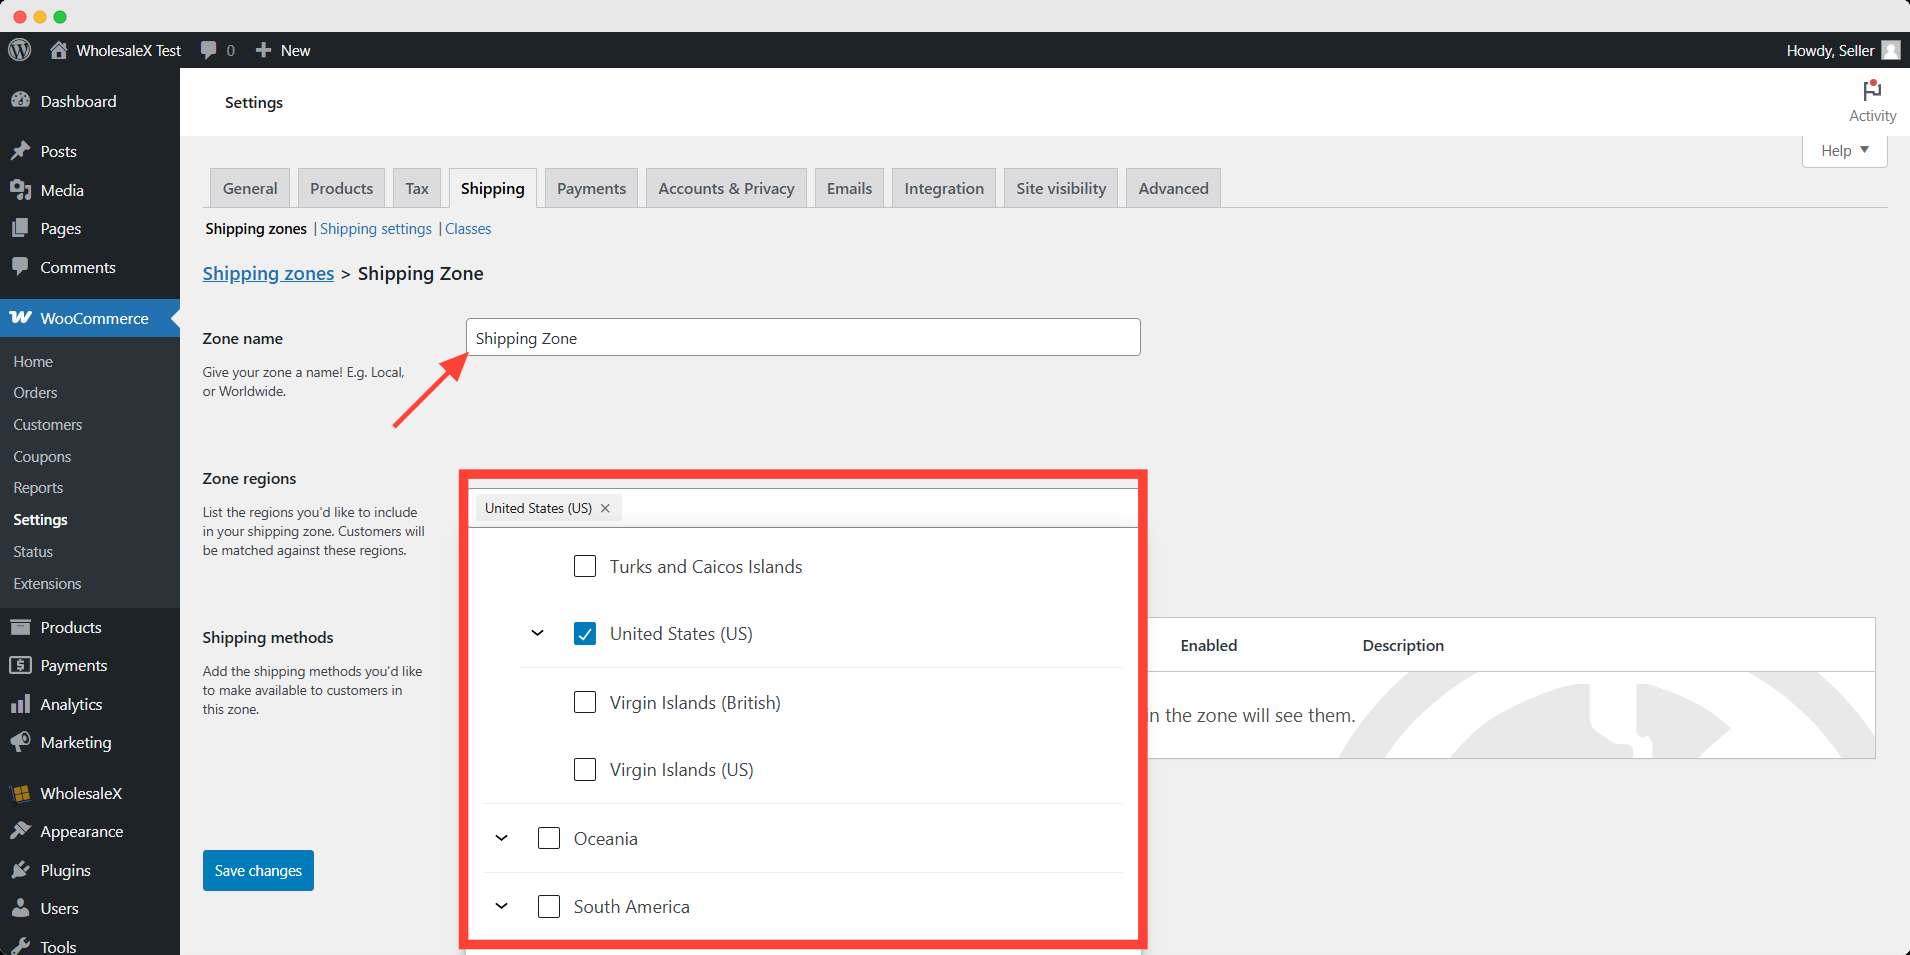
After this, you have to select a shipping method for the region(s) you added.
💡 Pro Tips
You can directly search for your country or cities in the region option. The matching items will break down from continent ➡️ country ➡️ cities.
Once you’ve named your shipping zone and selected the country or region it covers, WooCommerce gives you the option to limit the zone to specific ZIP/postcodes.
Want to make shipping effortless in your WooCommerce store?
Use WowShipping — the smarter way to set accurate rates and keep customers moving through checkout.
When shipping feels this easy, more visitors turn into buyers.
This feature is especially useful when you want to apply a shipping method only to customers in certain areas, like specific cities, districts, or delivery coverage zones within a state.
Here’s how it works:
- You can enter:
- Individual ZIP/postcodes, like 90210
- A range, such as 90001…90020
- Wildcards, like 90* to match any ZIP starting with “90”
- Separate each entry with a comma or place one code per line for better readability
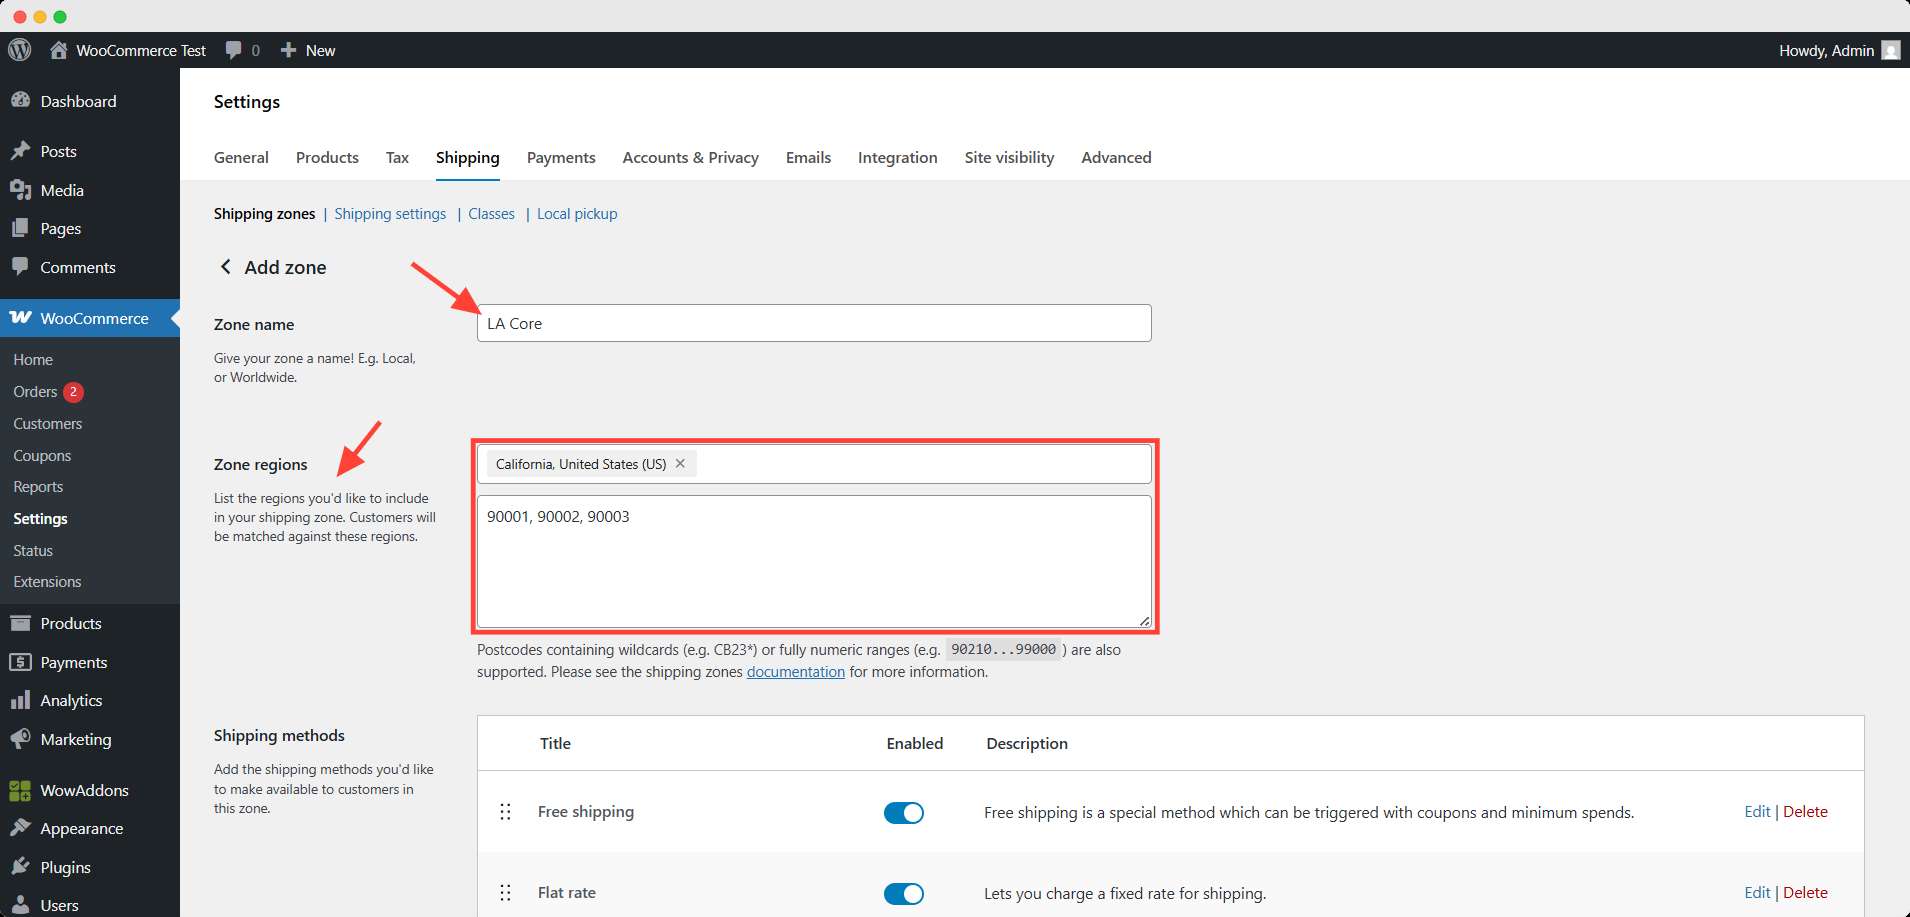
This way, only customers whose shipping address matches those ZIPs will see the local delivery option at checkout.
💡 Pro Tip
When WooCommerce checks for a matching shipping zone, it goes in order from top to bottom. So, if you’re using both broad and specific zones, place ZIP-limited zones above the general ones to make sure they apply correctly.
This helps you create precise shipping rules for local areas without affecting your broader regional or national settings.
Step 4: Add suitable shipping methods
Now, head over to the shipping method; here, you can add the method you would like to offer for selected regions. Click the Add shipping method button. It will show you three default methods in woocommerce.
Free shipping will charge you no rate for deliveries in the selected region(s). You can offer free shipping based on different conditions.
Flat rate will charge you a fixed rate for deliveries. You can set up a flat rate for all products or charge different rates for different classes.
Local pickup will let your customer pick up the delivery for them in the given region(s). Usually, it’s near the store’s address.
After adding/changing the method, you have to hit the save changes button to make it live for your store.
TL;DR
To set up shipping zones in WooCommerce, go to WooCommerce → Settings → Shipping, and define zones by country, state, or ZIP code. Then assign specific shipping methods—like flat rate or free shipping—per zone.
How can You Restrict Any User to a Specific Shipping Zone?
You can restrict any user to your preferred shipping zone, but there’s no built-in option to do that in WooCommerce. You will need a plugin to customize a user-based shipping zone.
There are several plugins that allow us to do that, but for this instance, I will use WholesaleX. It’s a powerful tool for both B2B and B2C store owners to control dynamically.
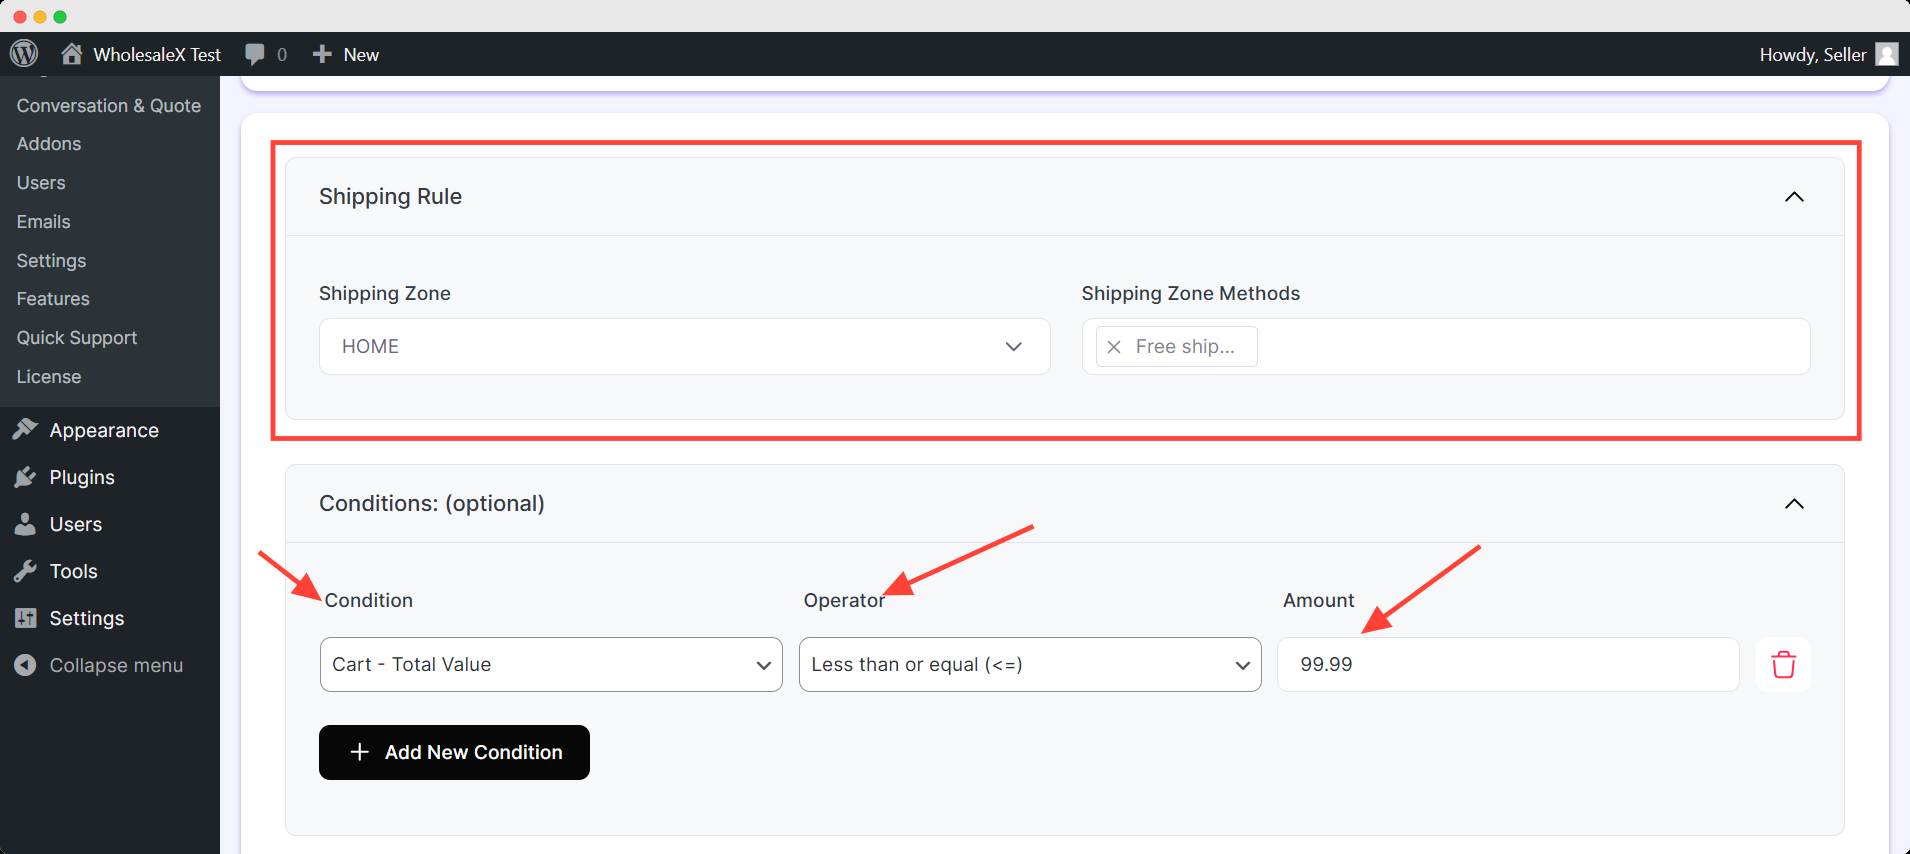
With WholesaleX, you can add a dynamic rule that can give you control over which users from the shipping zone can get a specific method.
In the Shipping Rule, you can restrict a shipping zone and a method from it to a selected user. You have to configure the shipping regarding the products of your stores, too.
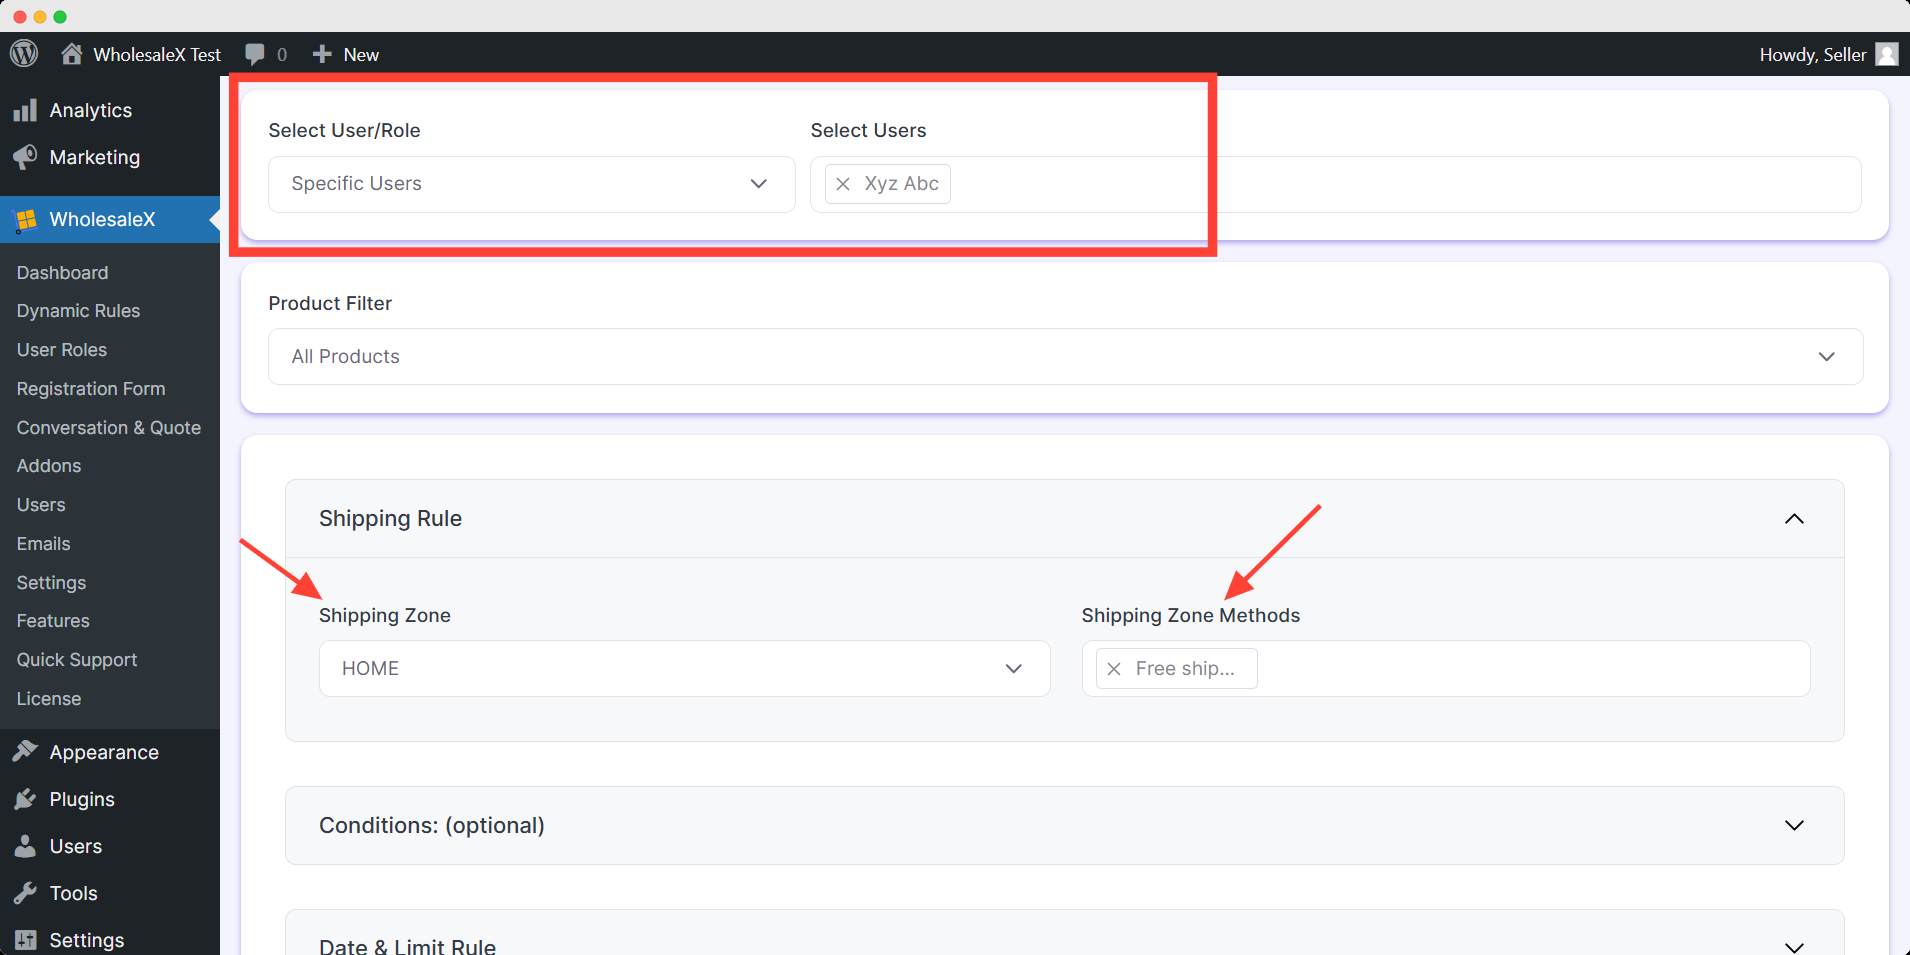
Then you can add additional conditions to nudge that user to achieve a milestone to activate the given rule.
You can redesign or delete the rule anytime you want.
Best Plugins for WooCommerce Shipping Zones
Besides the WooCommerce basic settings, you can get enhanced control over shipping zones with additional plugins.
There are several plugins in the WordPress repository for you to edit zones extensively. I will provide you with some popular plugins and their best use cases.
| Plugin Name | Core Feature | Best For |
|---|---|---|
| Table Rate Shipping for WooCommerce | ✅ Create multiple shipping rates for different zones. ✅ Calculate rates based on weight, price, and quantity. ✅ Flexible shipping options for various conditions. | Stores with complex shipping needs require advanced rate calculations. |
| Flexible Shipping | ✅ Set shipping rates based on weight, cart total, and quantity. ✅ Supports free shipping and local pickup options. ✅ Real-time shipping calculations for various zones. | Small to medium-sized stores looking for quick & easy customization. |
| Shipping Zones by Drawing for WooCommerce | ✅ Define shipping zones based on a map drawing. ✅ Draw custom zones on a map for precise choice. ✅ Ideal for stores with specific delivery area needs. | Stores that require custom delivery areas are defined by map boundaries. |
| Ade Custom Shipping | ✅ Create custom shipping methods tailored to specific needs. ✅ Supports flat rate, weight-based, and other custom shipping options. | Stores need custom shipping methods and options outside the default settings. |
You can get a bit more control over shipping from these plugins. You can choose any plugin from the table above based on your preference.
WooCommerce Shipping Zones Common Mistakes
Here are some common mistakes store owners might make. You can rectify it or avoid it by learning from them.
- Overlapping shipping zones
If you have multiple shipping zones with similar conditions, they may overlap. It might confuse WooCommerce when calculating rates.
Solution: Avoid overlapping zones by ensuring each zone is distinct and doesn’t conflict with another. Double-check your zones before saving the shipping settings.
- Incorrect shipping rates
Shipping zones should be aligned with tax rates and additional fees, but this is often overlooked.
Solution: Check that shipping zones are set up according to your tax settings and other additional fees you prefer to apply based on regions.
- Forgetting to assign a shipping method to a zone
You may forget to assign shipping methods to their selected zones. This means customers in those zones won’t see any available shipping options.
Solution: Always add the necessary shipping methods to each zone.
- Not testing shipping methods for different zones
Sometimes, shipping methods are set up correctly but not tested, leading to issues when customers try to check out. This can result in missing or incorrect shipping options.
Solution: After setting up shipping zones, always test your shipping methods. Try simulating orders from different locations to ensure the correct shipping rates and options are shown.
Frequently Asked Questions
How to add multiple shipping regions in the same zone?
You can add multiple shipping regions in your store by simply adding another region after one. Once you select a region, click the box again and search for other regions. You can repeat this to add multiple regions.
Can I set up different shipping zones for different countries in WooCommerce?
Yes, you can set different shipping zones for different countries simply by adding another zone. Repeat the same process for adding a new zone and select a different country for each zone.
Can I offer free shipping in one zone and a flat rate in another?
Yes, you can offer different methods for different zones. While creating another zone, select flat rate or free shipping (whichever you didn’t use) and save the changes.
Can I change the shipping destination to the customer’s billing address?
Yes, you can change the shipping destination from the shipping settings. Head over to the setting beside the zone, and you will find the option to change it. You can choose from,
1. Default to the customer’s shipping address
2. Default to customer billing address
3. Force shipping to the customer’s billing address
What happens if no shipping zone matches?
If no shipping zone matches a customer’s address, WooCommerce won’t show any shipping options at checkout. To avoid this, make sure to add a fallback zone like Rest of the World with at least one shipping method, and double-check your zone coverage and ordering.
Can I set different rates for ZIP codes?
Yes, you can set different shipping rates for specific ZIP codes by creating separate shipping zones and using the Limit to specific ZIP/postcodes option for each. This lets you apply custom rates or methods based on precise delivery areas.
How to prioritize zones in WooCommerce?
WooCommerce prioritizes zones based on their order—zones listed at the top are checked first. To control which zone applies, simply drag and drop zones in the shipping settings so that more specific zones (like ZIP-based ones) are above broader ones.
Conclusion
WooCommerce shipping zone is one of the core requirements to set up a profitable store. It will make sure your customer can complete the checkout process smoothly.
From this blog, you have discovered,
- Why shipping zone settings are important
- How can you do it efficiently
- How to control the shipping zone with WholesaleX
- Some common mistakes and their solution
Now you can implement those steps in your store and determine the change. Let us know how this blog helped you grow your business in the comments.