Setting up WooCommerce shipping sounds so simple but you will find it kind of confusing. When I first tried to set up shipping, I often found myself drifting off track. I couldn’t even realize why.
Later, I discovered that the shipping settings in WooCommerce are interconnected. You need to maintain a flow while setting up the shipping. In this blog, I will demonstrate how to do it easily and efficiently without losing any track.
After completing the blog, you will learn,
☑️ How to set up shipping zones correctly
☑️ Differences among shipping methods and when to use it
☑️ How classes are created and implemented
☑️ How to set taxes based on your shipping
☑️ Popular plugins for shipping settings
☑️ Common troubleshooting
Without any further ado let’s sail for the WooCommerce shipping settings.
WooCommerce Shipping Setup Overview
Before exploring each topic, I want to show you what types of settings there are. You can track each setting from this overview below:
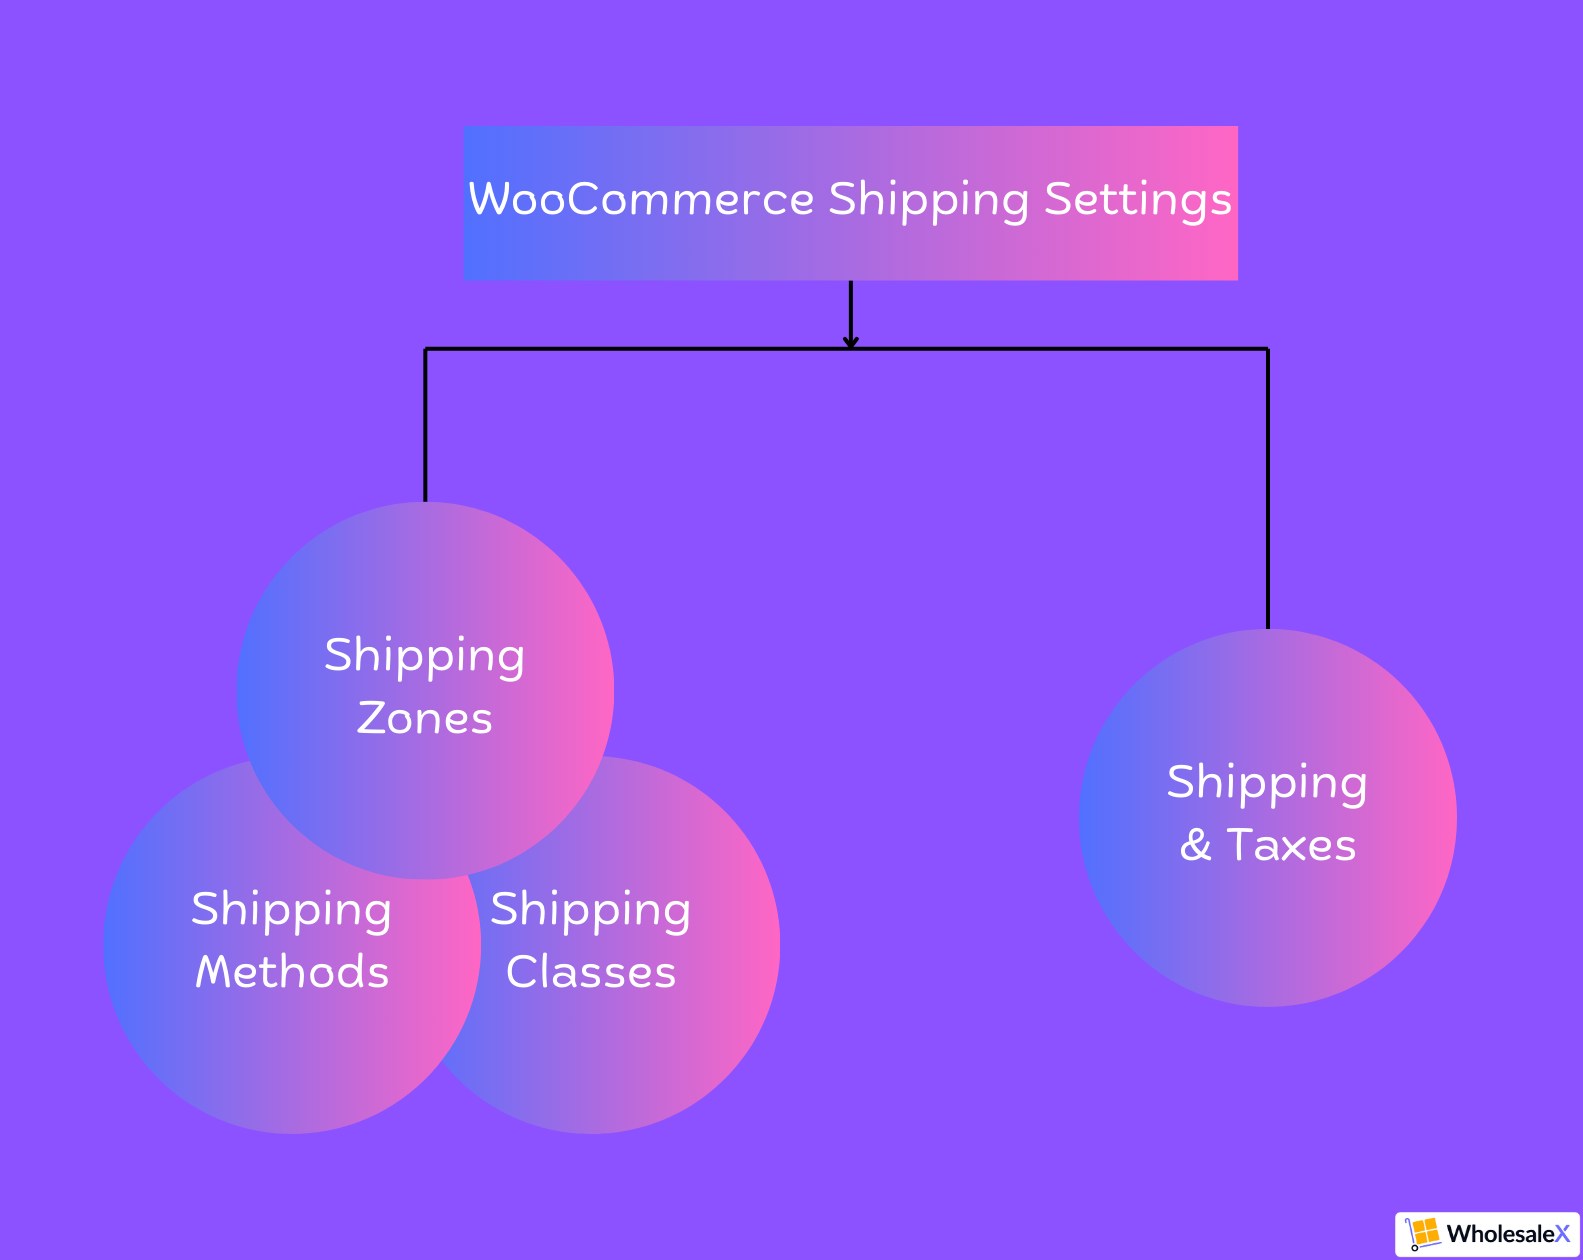
From the image, you can understand I will discuss shipping zones, methods, classes, and taxes. Let’s deep dive into each setting.
Understanding WooCommerce Shipping Zones
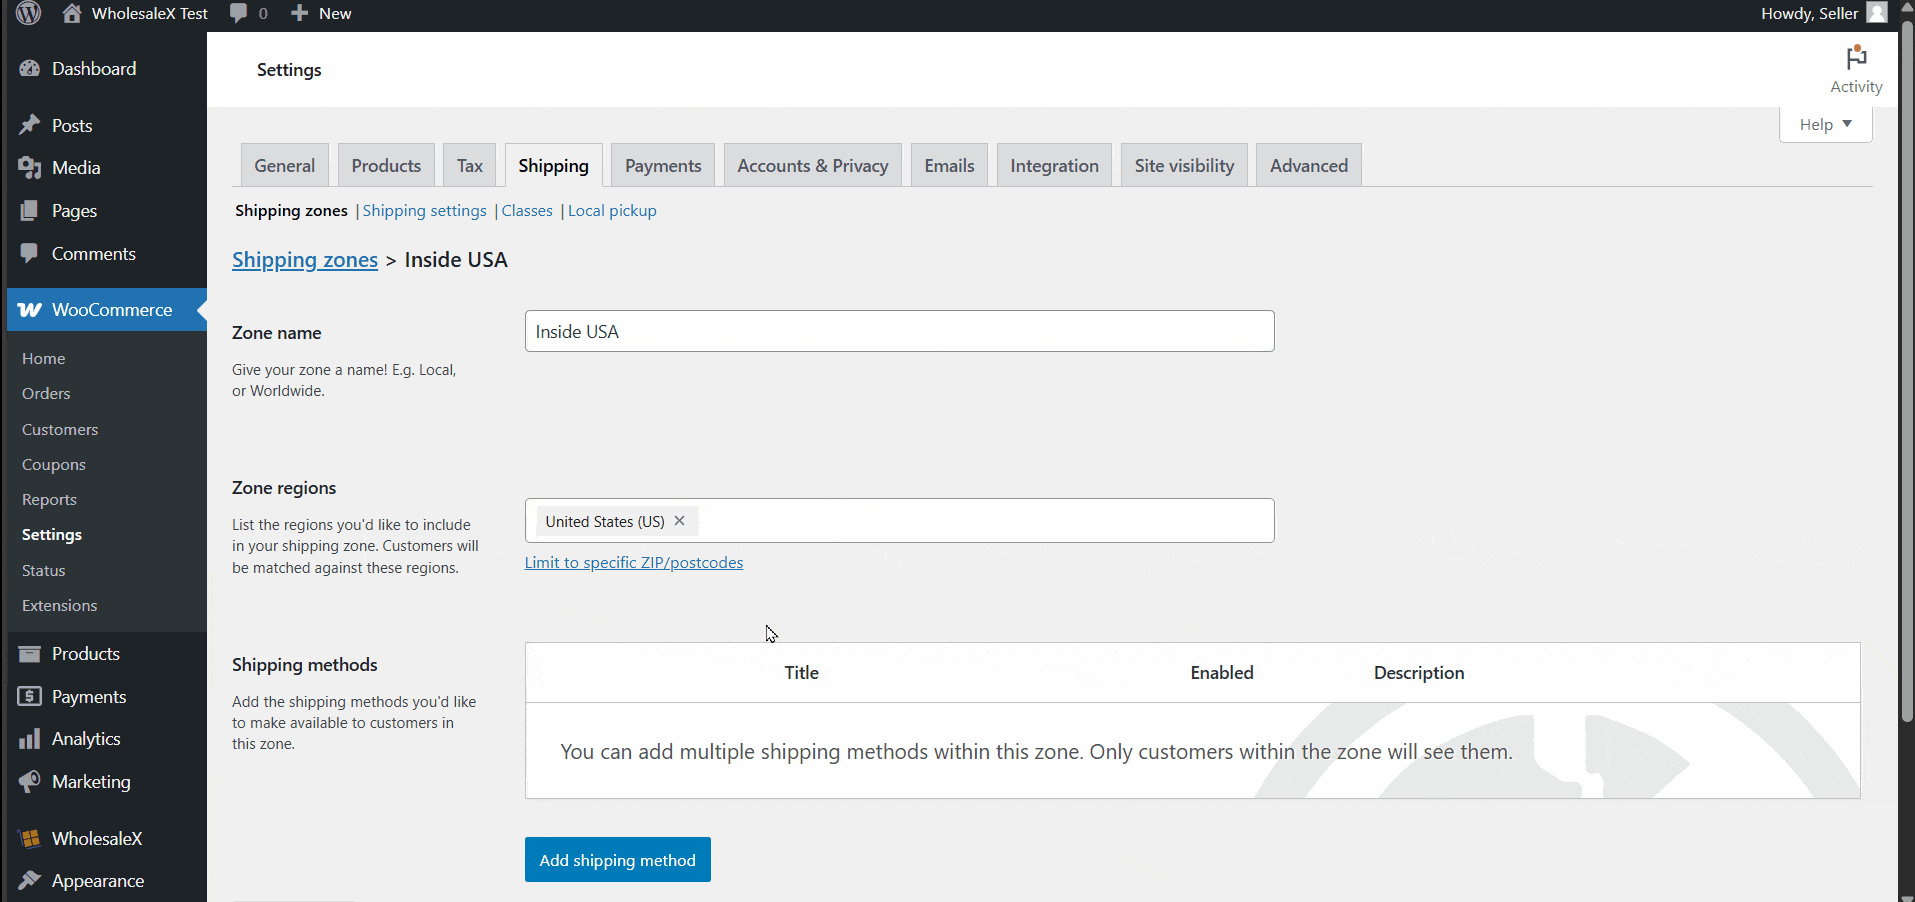
At first. You will find the shipping zone setting at the start of the WooCommerce shipping setup.
This setting will let you choose the locations and all the necessary settings along with it. While adding a new zone, there will be a list of regions for you to select from. You can select your preferred regions from the list.
The shipping zones help you to define your pricing and efficiency. Usually, store sellers provide two types of zones: Local and International. You can set shipping zones in any way you want to prioritize.
To demonstrate, I select the USA. You can select your preferred region(s) and set a name for it.
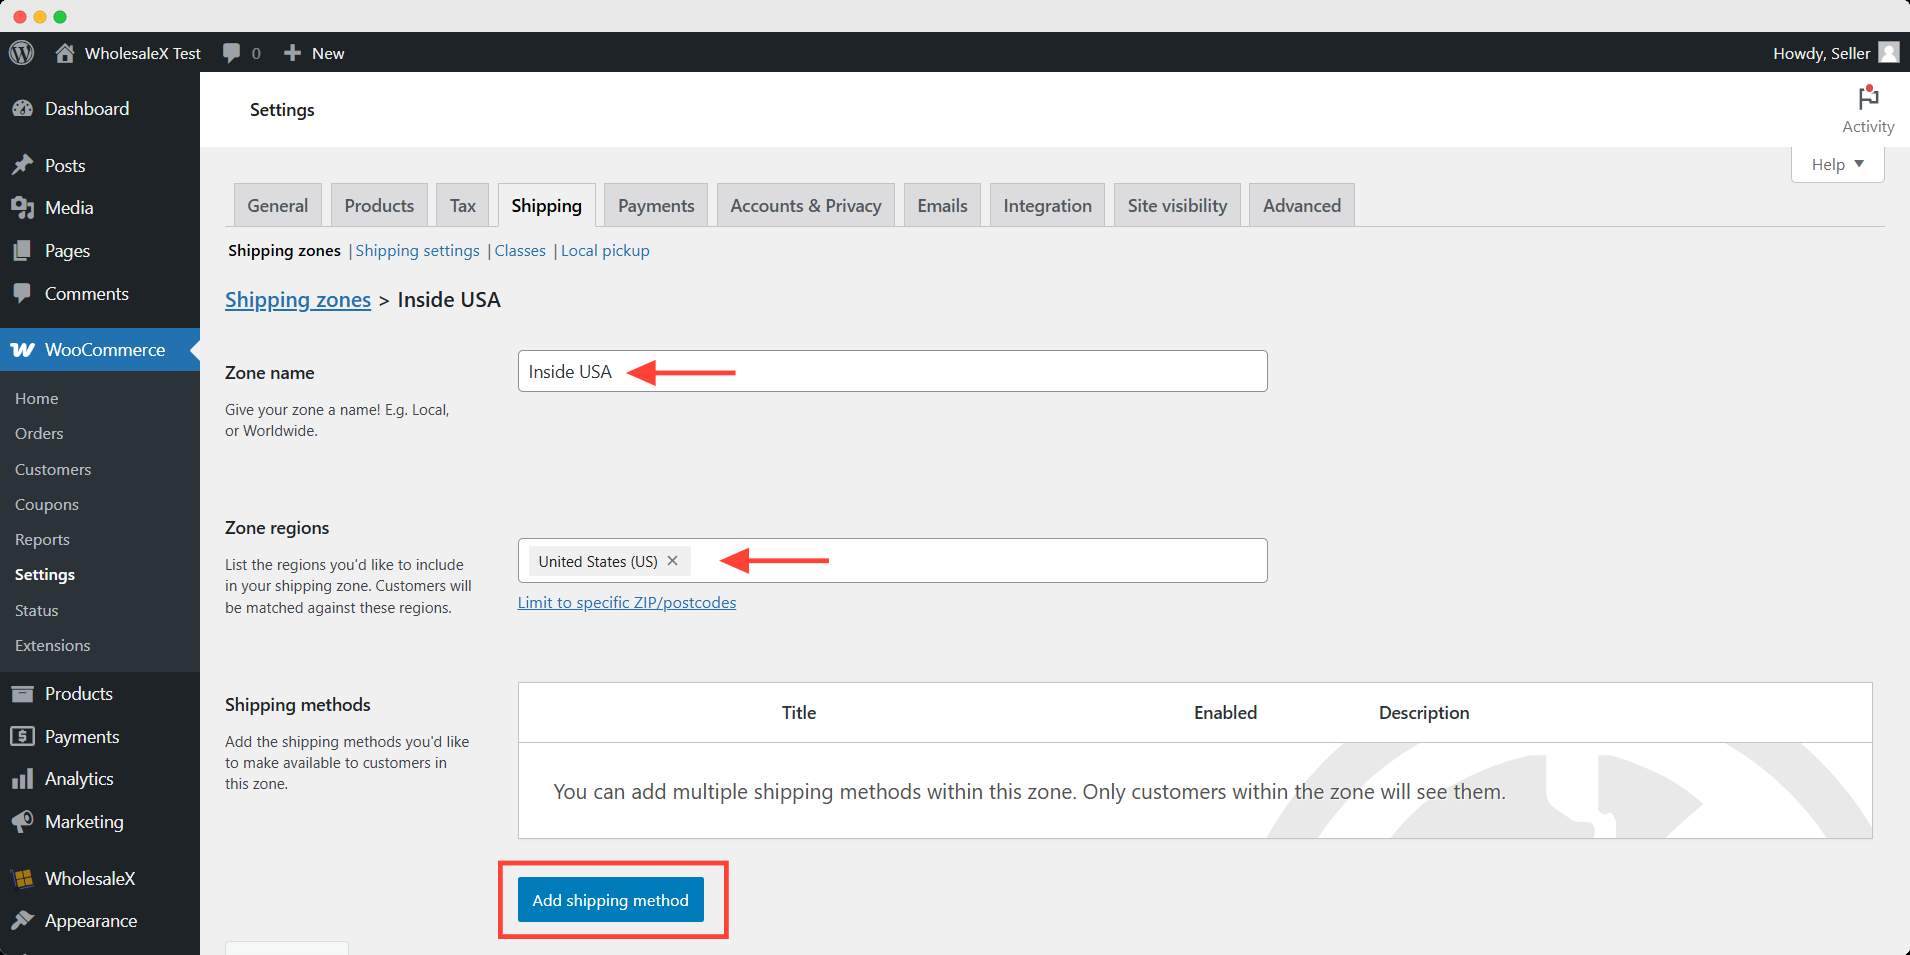
Finally, you also have to add shipping methods for each zone here. The methods are another interesting broad topic. Let’s see what are the methods and how to configure them.
💡 Pro Tip
If you sell internationally, create a separate zone for remote regions to charge accordingly. WooCommerce applies the first matching zone, so order them carefully!
Exploring WooCommerce Shipping Methods
There are three types of methods you can select from by default in WooCommerce. They are:
- Free shipping
- Flat rate &
- Local pickup
However, you can configure only free shipping and flat rates from the shipping zone editor. There is another tab for local pickup to configure. There you will find the cost & location setting for pickup.
For this demonstration, I chose the flat rate method. I set the cost to $5 flat for all scenarios. You can choose other methods and advanced settings if you need them.
Free shipping in WooCommerce means there will be no delivery charges for the order. The store owner would bear all the costs regarding delivery.
The Flat rate refers to a standard, fixed charge for delivery. Normally, shop owners apply a flat rate for a certain zone/region.
How to show shipping options in WooCommerce
| Free Shipping | Best for promotional purposes, increase sales and customer base. |
| Flat Rate | Best for regular delivery to any region. |
| Local Pickup | Best for physical shop owners that arrange a pickup point. |
You can also add flat rates based on different shipping classes. Let’s find out what shipping classes are and how to configure them.
Figuring out WooCommerce Shipping Classes
Shipping classes are the classification of similar groups of products. For example, you can create classes based on weight, size, fragility, etc.
To create a class you have to give it a name and a description. This description will help the shopper to understand the nature of a class.
After adding a class, you will find the option to add a value for that created class. You need to set the rate for that particular class in the given box.
Moreover, you have to include the products in your classes. Thus, when shoppers choose to buy a classed product, they have to bear the flat rate based on their class.
Here, I created three classes. Heavy based on weight, Quick based on delivery time, and fragile for sensitive items. You can create your classes in a way to increase revenue.
I set $10 for heavy, $15 for quick, and $20 for fragile class product.
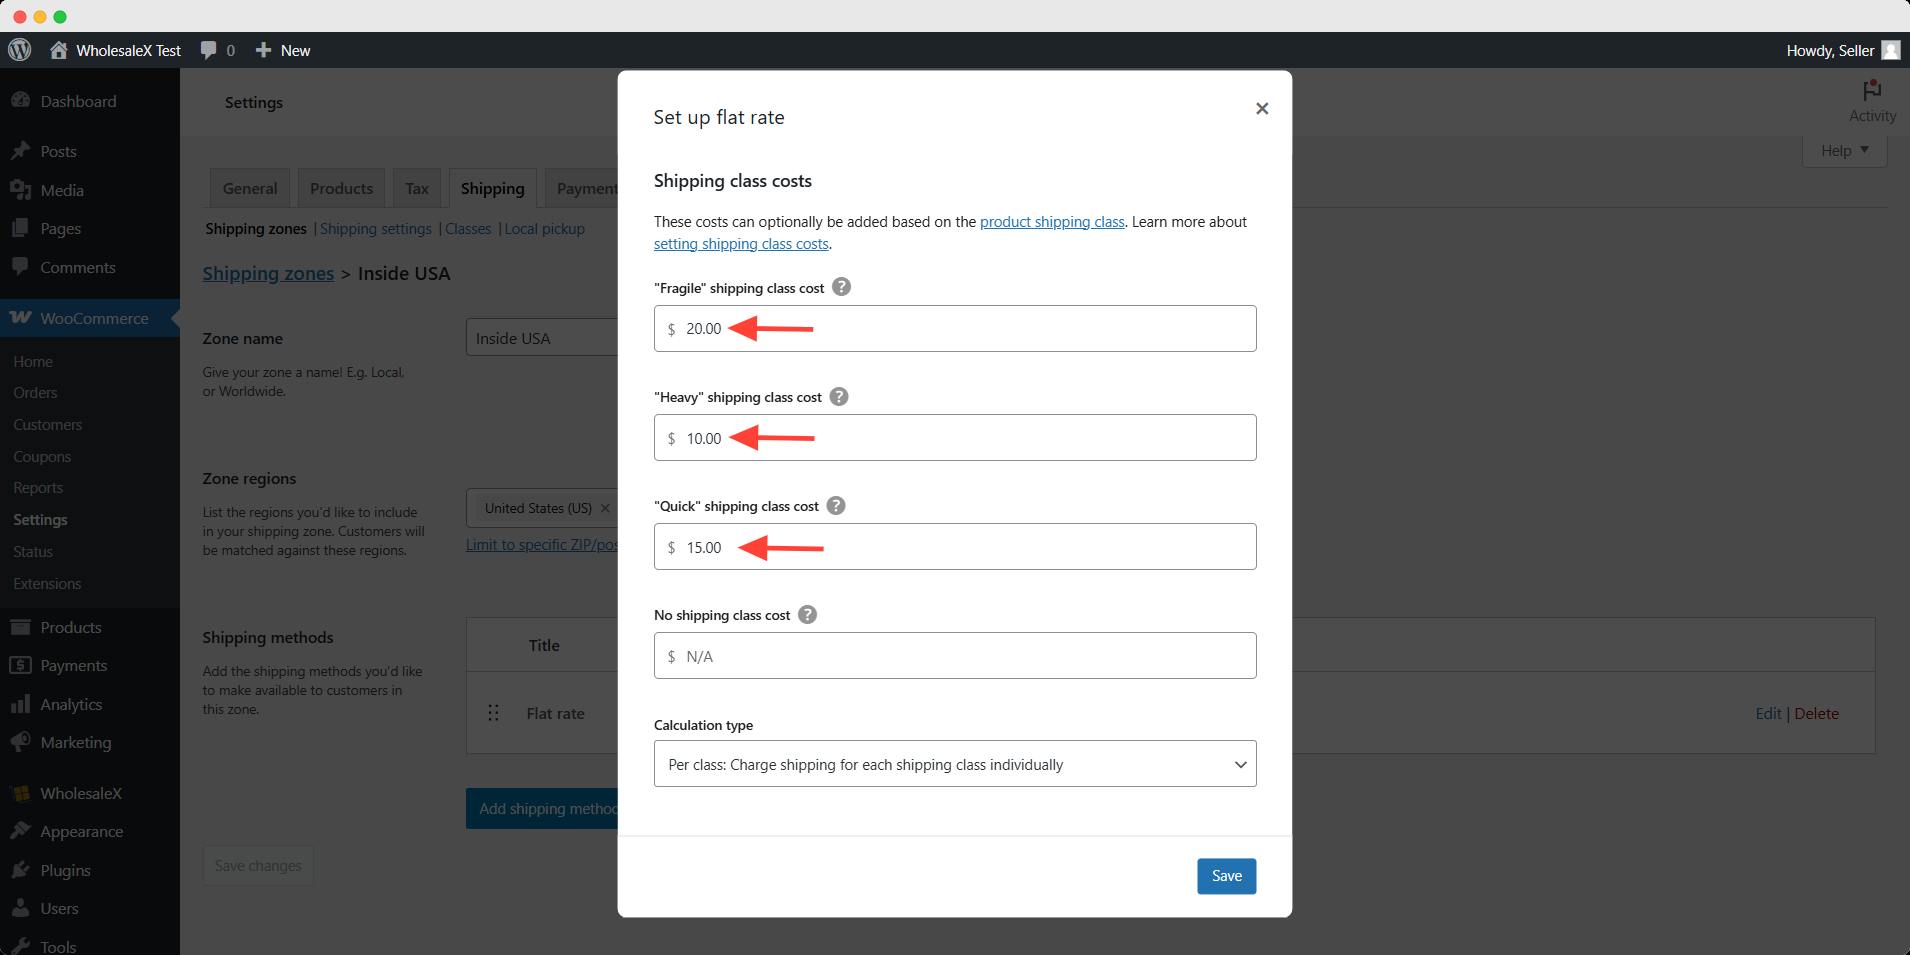
At the end, you will find the calculation type. Here you can select how you want to charge the shipping cost if anyone intends to buy multiple-class products.
WooCommerce Shipping and Taxes
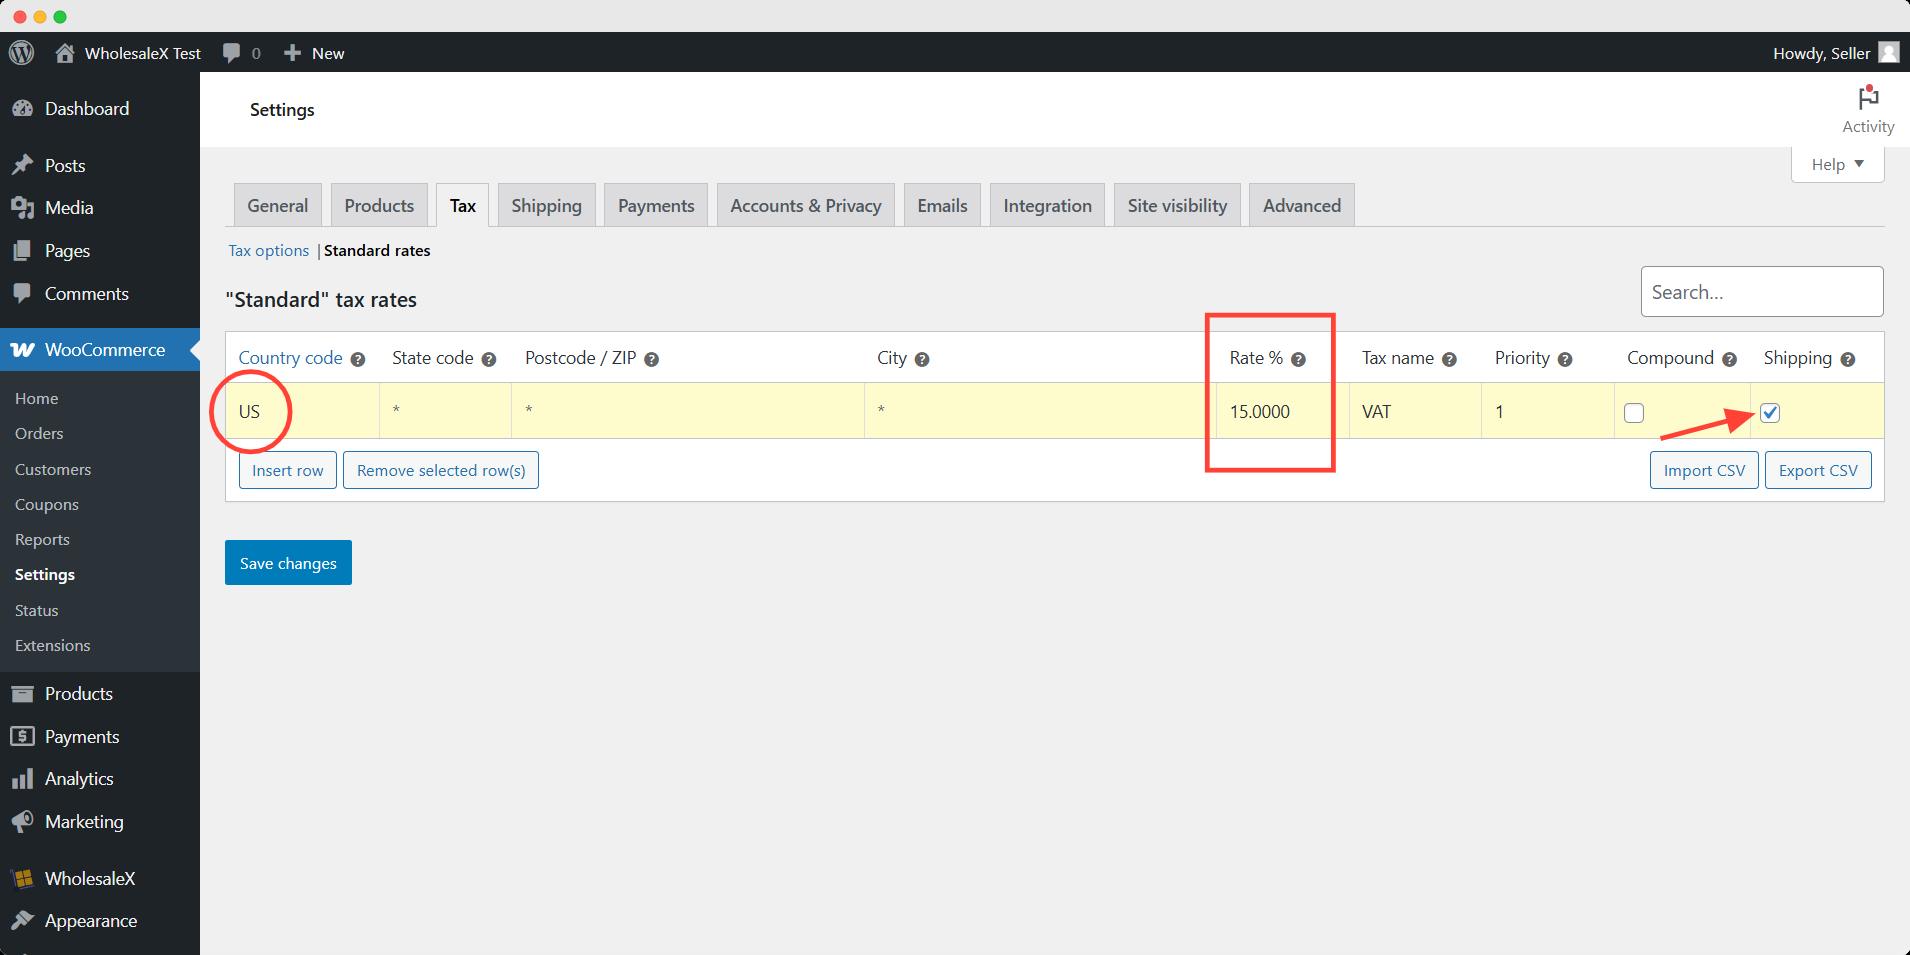
Taxes are the additional shipping setting, that you have to configure. Head over to the tax tab and you will find the optional control.
With this control, you can decide on tax class based on cart items or a standard rate for all products.
To set the standard rate, go to the standard rate tab and you will find the options to add standard tax rates. This rate depends on the country/region’s tax regulations.
I set a standard 15% VAT including shipping costs for my store. The total price will include this tax.
💡 Pro Tip
Shipping taxes depend on where the store is located and tax regulations for that region. For example, in the US tax varies from state to state, but in Europe, the tax depends on the product in the cart.
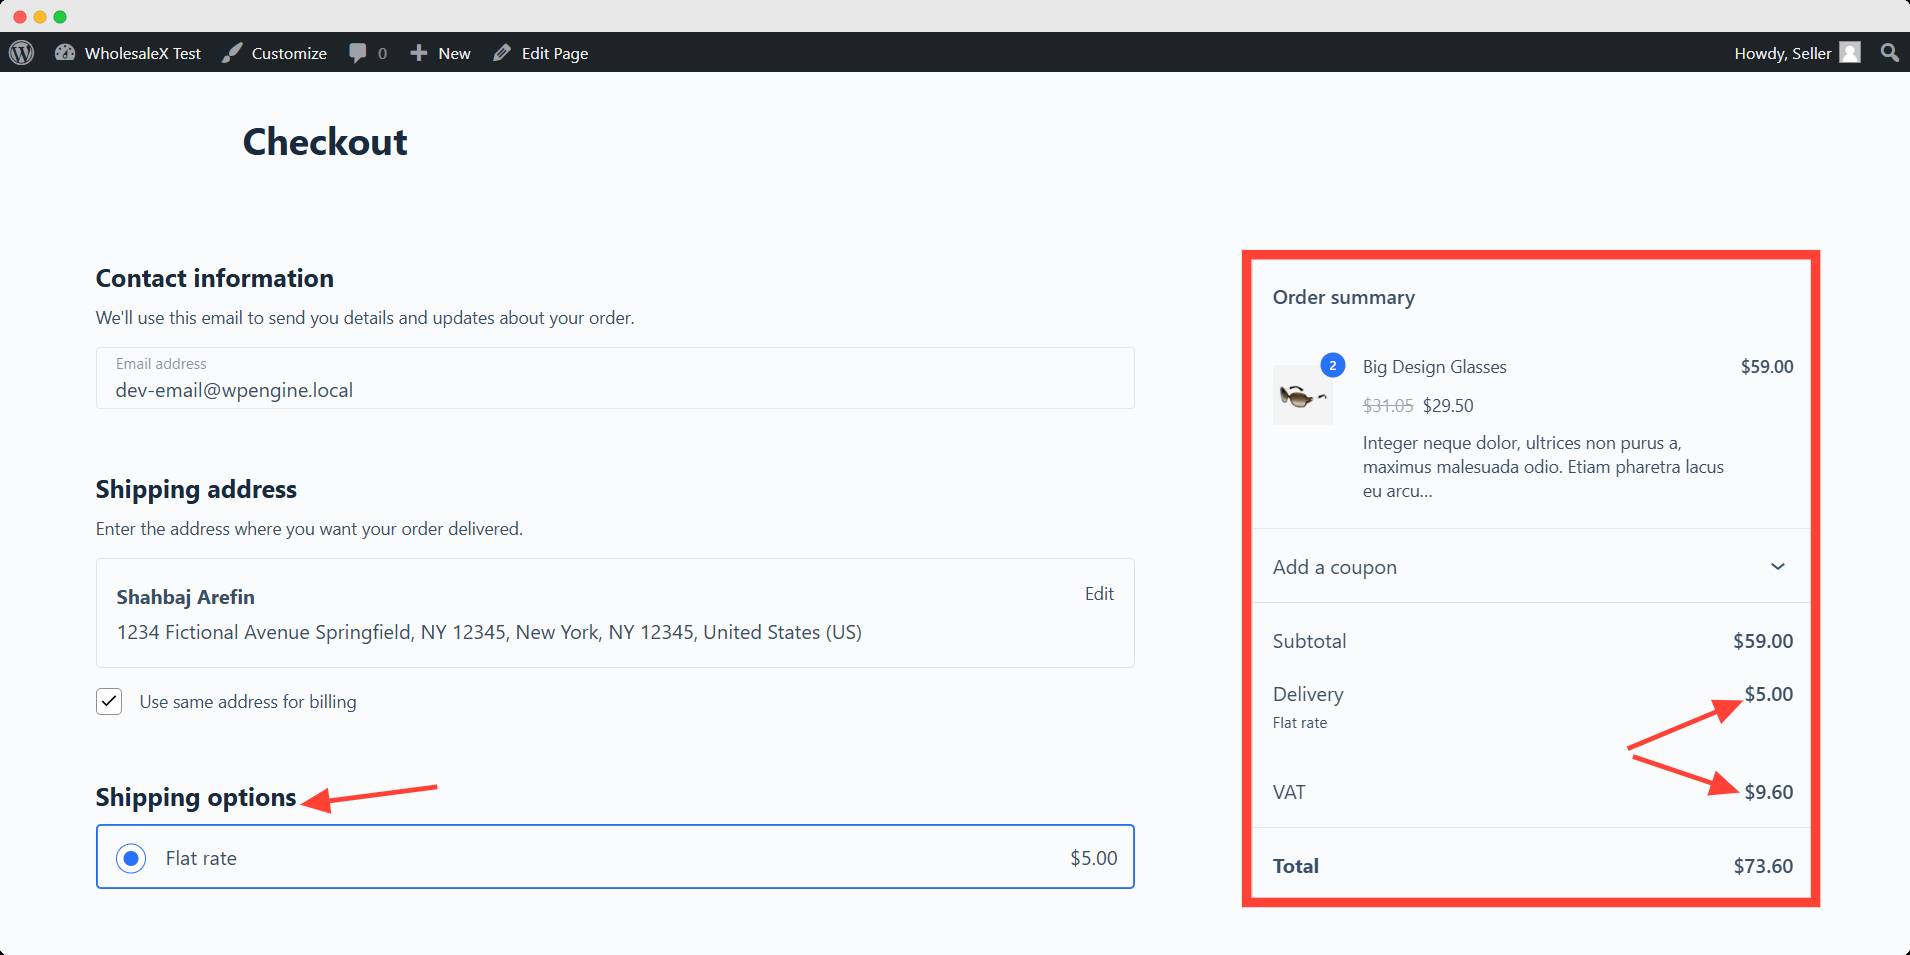
You can set up your WooCommerce store’s shipping in any way you see fit. I chose the settings here for demonstrating purposes. Let’s recap what I have done so far.
👉 I set the shipping zone to the USA
👉 Chose & set the flat rate method
👉 Created three distinctive classes for additional service & added value
👉 Applied 15% VAT on shipping costs
Now I will check how the shipping cost works on the checkout page. Here, the total price is $73.60. the delivery charge is $5 and 15% VAT on the cart total is $9.60.
Step-by-Step Guide to WooCommerce Shipping Setup (2025)
1. Setting Up Shipping Zones
Shipping Zones let you define where you ship to and which rates apply. Here’s how to configure them:
- Go to WooCommerce > Settings > Shipping.
- Create a new zone by specifying name and region.
- Assign specific shipping methods to the zone (flat rate, local pickup, free shipping).
2. Configuring Shipping Methods & Rates
Choose the appropriate shipping method for each zone:
- Flat Rate: Charge a set fee for all products in a zone.
- Free Shipping: Offer free shipping for customers who meet the criteria.
- Local Pickup: Allow customers to pick up items locally.
WooCommerce Shipping Plugins
You can manage all the basic configurations from WooCommerce built-in settings. But there are some additional features you might need. That’s where plugins come.
These plugins offer some extra features to increase the user experience for your stores. You can manage all shipping-related settings with plugins efficiently.
There are a handful of plugins you will find in the WordPress repository. Here are some popular plugins for the most useful features:
| Plugin Name | Key feature | Best for |
|---|---|---|
| WowShipping | Flexible table rate shipping with role-based rules, free shipping options, and conditional methods. | Suitable for stores wanting advanced shipping rules and higher conversion rates. |
| WooCommerce Shipping & Tax | Offers live career rates and built-in tax handling | Suitable for small and medium enterprise |
| Table Rate Shipping Method for WooCommerce by Flexible Shipping | Offers table rate shipping based on weight, price, quantity, etc. | Suitable for complex shipping rule-based & multi-tiered pricing-based stores. |
| WooCommerce Weight Based Shipping | Offers tiered Weight-based shipping cost. | Suitable for heavy or variable-weight product sellers. |
| Advanced Shipment Tracking for WooCommerce | Offers real-time shipment tracking with tracking numbers. | Suitable for stores that need customer experience with automated tracking updates. |
These plugins will help you run a store with dynamic shipping rates, tracking, etc effortlessly and efficiently.
If you’re doing wholesaling business you might be interested about interested about dropshipping. Learn more about these dropshipping plugins to enhance your store’s inventory.
How to Set up a Role-Based Shipping Method?
Role-based shipping methods are one of the most used requirements for wholesalers. As there’s no built-in way, you need a plugin to set this thing up.
WholesaleX is a popular plugin for b2b and b2c store owners. With this plugin, you can choose shipping methods for any specific user/role.
WholesaleX’s Dynamic rule feature allows its users to set a special shipping rule for a specific user/role. This way, store owners can offer discounts, and increase sales for suitable shipping rules.
Common Shipping Issues and Troubleshooting
There might be some minor issues while working with the WooCommerce shipping setting. They are:
The Shipping Options Not Showing on the Checkout Page
It’s the most common issue people face often during the checkout process. Upon inputting a valid address, sometimes you might not find the shipping option.
| Reason | Solution |
|---|---|
| No shipping zone | Add at least one shipping zone |
| No shipping method | Add a functioning shipping method for each zone |
Incorrect Shipping Cost
Sometimes users might complain about incorrect shipping for their order. In most cases, the complaint comes from excessive cost.
| Reason | Solution |
|---|---|
| Incorrect flat rate | Check the flat rate cost if it is correct |
| Wrong shipping class | Check if the class applied to the right product |
To avoid the hassle of flat rate shipping, consider using WowShipping. This plugin enables table rate shipping, providing flexibility and accuracy for your WooCommerce store. You can easily configure various shipping options without the worry of overcharging customers.
Free Shipping Not Working
Free shipping might not appear on the checkout page. Even if after entering a coupon, the free shipping does not activate.
| Reason | Solution |
|---|---|
| Free shipping is not enabled | Add a free shipping method |
| Invalid free shipping coupon code | Create a valid free shipping to meet the requirement |
“No Shipping Available” Error Message
There might be an error message after entering the shipping address.
| Reason | Solution |
|---|---|
| The region might not be included in the shipping zone | Add the applicable regions in the zone. |
💡 Pro Tips
To get a clear understanding of issues, turn on the WooCommerce debug mode. It will provide you with a detailed error message.
FAQs
Can I set different shipping rates for different products in WooCommerce?
Yes, you can set different shipping rates by using shipping classes. Go to WooCommerce shipping settings and then shipping classes. Create a class for specific products and assign it to them. Then, in shipping methods, you can set a unique cost for each class at a flat rate.
Can I disable taxes on shipping?
Yes, you can disable taxes on shipping from WooCommerce tax settings. Under the tax class you’re using (e.g., Standard Rates), uncheck the “Shipping” option. This will prevent taxes from being added to shipping costs.
What is the table rate in WooCommerce shipping?
Table Rate Shipping allows you to set dynamic shipping costs based on conditions like weight, cart total, or destination. WooCommerce doesn’t offer this by default, but you can use a plugin to configure it.
What is the free shipping coupon?
A free shipping coupon allows customers to get free delivery at checkout. To create one, go to WooCommerce → Coupons → Add New Coupon. Then enter a code, and check the “Allow free shipping” box, and set the discount type & amount.
What is the difference between shipping zones and methods?
Zones are regions, and methods are the rates or delivery options available for those zones
Conclusion
WooCommerce provides all the basic necessary setup in its built-in settings. But the direction isn’t in a straight way rather a rotating journey. You might keep going in circles and not reach the final stage.
So to avoid such a frustrating experience, you should follow the way I mentioned in the blog. This way you won’t get lost and can track where you should go next.
This simplified approach has made my journey easier. If you have any other approach, please share it in the comment section. You can also mention how can i improve my strategy.