When setting up an online store with WooCommerce, one of the most important factors you need to consider is the payment methods. After all, how you get paid directly impacts your revenue, customer satisfaction, and overall business success.
In this blog post, I’ll cover everything you need to know about WooCommerce payment gateways: how they work, choosing the right gateways, and how to set them up – all discussed step-by-step for you to follow.
Here are the key takeaways:
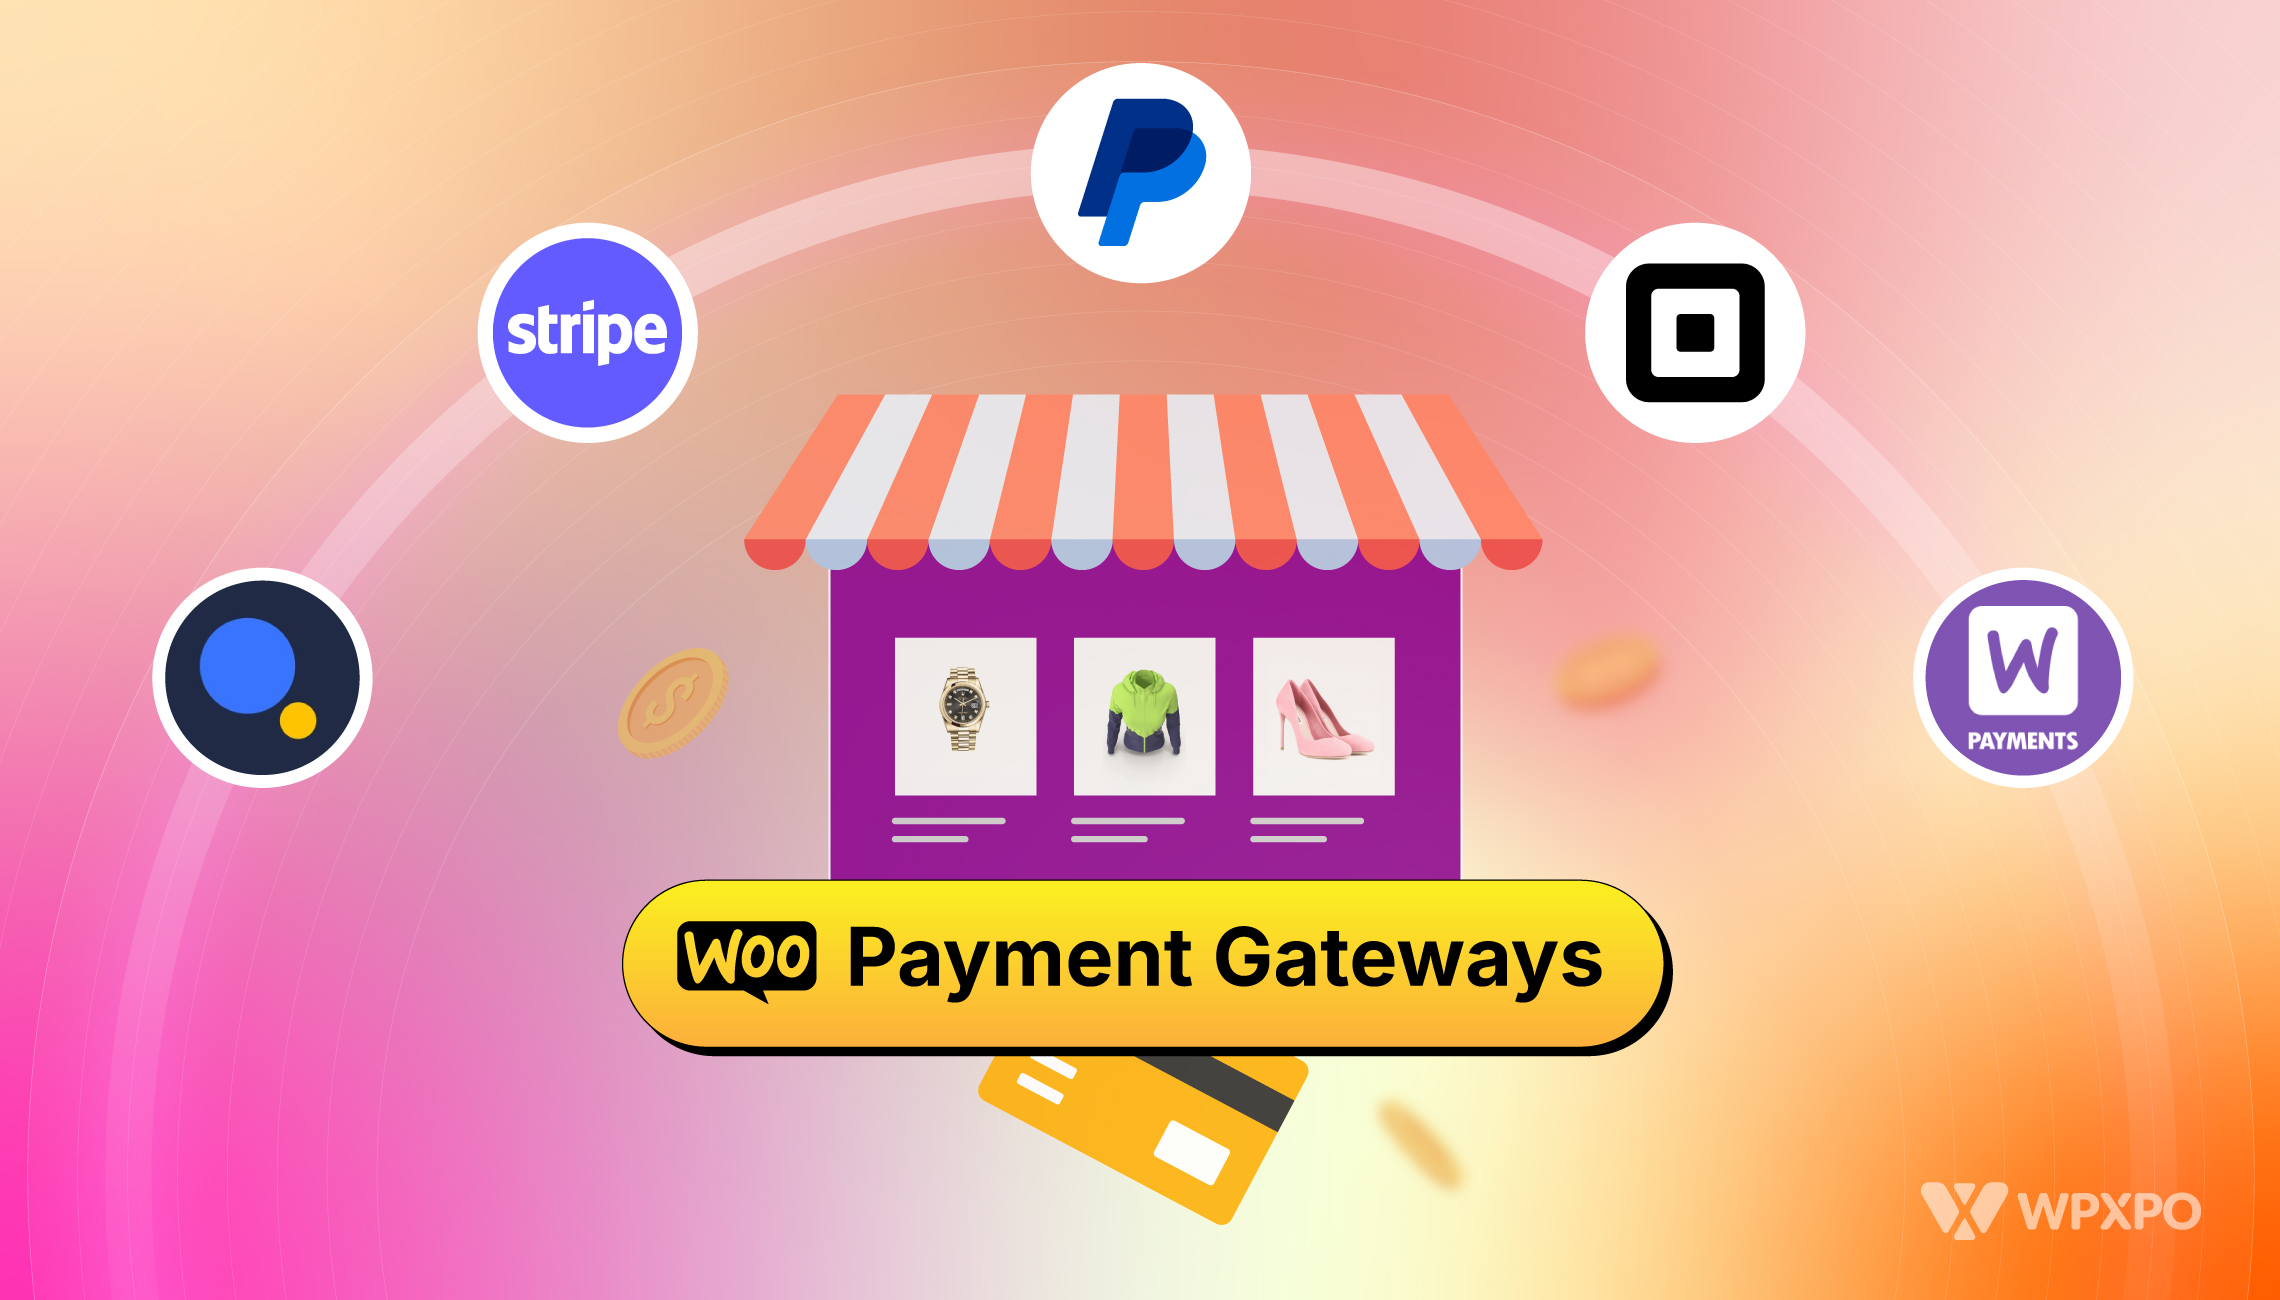
➡️ WooCommerce offers several payment methods by default which are: WooPayments, Direct Bank Transfer, Check Payments, and Cash on Delivery (COD).
➡️ To choose the right payment gateway for your business, you should consider factors like transaction fees, ease of integration, security, and customer experience.
➡️ WooPayments supports major credit/debit cards and digital wallets, providing a seamless checkout experience and increasing conversion rates.
➡️ You can set up WooCommerce payment gateways based on different conditions such as user role, specific products, customer location, and a lot more.
Ready to learn more? Okay, grab a cup of coffee and dive into the details!
Understanding WooCommerce Payment Gateways
A WooCommerce payment gateway is a WordPress plugin that enables your customers to pay for goods or services. It connects customers to the payment processor, allowing transactions via credit cards, debit cards, or other methods.
Here’s how a payment gateway in WooCommerce works:
When a customer makes a purchase, the payment gateway handles the transaction process. It securely collects payment information (such as credit card details) and communicates with the customer’s bank or payment processor.
The gateway ensures that the payment is authorized, processed, and transferred to your merchant account.
To use a payment gateway, you’ll need to set up an account with a payment gateway company such as PayPal, Stripe, or Authorize.net. After the configuration, the gateway integrates seamlessly with your WooCommerce store and allows customers to complete transactions smoothly.
For more detailed information, you can visit the WooCommerce Documentation.
What Are the Default Payment Methods in WooCommerce?
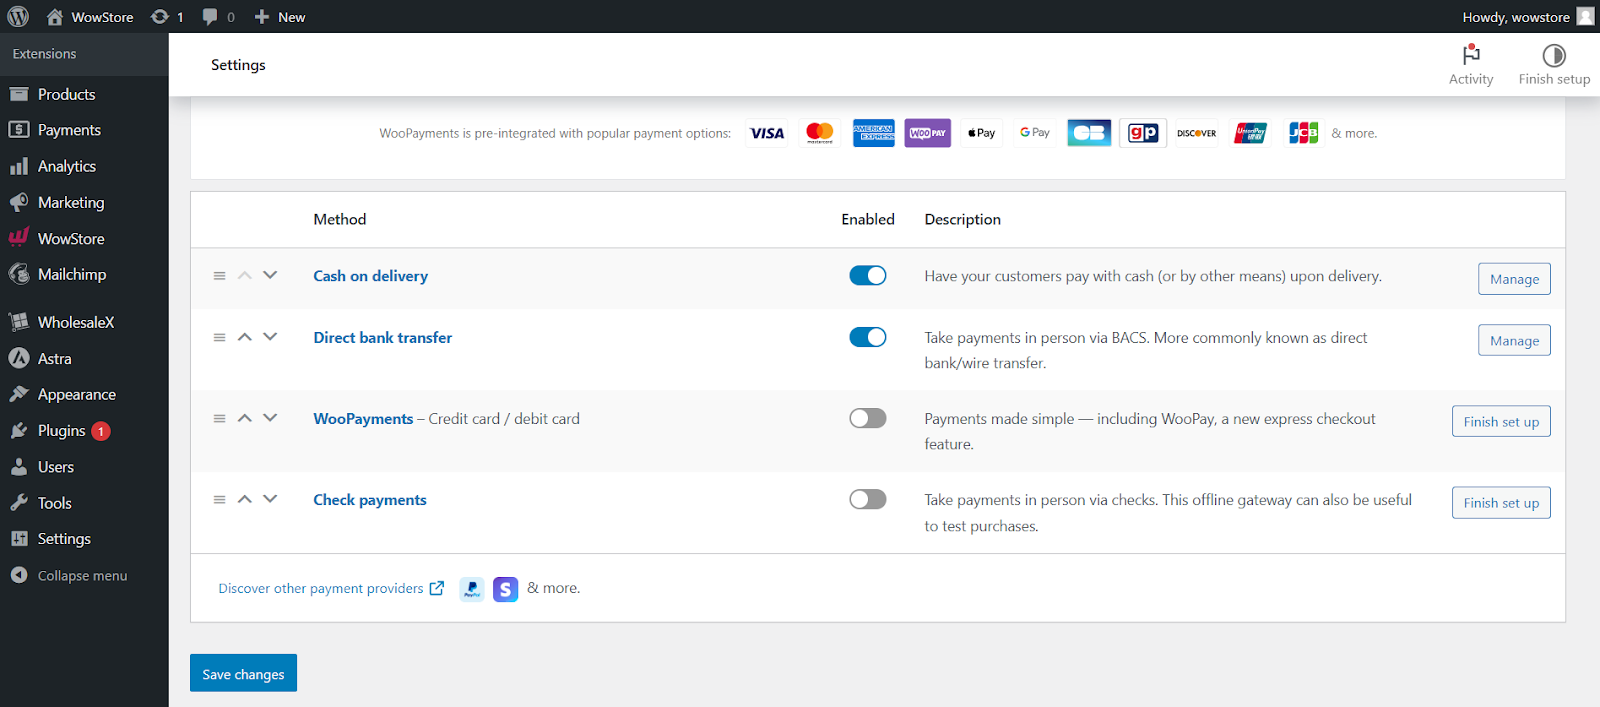
When you install WooCommerce, it comes with several default payment methods that allow you to receive payments for selling products immediately. These options cover both online and offline payment methods so that you can choose whichever options work best for your business.
1. WooPayments
WooPayments is a fully integrated payment gateway created by WooCommerce to simplify the payment process. It allows you to manage transactions, refunds, and disputes directly from the WooCommerce dashboard so that you don’t need to rely on third-party services.
Features:
- Accepts major credit and debit cards and digital wallets like Apple Pay and Google Pay.
- Supports payments in over 135 currencies, which is suitable for international transactions.
- Instant deposits and automated recurring payments for subscriptions.
- In-person payments via Tap to Pay on iPhone, which is useful for U.S.-based merchants.
- No extra monthly fees; charges apply only on a per-transaction basis.
Set Up Process:
Here are the easy steps to set up WooPayments on your WooCommerce store:
- Navigate to WooCommerce > Settings > Payments.
- Enable WooPayments by toggling it on.
- Follow the prompts to link your store to your WordPress.com account.
- Choose the payment methods to enable (e.g., credit/debit cards, Apple Pay).
- Use Test Mode to simulate transactions before going live.
2. Direct Bank Transfer
The Direct Bank Transfer in WooCommerce allows customers to transfer payments directly from their bank accounts to yours. This method is straightforward but you need to confirm payments before processing orders.
Features:
- Direct bank-to-bank transfer for payments.
- Orders remain in a pending state until the payment is confirmed manually.
- No transaction fees from WooCommerce, but bank fees may apply.
- Suitable for stores with fewer orders or those that don’t need instant payment confirmation.
Set Up Process:
Follow these simple steps to enable Direct Bank Transfer for your store:
- Go to WooCommerce > Settings > Payments.
- Enable Direct Bank Transfer by toggling it on.
- Fill out the bank details (e.g., account number, bank name) that customers will use to transfer funds.
- Save changes to finalize the setup.
3. Check Payments
Check Payments is a traditional payment method where customers send you a physical check to pay for the product. This option is not commonly used today but it can be useful for customers who prefer offline payment methods.
Features:
- Allows customers to pay via mailed checks.
- Orders are placed on hold until the check is received and processed.
- Ideal for niche markets or businesses in regions where check payments are still common.
Set Up Process:
To enable the Check Payments, simply follow these steps:
- Navigate to WooCommerce > Settings > Payments.
- Enable Check Payments by toggling it on.
- Provide instructions for customers on where to send the check.
- Save changes to complete the setup.
4. Cash on Delivery (COD)
Cash on Delivery (COD) in WooCommerce is a payment method where customers pay for their orders upon receiving them. This option is popular among users who prefer to receive items first and then pay for the products.
Features:
- Customers pay when the product is delivered.
- No online payment processing is needed, which reduces the risk of online fraud.
- Suitable for businesses in regions where customers prefer to pay in person.
- It may lead to logistical issues, as orders may be returned if the customer does not pay after the delivery.
Set Up Process:
- Go to WooCommerce > Settings > Payments.
- Enable Cash on Delivery by toggling it on.
- Set up additional options like limiting COD to specific shipping methods or locations.
- Save changes to finalize the COD setup.
How to Choose the Right Payment Gateway for Your Business?
Choosing the best payment gateway for your business depends on transaction fees, ease of use, the geographical location of your customers, and various other factors. Here are the most essential factors you should consider when adding a payment gateway:
Supported Payment Methods
Ensure the gateway supports the payment methods your customers prefer. This includes credit/debit cards, digital wallets, and other local payment methods. Also, you should check how often the payment gateway adopts newer, more convenient payment methods to ensure better customer experience.
Transaction Fees
Different gateways charge various fees per transaction, which can greatly impact your revenue. Look for a gateway with fees that fit your business model. For example, choosing the right payment methods is essential if your business deals with high volumes or low-margin products.
Security and Compliance
Your payment gateway should comply with PCI DSS (Payment Card Industry Data Security Standard) to protect your customers’ data. Advanced security features like encryption and fraud detection are also crucial.
Ease of Integration
The gateway should integrate smoothly with WooCommerce, offering seamless customer experiences without requiring extensive technical setup. Also, it should offer helpful documentation, support resources, and compatibility with other plugins.
Recurring Payments Support
If your business offers subscriptions or membership services, choose a gateway that supports recurring billing and automated payments.
Customer Experience
A gateway that provides a smooth and quick checkout process will reduce cart abandonment and improve conversions. Also, check whether the gateway offers localized checkout experiences, including language support and currency conversion.
What Are the Best Payment Gateways for WooCommerce?
As you have learned: to choose the best payment gateway for WooCommerce, you should consider factors like fees, ease of integration, security features, and customer experience.
And to help you with your decision, I have prepared a table comparing the top 5 payment gateways, highlighting their key features.
Comparison Table for Best Payment Gateways for WooCommerce:
| Payment Gateway | Transaction Fees | Available Countries | Key Features |
| Stripe | 2.9% + $0.30 | 46+ countries | – Developer-friendly – Tracking analytics – Fraud detection |
| PayPal | 2.9% + 1.5% for international transactions | 200+ countries | – Brand Recognition – Seller protection |
| Square | 2.9% + $0.30 | Australia, Canada, France, USA, UK & others | – Unified POS – Offline transaction |
| Authorize.Net | 25$/month + transaction fees | 11 countries | – Advanced Security – Recurring payment – eChecks payment |
| WooPayments | 2.9% + $0.30 | 35 countries | – Recurring payment – Offline payments – Digital wallet |
Need more information to make your decision?
Here’s a detailed look at the best five payment gateways for WooCommerce, discussing their unique features and ideal users:
1. Stripe
Stripe is one of the most popular payment gateways for WooCommerce, known for its seamless integration and support for a wide range of payment methods and currencies.
Features:
- Supports over 135 currencies.
- Excellent for global businesses due to broad international support.
- Developer-friendly with extensive API documentation.
- No setup or monthly fees; only transaction fees apply.
Recommended For: Ideal for all kinds of businesses looking for a robust, scalable solution that can handle international transactions and various payment methods. It is very well-suited for subscription-based businesses and freelancers. .
2. PayPal
PayPal is a very popular payment gateway. Because of its familiarity and ease of use, it is a go-to choice for many WooCommerce stores.
Features:
- Trusted by consumers worldwide, reducing cart abandonment rates.
- Supports over 200 countries and 25 currencies.
- No setup or monthly fees; only transaction fees apply.
- Integrated dispute resolution and fraud protection.
Recommended For: Designed for online transactions, making it suitable for any ecommerce business. Particularly helpful for businesses with an international customer base, looking for a simple and reliable payment gateway.
3. Square
Square is an excellent choice for businesses that operate both online and offline, providing a unified solution for in-person and online transactions.
Pros:
- Integrates seamlessly with WooCommerce and Square’s POS system.
- No setup or monthly fees; only transaction fees apply.
- Simple and straightforward to use, especially for physical stores expanding online.
- Free chargeback protection.
Recommended For: Best for businesses such as retail stores, restaurants and service businesses that need to manage both in-person and online sales through a single platform.
4. Authorize.Net
Authorize.Net is a reliable payment gateway offering extensive features and security measures, making it a solid choice for established businesses.
Features:
- Advanced fraud detection tools and customizable security settings.
- Supports eChecks, credit cards, and other payment methods.
- Excellent for recurring billing and subscriptions.
- Strong customer support.
Recommended For: Suitable for all kinds of businesses that require a wide range of features including amazing security feature and support for recurring payments.
5. WooPayments
As already discussed above, WooPayments is a payment gateway built specifically for WooCommerce. It offers an intuitive dashboard where you can easily manage all your payment needs.
Features:
- Direct integration with WooCommerce, simplifying the management of payments.
- No setup fees, and competitive transaction fees.
- Supports a variety of payment methods.
Recommended For: Ideal for businesses that want a centralized payment solution within WooCommerce without spending a fortune on payment processing fees.
How to Add Payment Methods in WooCommerce Easily
WooCommerce comes with several default payment methods such as direct bank transfers and checks. However, based on your business needs and your target audience, you may need to offer more payment options.
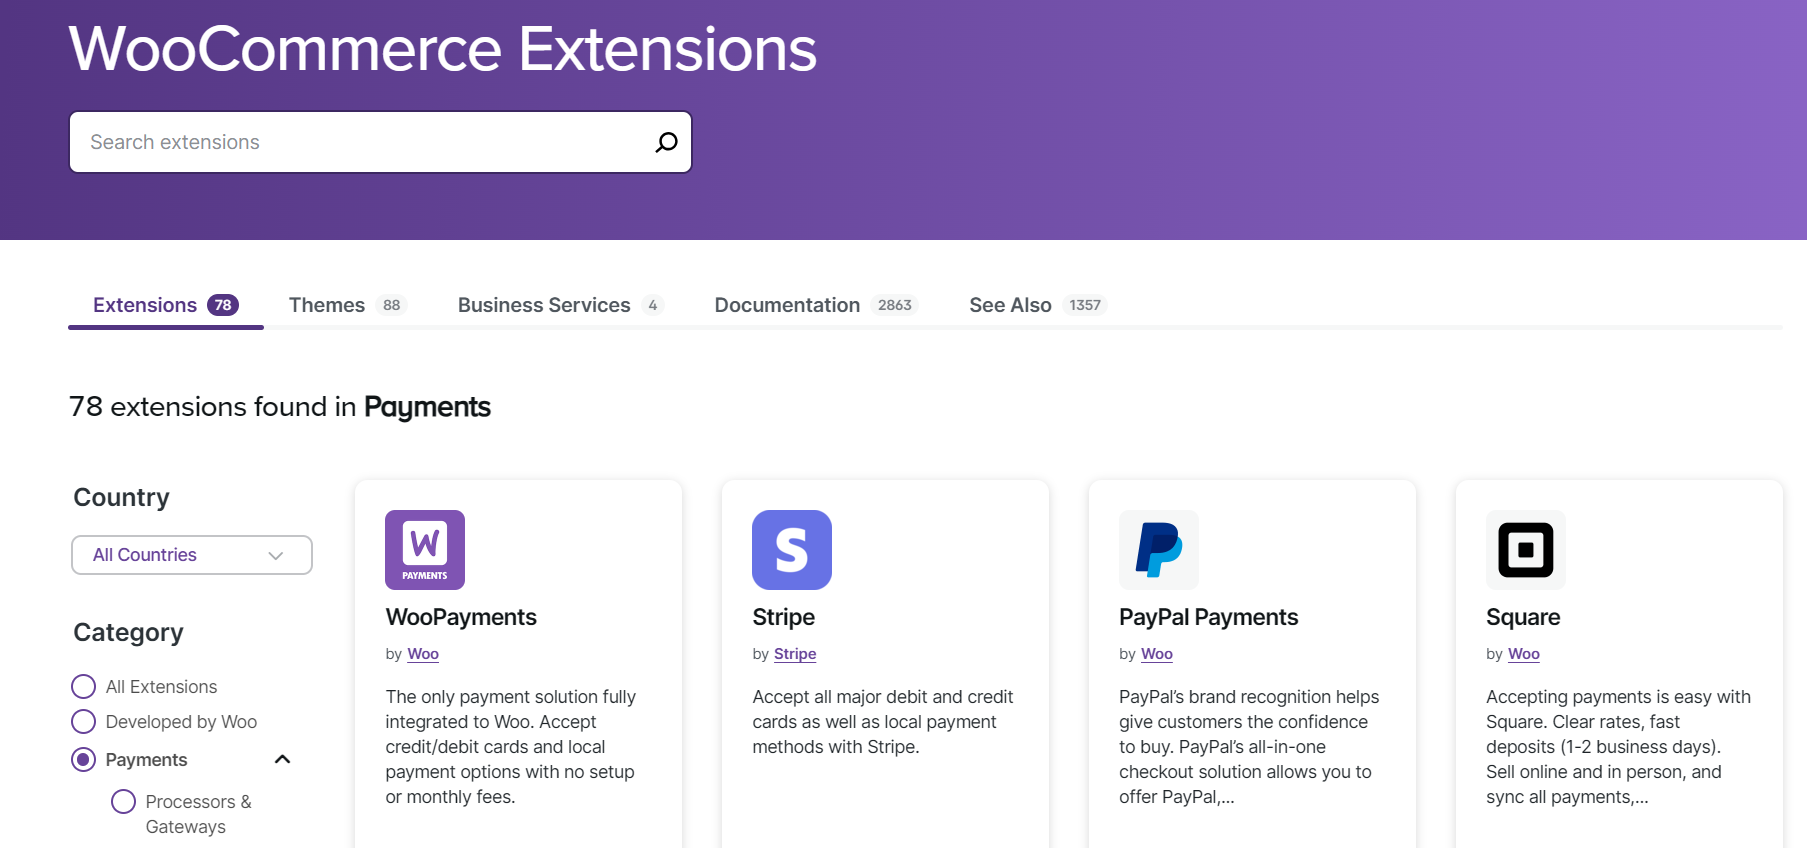
You can easily visit the official WooCommerce Extensions page and visit the category Payments to find all the available payment gateways you can add to your store. Currently, there are 78 extensions available for you to choose from. Simply pick the gateways that are suitable for your business.
Two of the most popular payment methods that are widely used across the world are PayPal and Stripe. These payment methods provide customers with secure and familiar ways to complete their purchases. So, adding these payment gateways to your WooCommerce store can positively impact your business.
In the next two sections, I will walk you through the steps to add PayPal and Stripe as payment methods in your WooCommerce store.
Adding PayPal as a Payment Method in WooCommerce
PayPal is a trusted and widely used payment gateway that allows customers to pay using their PayPal balance, credit cards, or bank accounts. Integrating PayPal into your WooCommerce store can make the checkout process smoother and more convenient for your customers.
Here’s how to add PayPal as a payment method in WooCommerce:
1. Install the PayPal Plugin:
- Navigate to your WordPress dashboard.
- Go to Plugins, then select Add New.
- Find and choose the plugin Payment Plugins for Paypal WooCommerce.
- Click Install Now and then Activate.
2. Connect Your PayPal Account:
- Go to WooCommerce, then Settings, and select Payments.
- Click on PayPal by Payment Plugins.
- In the settings, click on Click to Connect next to “Connect to PayPal.”
- Log in to your PayPal account. If you don’t have one, create a business account before proceeding.
- Once logged in, click Agree and Connect to link your PayPal account to WooCommerce.
3. Enable PayPal Payments:
- In the Payments settings, scroll down to find PayPal and toggle it on to activate it as a payment method.
- Click Save Changes to complete the setup.
Adding Stripe as a Payment Method in WooCommerce
Stripe is a flexible payment gateway that supports credit cards, Apple Pay, Google Pay, and more. By adding Stripe to your WooCommerce store, you offer customers a seamless and secure checkout experience.
1. Install the Stripe Plugin:
- From your WordPress dashboard, go to Plugins and select Add New.
- Find and select the plugin Payment Plugins for Stripe WooCommerce.
- Click Install Now and then Activate.
2. Connect Your Stripe Account:
- Go to WooCommerce > Settings, and select Payments.
- Click on Stripe by Payment Plugins, then go to Settings.
- Click on Click to Connect to link your Stripe account.
- Enter your Stripe account email and password to log in.
- If you don’t have a Stripe account, create one first.
- Complete the verification process by entering the code sent to your phone.
- Switch the mode from Test to Live to start accepting real payments.
3. Enable Stripe Payments:
- In the Payments settings, find the Stripe option and toggle it on to activate it.
- You can also enable additional payment methods like Apple Pay and Google Pay if needed.
- Save your changes to finalize the setup.
By adding PayPal and Stripe into your WooCommerce store, you can offer your customers convenient ways to make payments. This helps to enhance the user experience and cater to different customer preferences.
To learn more about adding different types of payment methods to your WooCommerce store, you can check out this helpful video:
Now that you have set up your preferred payment methods for your WooCommerce store, you should set a default payment method so that your customers have an easier experience in the checkout page. In the following section, you will learn all about it.
How to Set a Default Payment Method in WooCommerce
If you want to see your preferred payment method to be pre-selected during the checkout process, you need to set a default payment method. This is a great way to ensure a smoother checkout experience for your customers.
Here’s how to set a default payment method in WooCommerce:
Step 1: Access Payment Settings
To begin with, you need to navigate to WooCommerce > Settings on your WordPress dashboard. On the settings page, click on the “Payments” tab at the top. This will take you to the section where all your configured payment methods are listed.
Step 2: Drag and Drop to Set Default
To set a default payment method, simply click and hold the method you want to prioritize, then drag it to the top of the list. For example, I chose the payment option Cash on Delivery as my preferred method and placed it at the top of the list.
Step 3: Save Changes
After you’ve arranged the payment methods in your desired order, scroll down to the bottom of the page and click on the “Save changes” button. This step is crucial as it ensures that your changes are applied and that your selected payment method is now set as the default for all future transactions.
How to Set Up WooCommerce Payment Methods by Country
Payment methods available in WooCommerce can differ greatly depending on the country. For instance, Paypal is available in India, but it is still not available in its neighboring country Bangladesh.
Also, customer preferences matter. For example, while U.S. shoppers might prefer using credit cards or PayPal, customers in Europe might choose local payment methods like SEPA or digital wallets.
So, if you are a WooCommerce store owner, you should understand these differences. Based on customer preference and the availability of payment gateways, you need to set up country-specific payment methods in your WooCommerce store.
The easiest way to implement this is using plugins. I have found two useful plugins that can help you easily set up payment methods based on your preference.
Here are the plugins you should use:
- Disable Payment Methods by Countries: This extension of WooCommerce lets you hide certain payment options based on the customer’s billing or shipping country. It’s a very easy way to make sure customers only see the payment methods available to them.
- Payment Methods by Product & Country: This plugin lets you avoid expensive international transaction fees for some regions as you offer them local payment alternatives. It also gives you control over setting up payment methods based on different product categories.
Using these plugins, you can ensure your customers have a smooth and relevant payment experience no matter where they are shopping from.
Why Should You Set Up WooCommerce Payment Gateways by Country?
You may be wondering why should you set up payment gateways based on country. Well, customizing payment options for different countries can bring several benefits to your WooCommerce store.
Here are some of the essential reasons you should consider setting up payment methods based on countries:
- Better Shopping Experience: Customers feel more comfortable using familiar payment methods, making them more likely to complete their purchases.
- Higher Sales: Offering the right payment options can reduce cart abandonment and boost conversion rates.
- Legal Compliance: Some countries have specific regulations around payment processing that you must follow.
- Cost Efficiency: Choosing the most suitable payment methods for each region can help minimize transaction fees.
Can You Set Up a WooCommerce Payment Method by User Role?
Yes, you can easily set up payment methods based on user role using the WholeSaleX plugin. It is a complete B2B solution that provides all the essential features to build B2B+B2C hybrid stores. Among its plenty of amazing features, it also lets you create user roles with which you can set up various options including payment gateways.
Setting up payment methods by user role is particularly useful if you have wholesale customers who require different payment options compared to retail customers.
Here are the details steps to set up WooCommerce payment method by user role:
- Install WholeSaleX: Visit your WordPress dashboard and navigate to Plugins > Add New and search for WholeSaleX. Then, simply install and activate the plugin.
- Add New Role: Now go to WholeSaleX > User Roles. Now click on Add New B2B Role if you want to set up roles for your B2B customers. Otherwise, expand the existing B2C role to set up payments for your B2C customers. For example, I have set up a B2B role named Business Owners.

- Choose Payment Methods: Now expand the newly created role and find the option that says Payment Methods. Here, you will see the list of available payment methods in your store. Click on the payment options you want to allow for this user role.
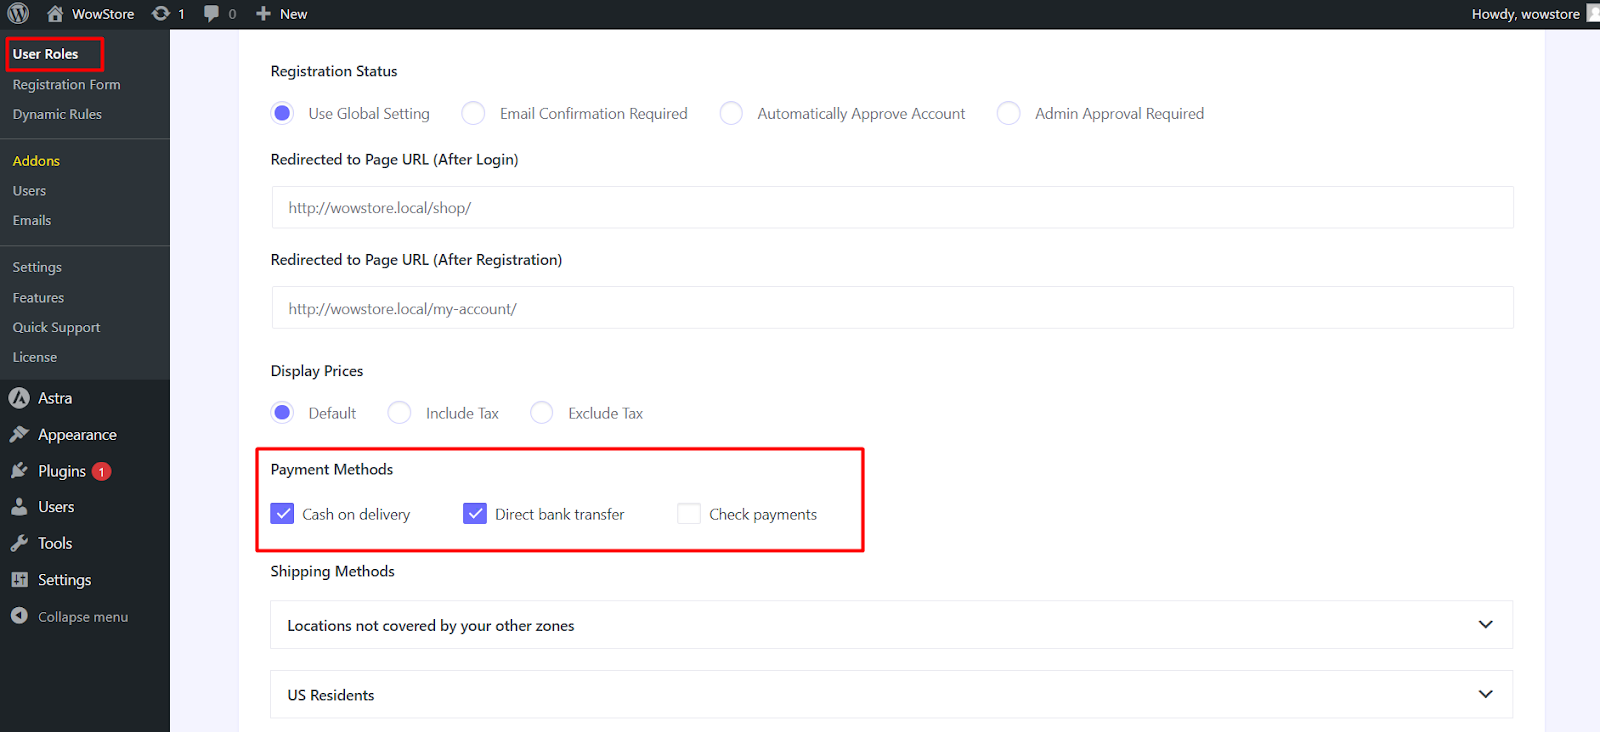
Finally, click on the Save button to finalize the changes.
And now users from your selected user role should only see the payment methods you have specified.

Pro Tip: WholeSaleX is a versatile plugin that helps your WooCommerce business to be more profitable. It lets you:
- Set up dynamic pricing and discounts based on many practical conditions
- Manage your customers with easy-to-implement user roles
- Create customized user registration forms
And a lot more. Check out WholeSaleX to transform your online store:
Can You Set Up Different Payment Methods for Different Products?
Yes, you can easily set up different payment methods for different products in WooCommerce using the “Conditional Payments for WooCommerce” plugin. This plugin allows you to create rules that show or hide specific payment methods based on conditions like the product being purchased, the order subtotal, the shipping method, and more.
Follow these steps to set up specific payment methods for specific products:
- Install and Activate the Plugin: Install the “Conditional Payments for WooCommerce” plugin from the WordPress plugin repository and activate it.
- Access Payment Conditions: Navigate to WooCommerce > Settings > Payments > Conditions to configure the conditions for each payment method.
- Create a Ruleset: Within the Conditions settings, create a ruleset for each payment method. For example, You can restrict a particular payment method to specific products or categories.
- Assign Conditions: Assign the relevant conditions to each payment method. For example, if you want PayPal to be available only for a certain product category, you can specify this within the ruleset.
And done! You can now successfully set up a different payment gateway for different products.
Resources You’ll Love
Summing Up
Choosing the right WooCommerce payment gateways and setting them up might seem daunting at first, but with the right approach, it can be a smooth process. Hopefully, this article was helpful in guiding you in the right direction.
My recommendation is to conduct thorough research on your target market and your business requirements. It will help you choose suitable payment methods easily. By configuring the right gateways, you can offer your customers a seamless and secure payment experience.
Frequently Asked Questions
Are WooCommerce Payments Free?
While WooCommerce itself is free, you may incur costs depending on the payment gateways you choose. Each gateway typically charges a transaction fee, and some may also have monthly fees.
Is It Better to Use Stripe or Square?
It depends on your needs. Stripe is great for online-only businesses due to its extensive features and global reach, while Square is ideal if you also have a physical store due to its robust point-of-sale (POS) system.
What Is the Default Payment Method for WooCommerce Checkout?
By default, WooCommerce doesn’t set a specific payment method as default. To set a default payment method, navigate to WooCommerce > Payments. Then, simply drag your preferred payment gateway to the top of the payments list.
How Do I Restrict Payment Methods by Product in WooCommerce?
You can restrict payment methods by product using a plugin like Conditional Payments for WooCommerce. This allows you to define rules based on the product, cart total, and other conditions.