Quantity-based discount is not only a great way to incentivize your customers, but it also helps you sell your products faster. A tiered pricing table provides your customers with the ability to buy a large number of products quickly and easily.
WooCommerce has no built-in feature to create a tiered pricing table in your store. With WholesaleX, you can not only set up quantity-based tiered pricing for your store, but you will also have all your wholesaling solutions in one plugin.
Table of Contents
Why Should We Add Quantity-Based WooCommerce Tiered Pricing to Our Existing WooCommerce Store?
We should add pricing tiers to our store to encourage users to buy more products. With the help of a tiered-pricing table, customers can easily see the milestone they must reach to be eligible for the next discount tier.
As a WooCommerce store owner, setting up a tiered pricing structure helps you clear your inventory faster, which is extremely beneficial for your business turnover as you can reach your sales target faster and also allows you to clear your inventory sooner.
Tired pricing is also a simple way to carter B2B and B2C users. Your B2C customers are rewarded with a discount for buying more of your products, and your B2B users are incentivized to buy a large sum of products. Ultimately, you, as a business owner, can increase your sales number.
How to Set Tiered Pricing in WooCommerce Stores Using WholesaleX
Now, let’s start setting up quantity-based tiered pricing. First, make sure you have the WholesaleX plugin installed and activated on your site. Then we will create pricing tiers for our products Globally (User Role), by categories, for products, and for Individual users.
Install WholesaleX
To install the free version of WholesaleX; we can do it through the WordPress plugins store. To reach the full potential of your WooCommerce wholesale store, you must get WholesaleX Pro. It is the simplest B2B WooCommerce solution to Wholesaling, Increase Sales, and Grow your business.
To install the free version of WholesaleX, follow these steps:
- Go to the plugin section and click the Add New button.
- Search for “WholesaleX.”
- Install and activate the plugin to start using it.

Create B2B User Roles
Now that we have successfully installed and activated WholesaleX, we must create a user role. Allowing us to manage a group of users at once. Creating a user role and setting the price for that role will only permit users under the role to see the new prices.
To create user roles:

- Go to the User Roles section of WholesaleX
- Click on the “Add New B2B Role” button
- Add a name and configure it as per the requirements
To get in-depth knowledge about user roles and creating a role in your WooCommerce store, check out our blog on How to Create WooCommerce User Roles to Manage B2C & B2B Customers.
Set Quantity-Based Tiered Pricing Globally
Since we have successfully created a user role, we can now start setting up pricing tiers for the users. We will start by providing quantity-based discounts on all products for all users. We will use the Dynamic Rules feature of WholesaleX to create a quantity-based discount rule. The Dynamic rule feature allows us to provide discounts to all products at once, dynamically. To create quantity-based discount, you will need to follow these steps:
Step 1: Create a New Dynamic Rule
From your WordPress dashboard, click on WholesaleX. Then click on Dynamic Rule from the dropdown menu. Now we are on the Dynamic Rule page. Click the Create Dynamic Rule button to expand the newly created ‘Untitled Rule.’

Step 2: Name the Rule
When you have quite a few rules for your store, it becomes difficult to find them. To help you identify the Rule easily, we need to give a name to the Rule. Enter the name of the Rule in the field provided; the untitled Rule will change to the name you have given. In this case, it is a quantity-based discount.

Step 3: Select Quantity-Based Discount Rule Type
There are various discount options available in the Dynamic Rule feature of WholesaleX. Since we are discussing quantity-based tiered pricing, select Quantity-Based Discount from the Rule Type dropdown menu.

Step 4: Select User/Role
WholesaleX lets you select All Users, All Roles, Specific Users, or Specific Roles. You can select the type of user or role you would like the discount to apply. Since we want to set the quantity-based discount globally, we will select All Users.

Step 5: Select the Product Filter
It’s time to select the product filter to which you want to apply the Quantity-Based Discount. Select the product filter from the dropdown menu. Select the accordingly because your discount may be product-specific or for users and user roles. In this instance, we will select all products.

Step 6: Select the Discount Type
We need to now select the discount type. With WholesaleX you can issue the discount as a percentage, amount, or fixed price.
The amount option, however, lets you choose a cash amount that will be deducted as a discount from the overall price of your customer’s transaction.
The Fixed Price discount type is used when a discounted product is added to the cart page. This discount type will display the after-discount price of the product in the Payment, so you don’t have to show the price breakdown on the Payment page.
We will select “percentage” as our choice of discount for this instance. The discounted amount will be a fraction of the total value when we select “percentage” as the discount type.

Step 7: Set the Minimum Quantity Consumers Need to Purchase
It is time to set the minimum quantity of products customers must buy for the first tire discount. For this post, we will start with 10 as our minimum quantity. So the customer must buy at least 10 products to get the tier 1 discount.

Step 8: Set the Discount Amount
As we have set the discount type to be a percentage, we need to set the discount amount to be offered to the customer when they meet our quantity requirement. We will set the amount as 15. Customers who buy 10 products from our store will get a 15% discount.

Step 9: Set the Display Name
The field we need to fill in is the discount name (Disc. Name); this is completely optional. The discount name helps your customer recognize the discount being offered to them. For example, we will set the discount name as “Clearance Sale” (You can name whatever you want).

Step 10: Create Additional Tiers
With that, we have created Tier 1 of our pricing structure. We are creating multiple tiers, so we need additional tiers for our customers. They need to purchase the minimum quantity set for each tier to be eligible for the discount of that tier.

We set our tier 1 discount to 15%, so when customers purchase more than 10 products, they will receive a 15% discount. We need to set the tier 2 level of discount. When the customer reaches the minimum quantity requirement of tier 2, they benefit from a 20% percent discount. There will be a minimum quantity requirement of 30 products for the final tier of this guide, which will be a 25% discount. Therefore, customers who purchase more than 30 products will benefit from a 25% discount.

Step 11: Set Additional Conditions (Optional)
We can adjust a few other optional settings to fine-tune our quantity-based discount. You can set an additional condition based on the following:
- Cart Total Quantity
- Cart Total Weight
- User Order Count
- Total Purchase Amount
Remember that these settings are optional; skipping them will not affect your store.

Step 12: Set the Duration and Usage Limit
Another optional setting that Wholesale provides is the Date & Limit Rule. This setting allows us to set the Rule’s date and usage limit. We can set the duration of the offer in advance and the number of times this offer can be used. Not adjusting these settings will not affect your store.

Step 13: Save and Activate the Rule
Our final step for setting up the quantity-based pricing tiers globally is to save and activate the Rule. Click on the save button and toggle the rule status button. Once you toggle the rule status, your settings will take effect.

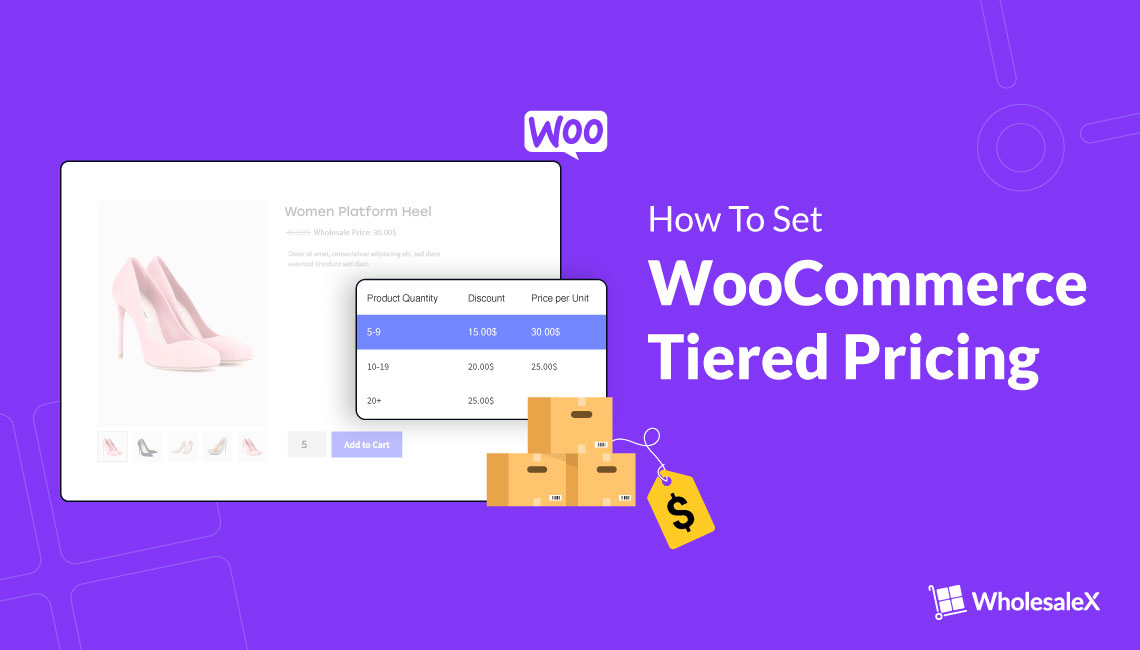
Final Output
Now let’s see how it looks in the front end. As you can see, our pricing table is displayed on the product page. All settings that we have adjusted are applied to the pricing table.

Changing Pricing Layout
That’s not it! WholesaleX also allows you to change the design of the pricing table. To do so, you must go to WholesaleX’s settings’ design section. Then select your preferred design.

Finally, click the Save changes button at the bottom of the page.

Set Quantity-Based WooCommerce Tiered Pricing Based on Category
Now that we have successfully created quantity-based discounts globally, we will show you how to set tiered pricing based on category. We can do it in two different ways. We could create a new dynamic rule by selecting the category option from the product filter and selecting our desired category. With WholesaleX, we can add the tiered pricing from the Product Category editor.
Step 1: Go to the Product Category Page
To set quantity-discount based on categories, we need to go to the category editor of our website. We can access the category by clicking on Products from our website’s dashboard; then, we need to click on Categories.

Step 2: Select the Category
From the category editor page, we need to select the category to which we want to add tiered pricing. You can do so just by clicking the edit button under the category.

Step 3: Set Quantity-Based Discount
When we scroll toward the bottom of the category page, we can find additional configuration settings that WholesaleX has added.
Under the WholesaleX Tier Pricing section, we can find the B2B user roles we create. Click on the user role to which you want to add the quantity-based tiered pricing and adjust it according to your needs.
Since we created a B2B user role for our big spenders earlier in this post, we will add a quantity-based discount for them in this category.

Step 4: Click on the Update Button
After configuring the settings, we must click on the update button for them to take effect.

Set Product-Specific WooCommerce Tiered Pricing
We will now show you how to create a price tier for a specific product. You can do it by adding product-specific pricing by selecting a specific product from the product filter option of the dynamic Rule.
With WholesaleX, you can also do it from the product page of your website.
Step 1: Go to the Product Page
From the WordPress dashboard, we have to go to the product page, for which we want to add a tier price.

Step 2: Set the Quantity-Based Discount
Like the product categories page, we see price-setting options for guest users and the user roles we created when we scroll down. Select the role you want to add tier pricing and adjust it as required.

Step 3: Click on the Update Button
Once we are done configuring the options, we need to click the update button. Now, a quantity-based discount will be displayed for only this product.

Set Quantity-Based WooCommerce Tiered Pricing Based on User Profile
WholesaleX lets you set quantity-based discounts on a particular product, product category, or all products for an individual registered user. You can set a special discount for your customers without any user role. You can even set specific discounts for individual users under a user role; for that, you need to set the discount priority from the settings section of WholesaleX.
Step 1: Go to the User’s Profile Page
To set quantity-based WooCommerce tiered pricing for individual users, we need to go to the user’s section from your website’s dashboard. Then we need to select the user you want to apply the quantity-based discount.

Step 2: Set the Quantity-Based Discount
On the user’s profile page, you can see additional WholesaleX options when you scroll down. Click on the WholesaleX Profile Discount option and configure them as required.

Step 3: Click on the Save Button
Once we are done configuring the settings, we need to click on the update button.

Conclusion
That’s all from this blog post. We hope we’ve provided all the necessary steps for you to use and set quantity-based WooCommerce tiered pricing. If you still have any questions about the WholesaleX plugin, feel free to leave a comment below or check out our youtube channel. You can also contact our support team for more detailed information. Get the WholesaleX plugin today to transform your existing WooCommerce store into a wholesaling powerhouse.